What is DKIM – How it Works, Its Importance & All You Need to Know
DKIM (DomainKeys Identified Mail) is known as a security standard method that detects malicious activity and prevents spammers from masquerading as a legit domain.
It genuinely notices whether any changes are made in transit between sending and receiving mail servers.
Every email contains a domain. Spammers are used to replicating the domain name and send phishing emails to attack the receiver. DKIM is all about adding security encryption so that your email would be safe.
This blog will explain how DKIM works, how to set this up, and its importance. Keep reading.
What is DKIM Signature & How does it work

DKIM (Domain Keys Identified Mail) is an email authentication technique that allows the receiver to check that an email was indeed sent and authorized by the owner of that domain. This is done by giving the email a digital signature. This DKIM signature is a header that is added to the message and is secured with encryption.
dmarc analyzer
You add a DKIM signature or header to your emails and this helps your message to stay safe. It helps both senders and receivers.
Once, a receiver’s mail server identifies that your email is signed with a valid DKIM signature, your email connection will be secured.
DKIM signatures are not visible to end-users, it works in-between the server level.
Example of a DKIM Signature
To give you a better understanding of DKIM keys, here’s an example of a DKIM header –
v=1; a=rse-ufc989;
d=demo.com; s=large-email;
h=from:to:subject;
bh=sNicn1ZUBsharc9ewLAKwfAL3Jlo80c=;
t=19987367792;
b=LK09yytPoaw78hhkshyyyatafw877hagegvwqwe3mehaspoe034ieo+ ieor99juTGVsebfhhvo/HHwien34njsdbf7ouuseebsQIO/dheu78jhuwb=
Well, you see so many numbers up there, right? Let us clear up your confusion first with a complete description –
- v= it indicates the version of DKIM used.
- d= is a sender’s domain name.
- s= This is the area/selector to be used by the receiving server to search for the DNS record.
- h= It lists down the header fields that are used to generate the digital signatures
Let’s give you a real-life example for a better understanding. Suppose Niloy sent an email to Mehreen using weMail’s domain. He gave the subject line “Amazing Offers – Black Friday.”
So, here is how the content will be used in “b” = “[email protected]” + “[email protected]” + “Amazing Offers – Black Friday.” Basically, “To, From, and the Subject headers are taken.
- b= is the digital/numeric signature generated by “h” and “bh” and signed with the private key.
- bh= This tag is the hash of the email body. It’s an encrypted version of your email’s content. This helps to prevent modification of email content once DKIM has signed them and before they reach their recipients.
- a = This specifies the algorithm used to compute the digital signature.
- t = This is a timestamp tag. It helps to keep a record of the signature creation time.
How to Create DKIM Key

To add a DKIM record on the Domain Name Server (DNS), you must create a DKIM key first. Let’s give you an overview of how you generate a DKIM key.
Step 1: List down all your email-sending domains or third-party apps, such as Email Marketing tools, Marketing Automation tools, CRM – Customer Relationship Management tools, or any other tools that send emails on your behalf.
Step 2: After listing down all your sending domains, you must install a DKIM package. This whole process will depend on your mail server operating system and the DKIM package you’ve chosen.
Step 3: In the third step, you need to generate a public and private DKIM key. DKIM key generators can help you to create the keys. There are so many online tools available.
You can find them on google by simply searching them as “DKIM Generator.” During key creation, please set selector names for your key pairs. The selectors tell the mail servers where to locate the public key for each domain.
How to Add DKIM Record on DNS
After creating DKIM keys, you now need to add your DKIM record to your DNS to complete the setup process. Follow the steps below:
Step 1: you need to publish your DKIM public key and hide the private one. Add the public key to your Domain Name Server (DNS) as a txt file and publish your DKIM public key.
And save the private key on your SMTP mail server, Mail Transfer Agent (MTA), or the place where your DKIM package specifies. The changes can take up to 2 days to get settled. So be patient.
Step 2: The last thing you need to do is to configure your email server. Please follow the instructions guide provided by your server, as setup may vary based on servers.
Can you keep more than one DKIM record?
Actually, yes. But there is something you need to know. A domain can have multiple DKIM public key records to send emails. Just need to verify that every key uses a different selector name.
How to verify DKIM signature
It’s a bit of a complicated process to verify manually. So you will need some expertise to do it successfully. Moreover, it’s connected with complex systems like the Senders Policy Framework (SPF). So expert hands are required to go forward with this.
But don’t worry. If you are unaware of anything like this, there is always a solution. Most non-technical people use DKIM signature verification tools to check DKIM signatures to avoid such hassle. There are so many online tools available that help you to –
- Checks the DKIM key validity
- Verify email DKIM keys against a public database
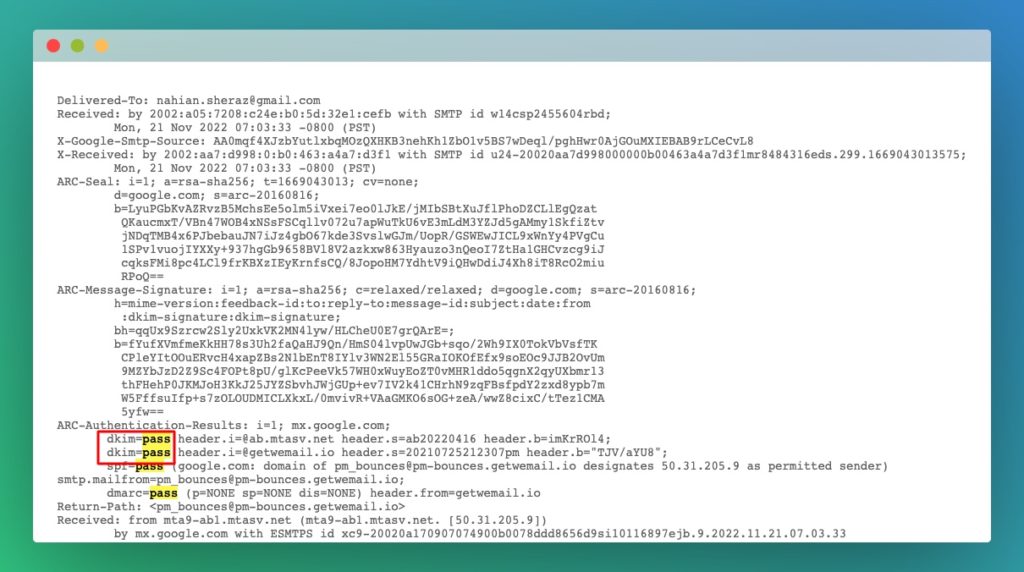
Check DKIM signature using Gmail:
To check this, ensure you are using the web version of Gmail. Now follow these steps –
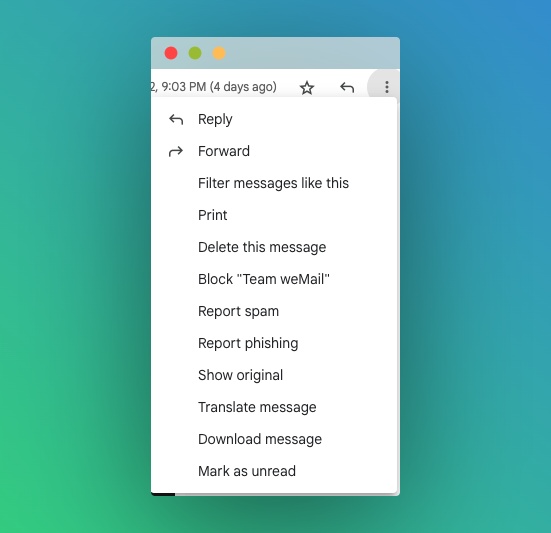
1. First, click on the email you want to check
2. Now, Click on the top bar navigation icon to check the labels and check whether it’s signed by your domain name or not
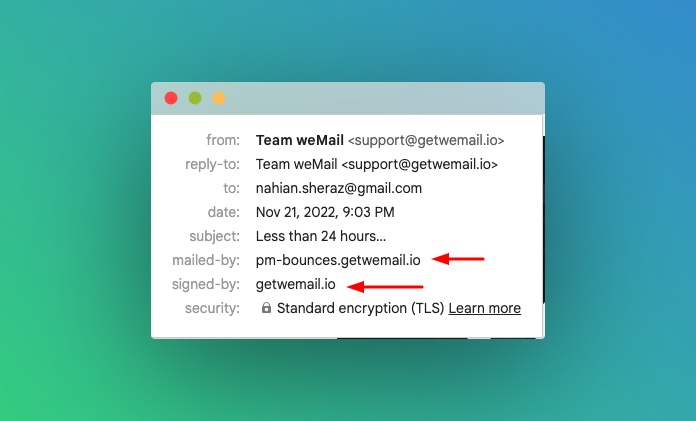
3. On this step, click the three dots available on the right side of your email and select show details.
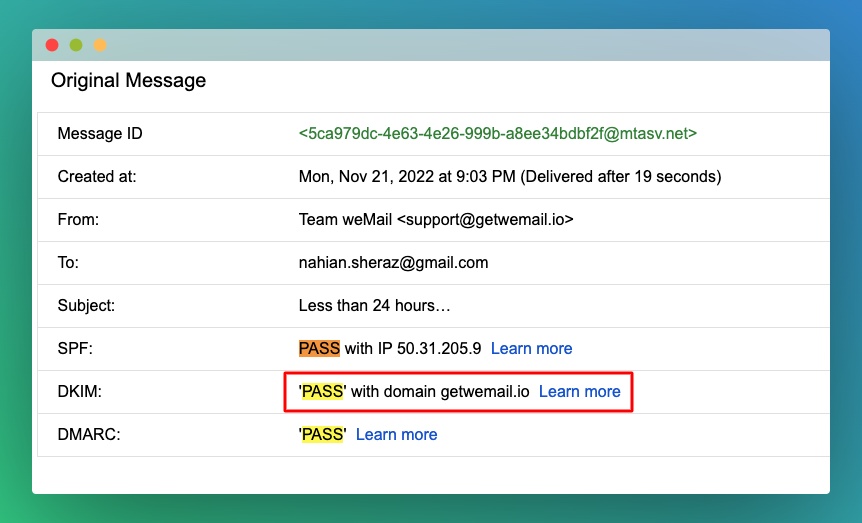
Now check the header of the email. If your “DKIM = Pass,” then your DKIM is ok.
Check DKIM signature with yahoo mail
To test the DKIM signature on Yahoo mail, follow the procedure –
- Open the desktop/web version of Yahoo mail
- Click on the setup icon
- Now select the “View full header” section
Now check the DKIM status. If you found “dkim=pass”, then your DKIM signature is acceptable.
Advantage of DomainKeys Identified Mail (DKIM) Authentication
DKIM is so important if you are dealing with a large email list. It can give you so many benefits. Here are some of them –
- Helps to stop email spoofing
- DKIM can Improve your authenticity
- Using DKIM you can avoid IP blocks and increase the throttle limit of some domains.
- DKIM-authenticated domains face less stringent SPAM filtering
- Prevent spammers from manipulating the source of the email
- Helps to gain client trust
Final Thoughts on DKIM
You must include a DKIM signature If you are running a small or large business and running email marketing campaigns. This signature will travel all the way to your client’s inbox around the world. This will lift your reputation and increase your authenticity in the virtual world. Also, you can help your clients from getting scammed. It’s a win-win method for both parties.