How to Create Interactive Email Newsletters to Boost Engagement
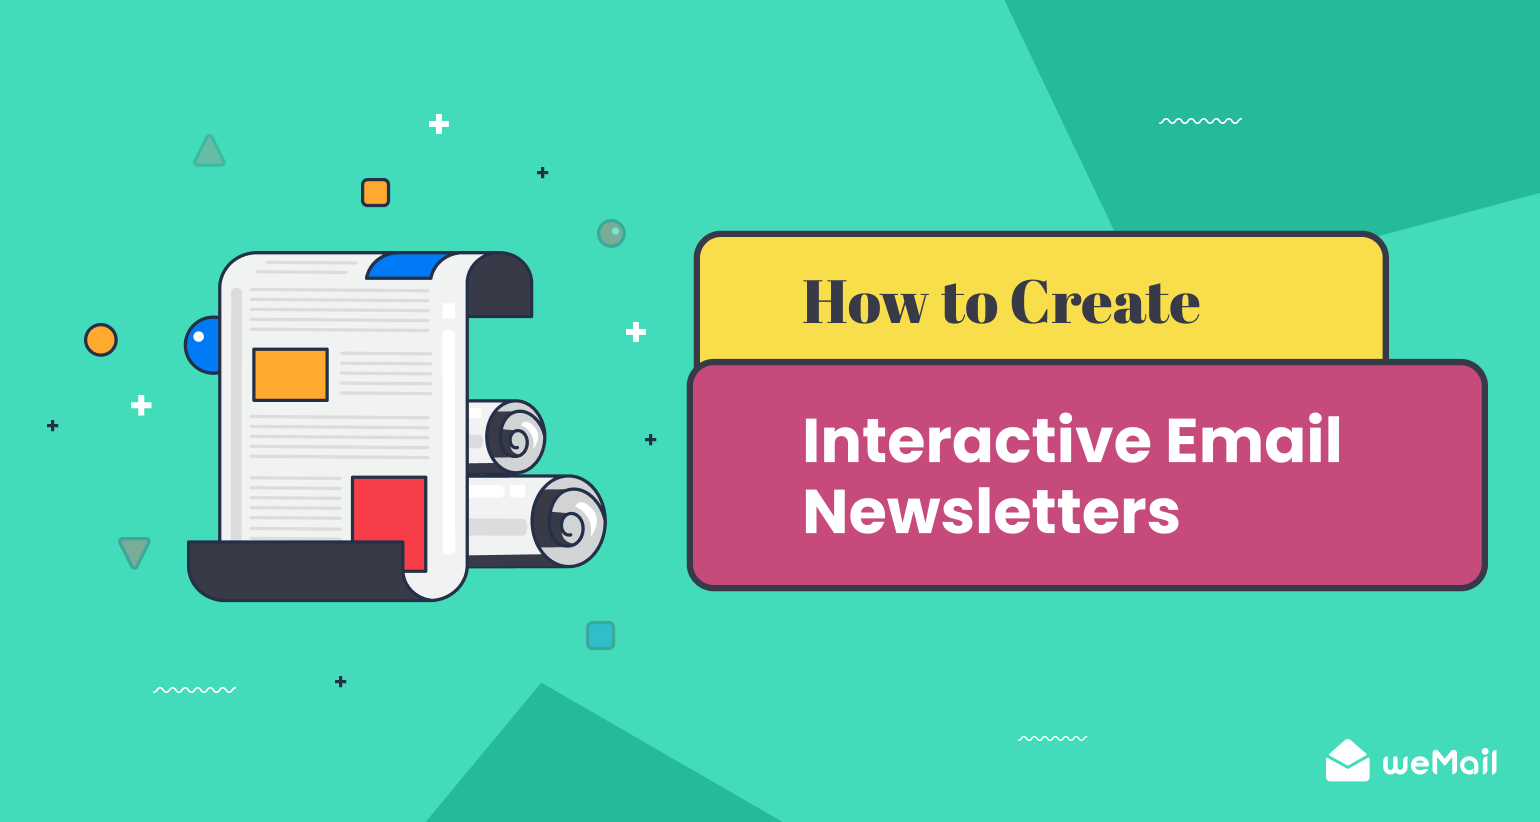
Since the advent of email technology, newsletters have been one of the most popular means of engaging and informing customers in business communication. However, curating appealing newsletters that successfully stand out from the rest has become a challenging task over time.
Traditional newsletters filled with plain texts and generic images can no longer bring positive enough traction today. According to HubSpot, 91% of customers and email users today expect interactive content in newsletters, but only one-third of marketers offer it.
A key reason behind this is most marketers are still unaware of interactive newsletters. But no worries! This article will provide you with a detailed guide on how to create interactive email newsletters that win your audiences’ hearts and boost engagement. Let’s get started!
What is an Interactive Email Newsletter?
An interactive email newsletter incorporates entertaining elements like GIFs, videos, animations, sliders, quizzes, and surveys to captivate email recipients and motivate them to participate in any activity. They aren’t like traditional emails that simply aim to deliver information.
Instead, interactive email newsletters try to create personalized experiences that trigger curiosity and prompt users in participating any action.
The underlying goals of interactive email newsletters are growing engagement, boosting conversions, and establishing an impactful relationship with audiences.
Best Approaches of How to Create Interactive Email Newsletters
Interactive email newsletters can be a new way to brand your products and reach customers. There are several steps involved in creating interactive newsletters. We’ll help you explore them with expert tips in this section. Let’s begin without wasting any more time.
Step 01: Set Goals for Email Newsletters
Before diving into the creation process, you must define a clear set of goals for your newsletter creation process. This will help you align your design efforts and the foundation for impactful campaigns. Several steps are involved in setting conversion-focused goals for interactive email newsletters. They are:
- Identify Target Audience
Segment and recognize the people who your newsletters will be targeting. Analyze their demographics, behavior, and buying persona to tailor your content’s appeal accordingly.
Learn how to segment and target audiences accurately.
- Outline Expected Outcomes
What do you want to achieve from the newsletter? Define it in this stage, whether it’s for increasing traffic, boosting sales, or growing social media engagement.
- Set Measurable KPIs
KPIs are quantitative metrics. They can help you make data-driven decisions and evaluate whether the outcomes have met your target. You may set KPIs like click-through rate, conversion rate, increased traffic percentage, etc.
Step 02: Select an Email Service Provider (ESP)
An email service provider is a tool or plugin that enables you to create newsletters and send them to subscribers. Email service providers make it easy for you to send bulk emails to numerous subscribers in a short time, which isn’t possible in other ways.
Besides, the popular email service providers come with a good collection of readymade templates. Using them, you can get your newsletters ready in the shortest possible time. Several issues you must explore before selecting an email service provider:
- Their features
- Pricing packages
- Ease of use
Some most popular email service providers are weMail, Mailgun, HubSpot, SendGrid, and MailPoet.
Note: We’ll use the weMail plugin in the following steps to explain the process of creating interactive email newsletters. You may download the plugin from the links below:
Step 03: Create Campaigns and Personalize the Newsletters
Newsletter personalization is the process of tailoring the newsletter content to suit target audiences. Once the weMail plugin(s) is installed, you’re ready to start campaigns. Newsletter creation is a part of the process. weMail allows you to personalize newsletters right from the beginning.
Let’s explore how to create a campaign and personalize it for your target audiences.
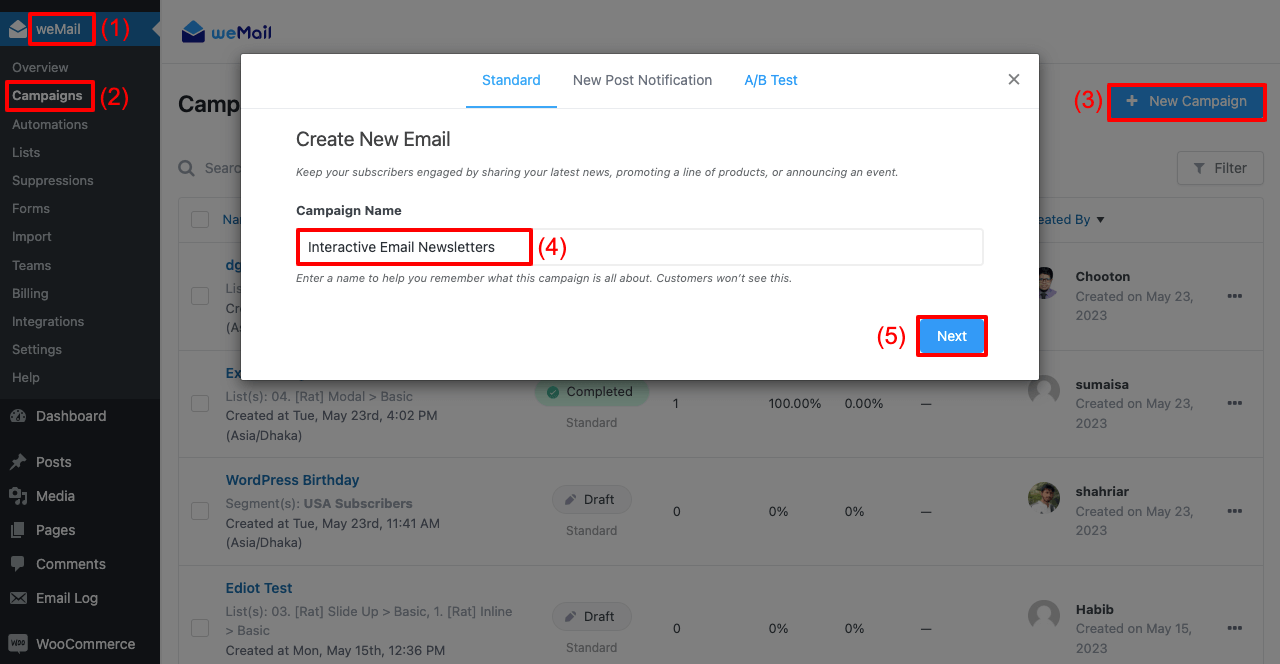
- Go to WP Dashboard > weMail > Campaigns.
- Press the + New Campaigns button.
- Give a name to the campaign.
- Click the Next button at the end.
- A new pop-up will be opened.
- Write a Subject Line. It will be displayed in your recipients’ subject field.
- Set the sender’s name and email address in the second field.
- Select Lists and Segments to define your email recipients.
- Hit the Create Campaign button at the end.
- This will take you to the template library.
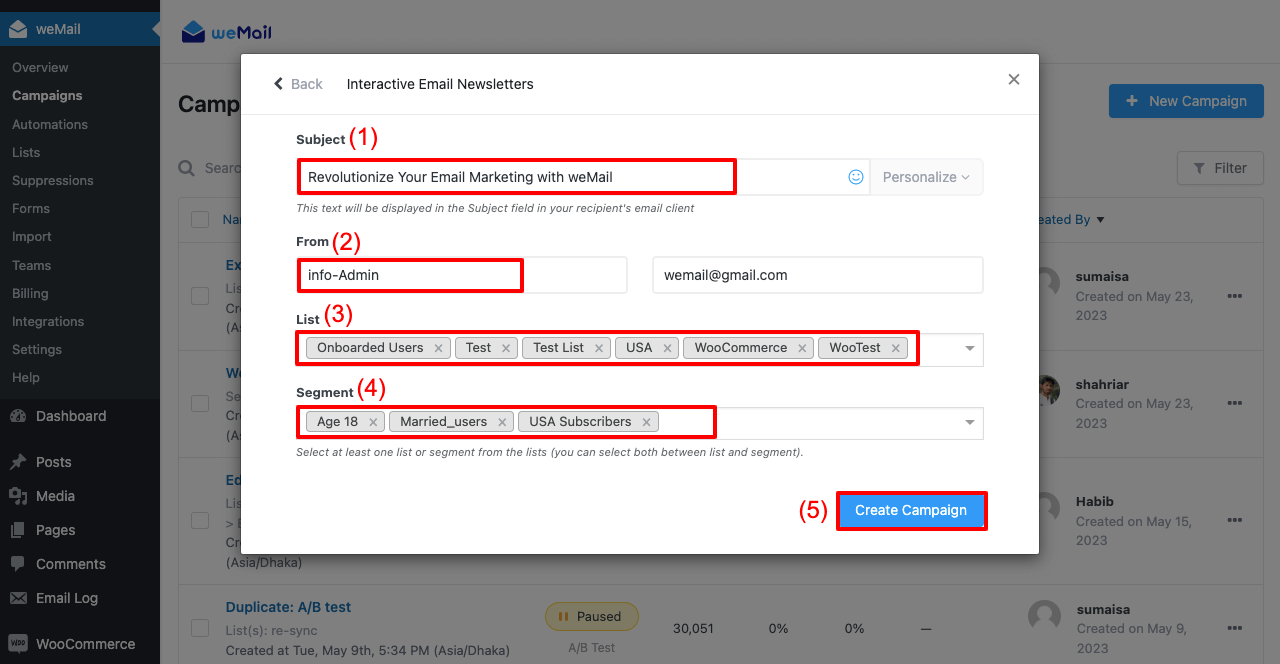
Thus, you can personalize particular email campaigns from the very beginning.
Step 04: Design Interactive Email Newsletters Using Templates
Interactive newsletters are different than static newsletters. They usually incorporate the following things and elements to create engaging user experiences.
- Catchy visuals and appealing design
- Images, videos, GIFs, and countdowns
- Call-to-action (CTAs) with captivating copies
- Testimonials and social proofs
- Micro animations, GIFs, and videos
- Responsive design
You don’t need to include each of these elements but only those that suit your newsletter. You can choose any readymade template from the weMail library to save you time.
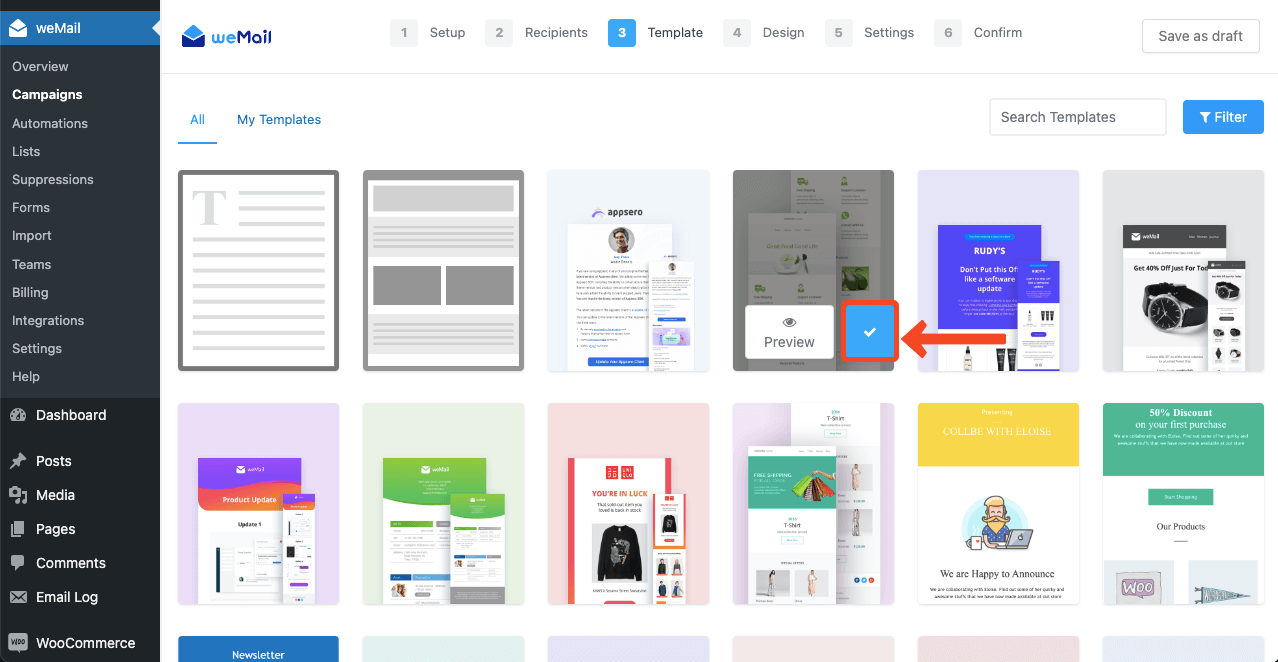
- Go to the template library.
- Hover your cursor on the template you like.
- You’ll get a Plus icon to appear.
- Hit the Plus icon.
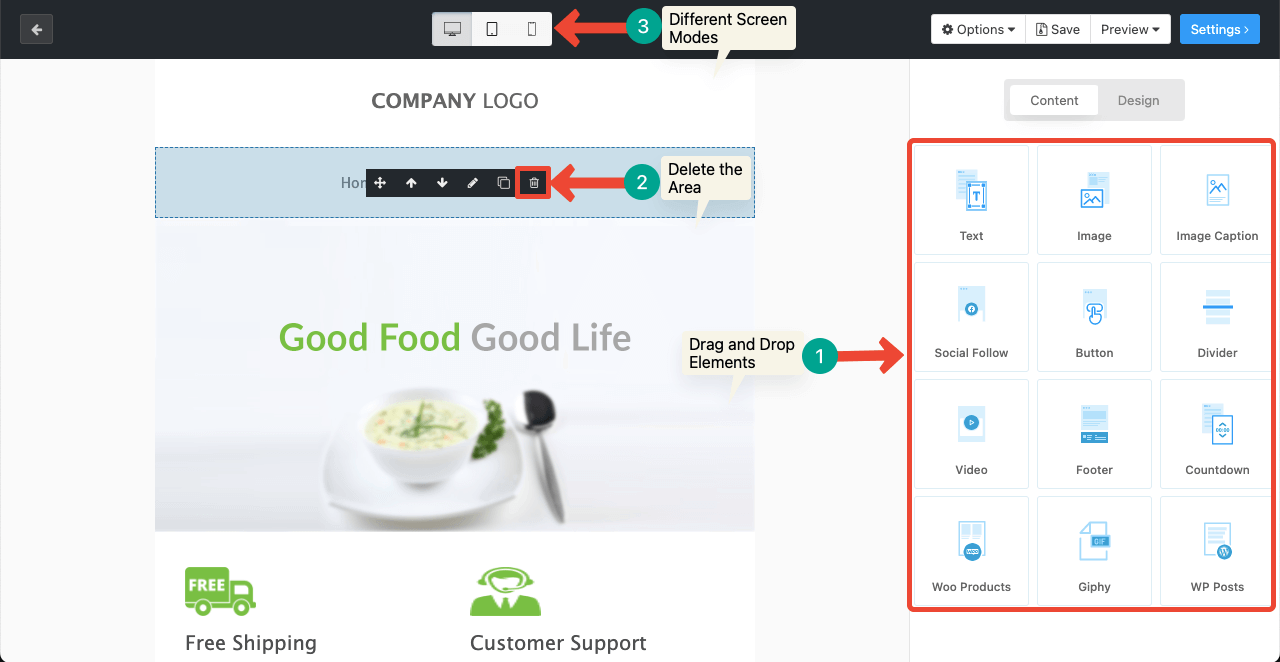
- Drag and drop widgets from the right sidebar to the template canvas to add content.
- Hover your cursor on the template content you want to delete.
- You’ll get a delete sign appearing. Clicking the delete sign will remove the content.
- On top are different screen modes. By switching to different modes, you can adjust the template content to make them mobile-responsive.
Step 05: Write a Clever And Relevant Headline and Text
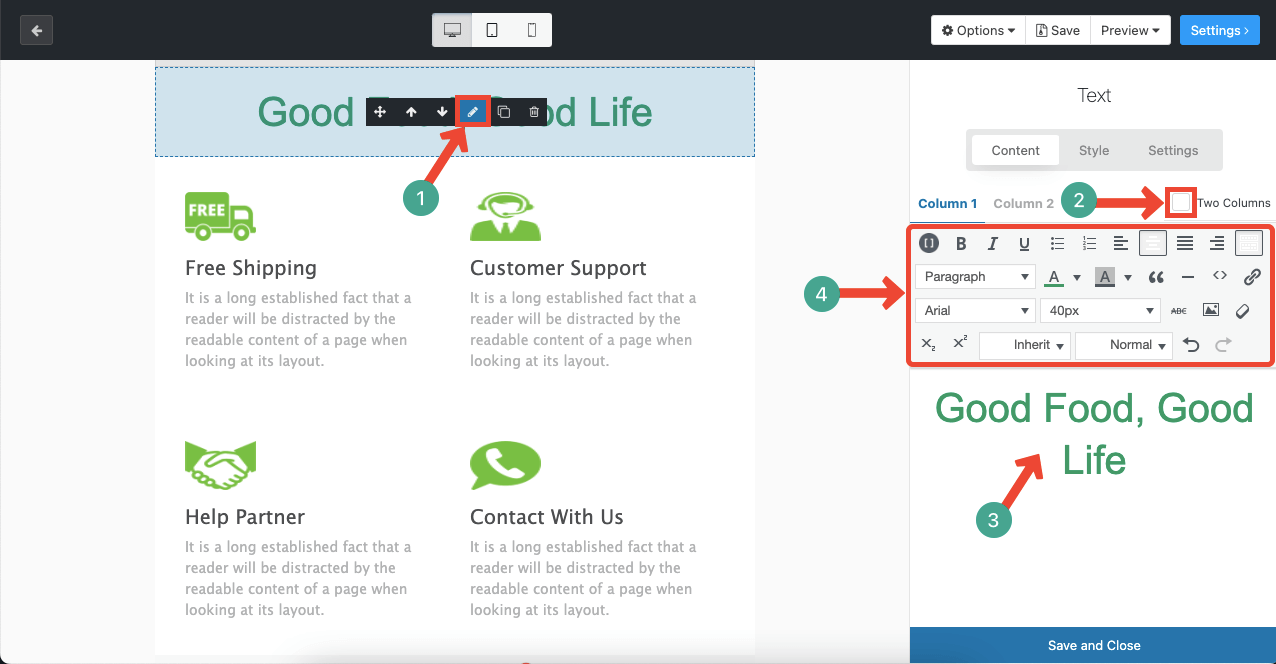
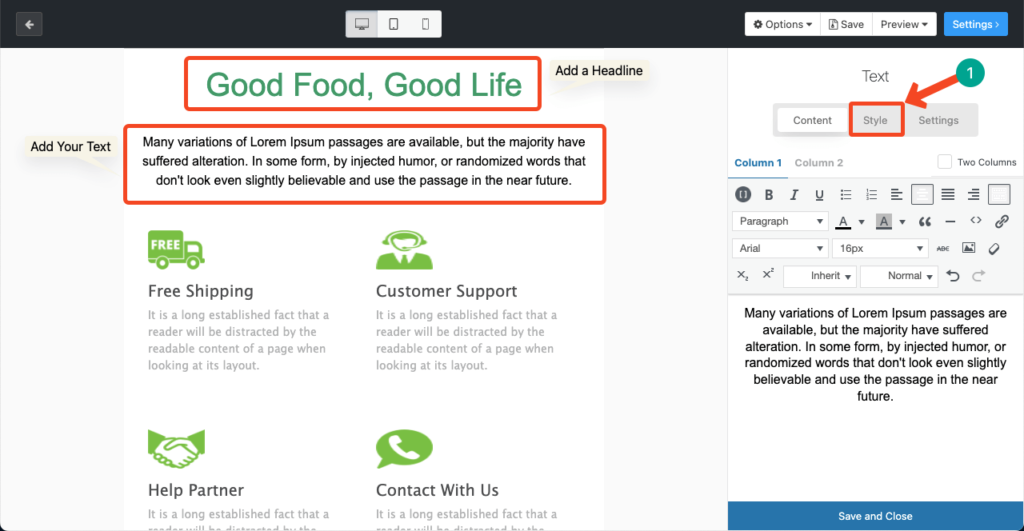
- Drag and drop the Text widget on the template canvas.
- Click the Pen icon on the widget area. It will open the editing option on the right sidebar.
- Uncheck the Two Columns option.
- Write your text in the below white section.
- On top of it, you’ll get options to stylize and align the text.
- Click the Save and Close button whenever you are down with your content area.
Note: We have added a headline in this section using the Text widget.
- In the same way, you can add text to the newsletter template using the same Text widget.
- Reduce its font and change the color from the editing options.
Step 06: Incorporate Images, Videos, and GIFs
You can use the image, video, or GIF widget based on your newsletter template’s demand.
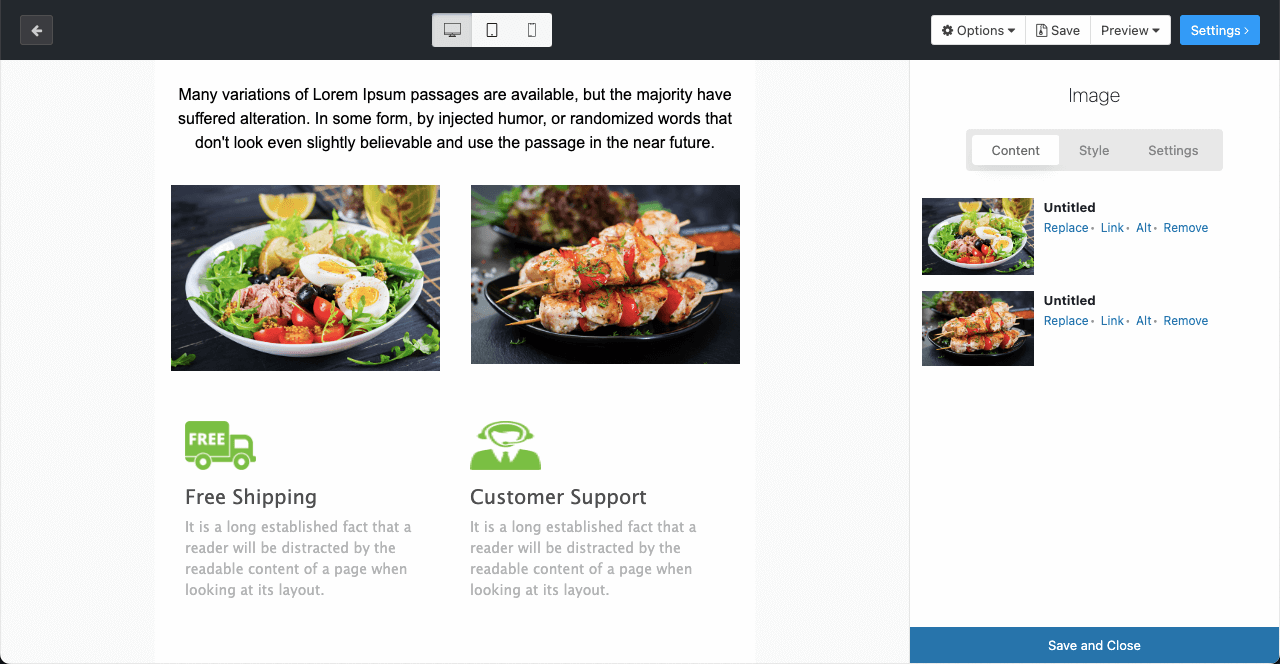
- Drag and drop the Image widget on the template canvas.
- It will allow you to Upload Images from your local drive or add them from the Media Library.
- You may link the images to any of your web pages and add Alt text if you want.
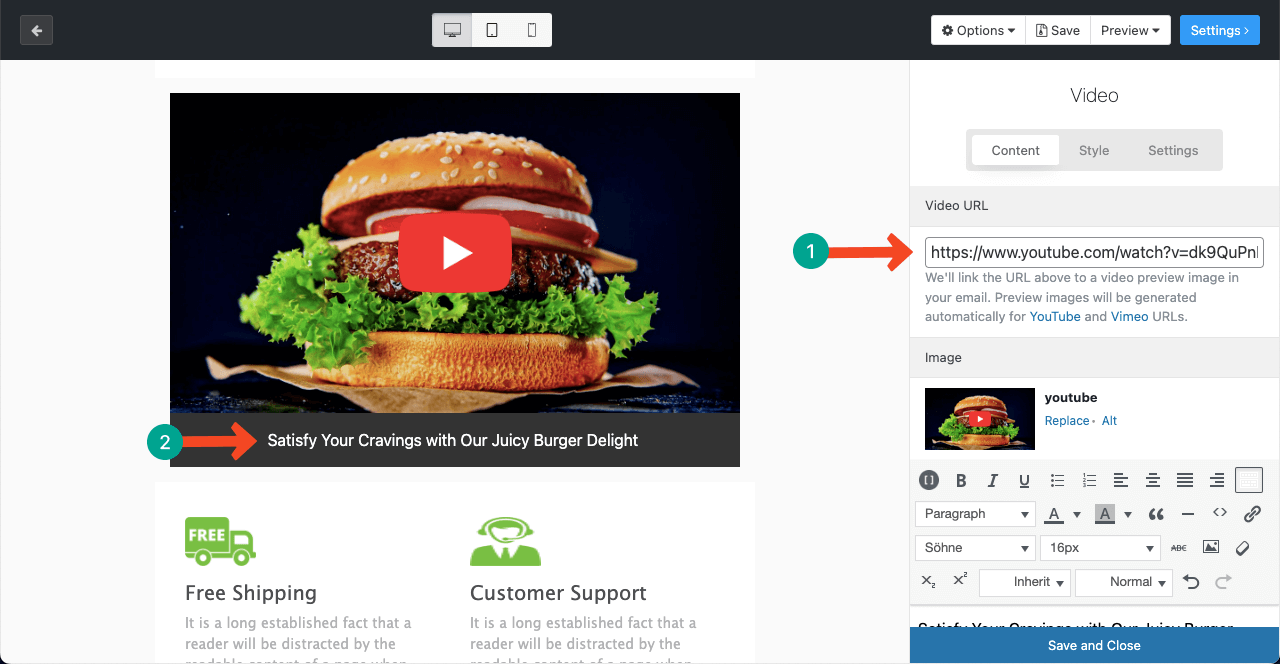
- Drag and drop the Video widget.
- Copy-paste your video link to the Video URL box.
- You’ll see the video thumbnail on the template.
- Add a caption below the video.
Step 07: Add Call-to-Action (CTA) Button
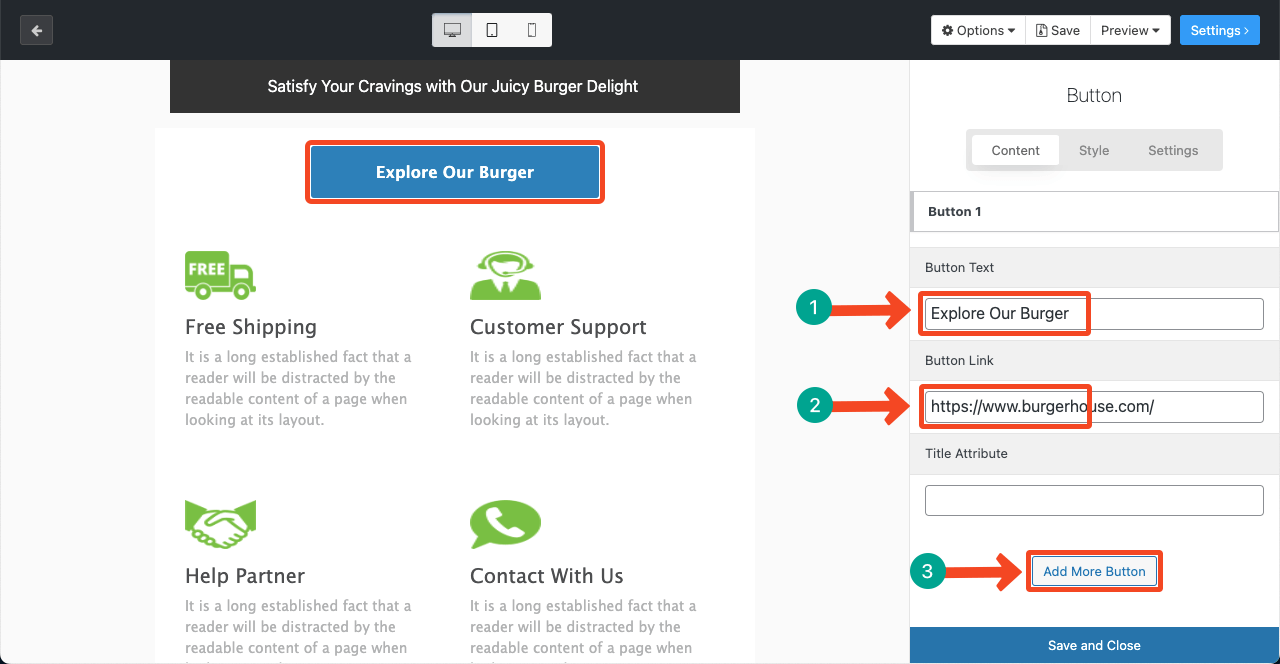
- Drag and drop the Button widget on the template.
- Add the CTA button copy and link on the right sidebar.
- To add more button, click the Add More Button.
- To change the button color, font size, color, and other options, go to the Style section.
Step 08: Add Social Channels
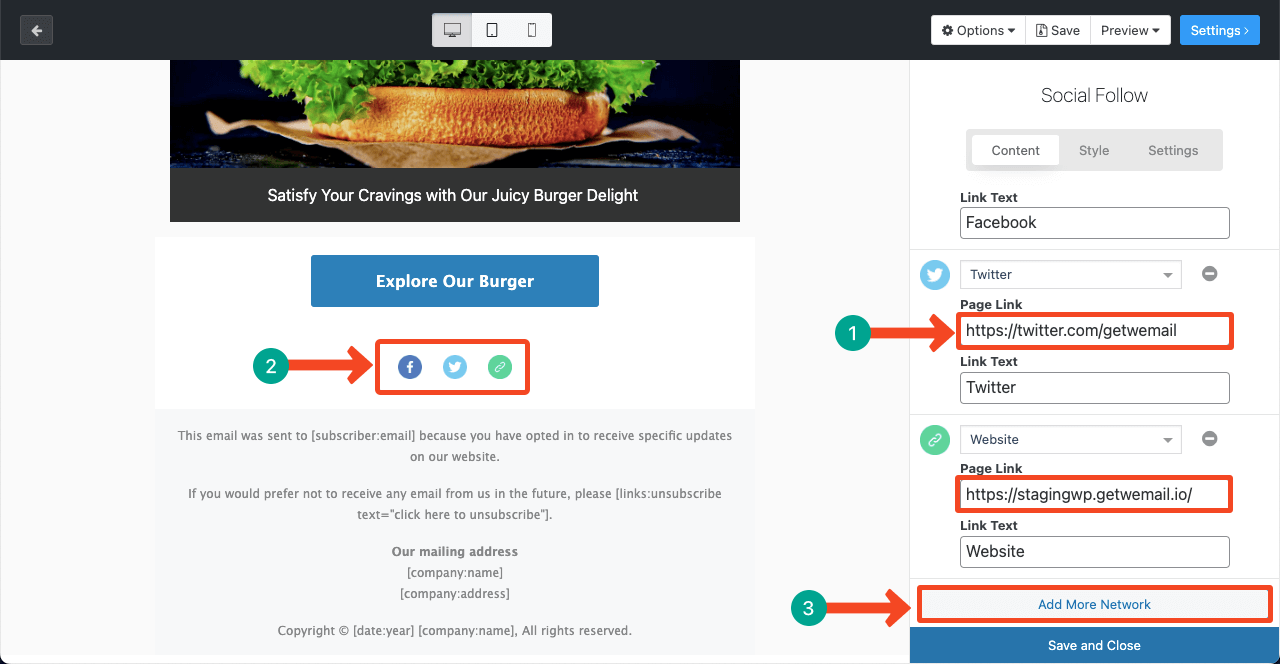
- Drag and drop the Social Follow widget.
- You can add social channels by clicking the Add More Network button.
- Add links to the respective social channels one by one.
- Finally, add a footer to the template.
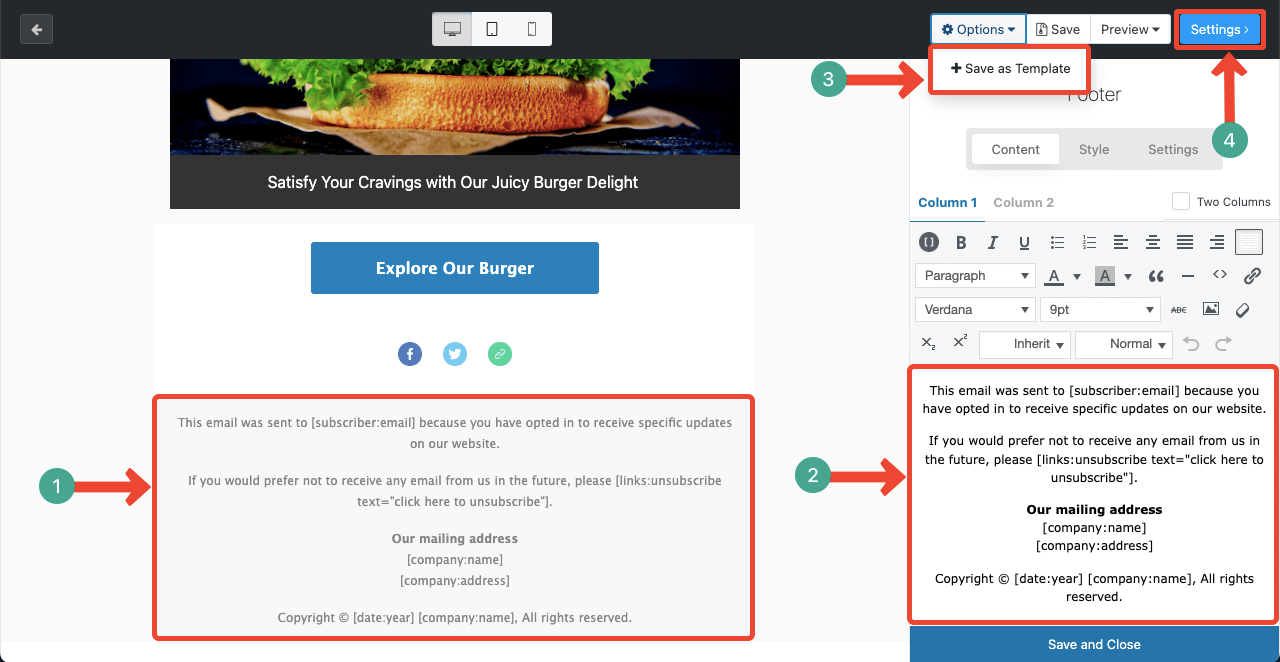
- Drag and drop the Footer widget.
- Type your company name, address, date, and year on the respective positions.
So, your newsletter template is ready. It’s now time to prepare the template for email.
- Go to Options > Save as Template to save the entire template.
- Click the Setting button next.
Step 09: A/B Testing and Analytics
When your template is ready, you can instantly send it to the users or do some A/B tests.
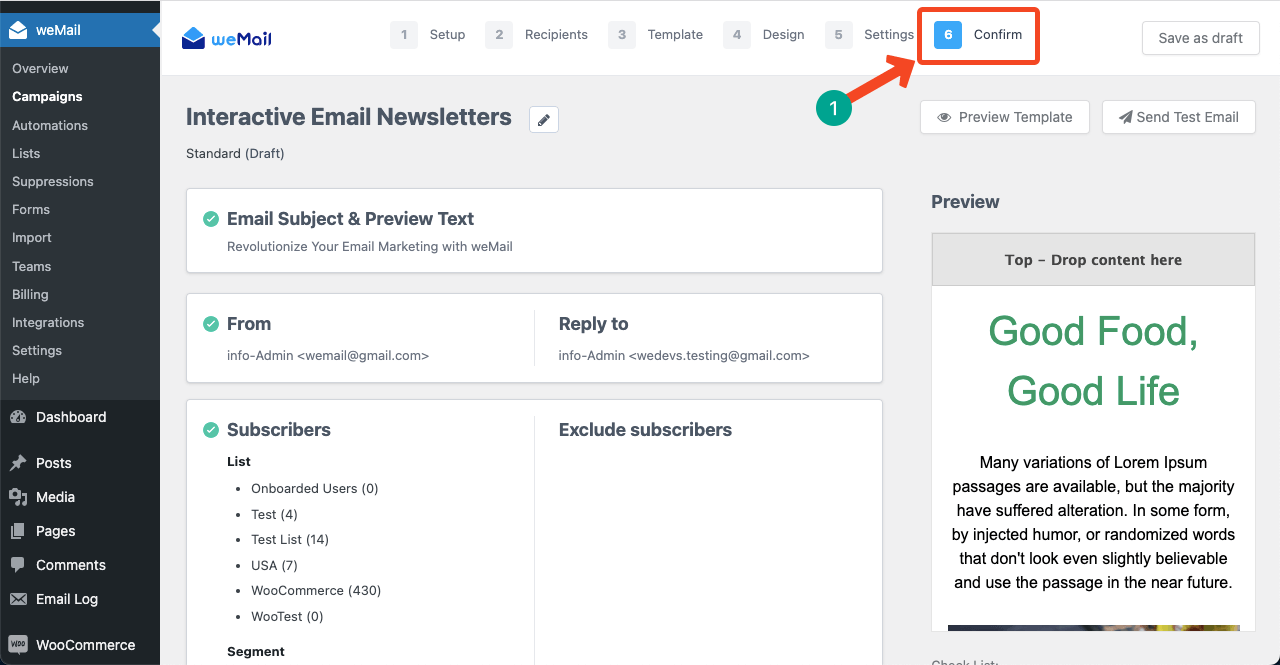
- If you want to send it right away, go to the Confirm tab.
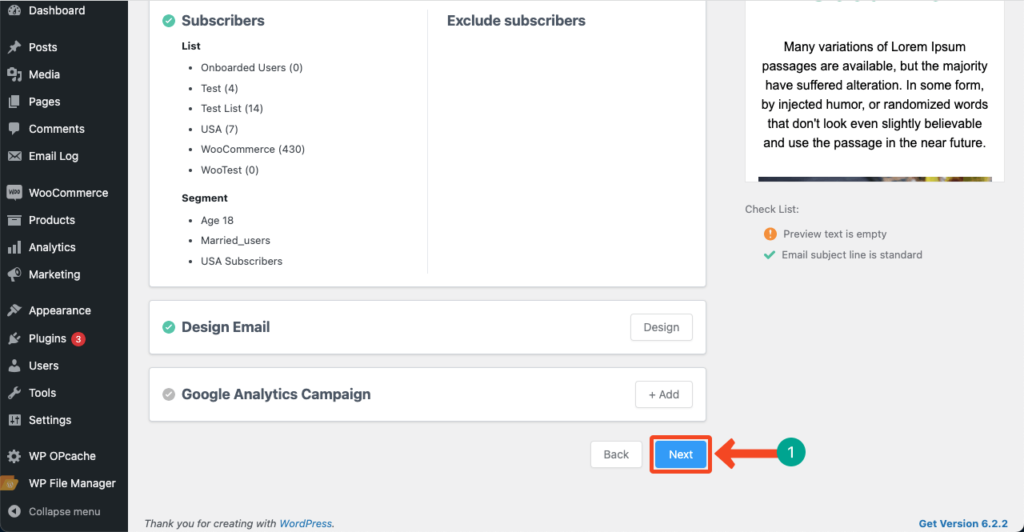
- Scroll down the page a bit.
- Click the Next button.
- It you lead you to a new pop-up, including a Send Now button.
- Clicking the button will activate the campaign.
# A/B Test the Newsletter
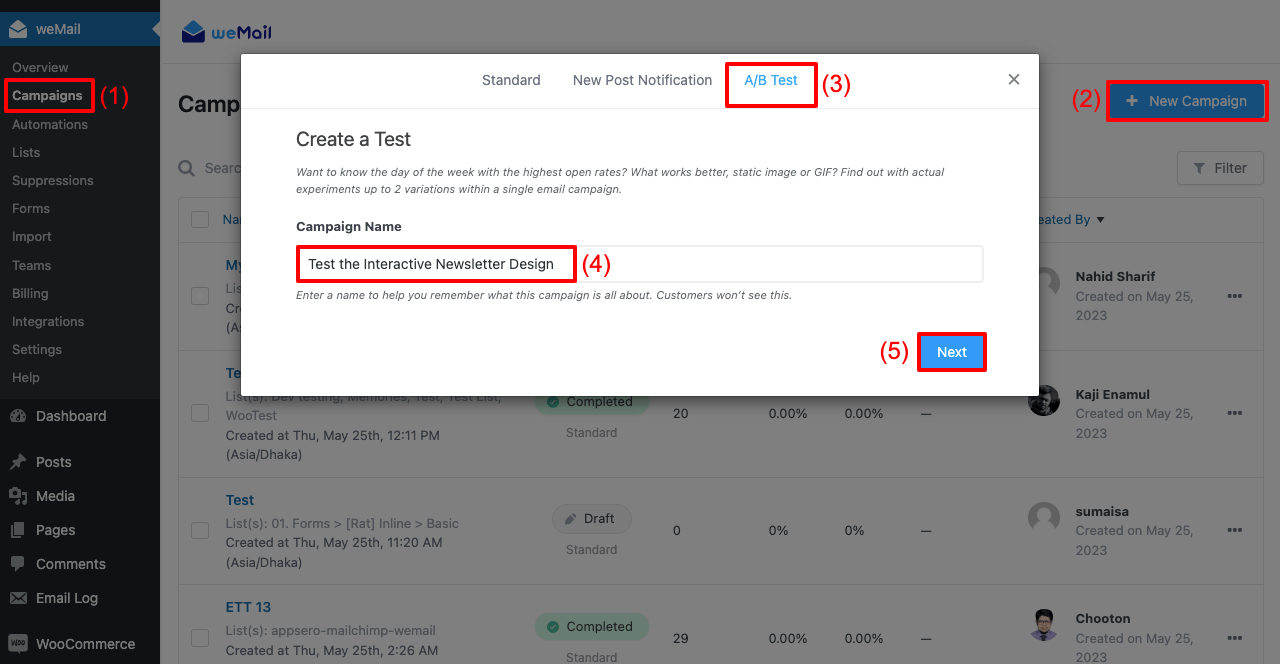
A/B testing can help you experiment with different newsletter elements like the subject line, images, texts, and CTA button to determine which truly resonates with your audiences. weMail has a built-in A/B testing feature. We’ll show you how to A/B your newsletters with this feature.
- Create a campaign again.
- Make sure to select A/B Test for the campaign.
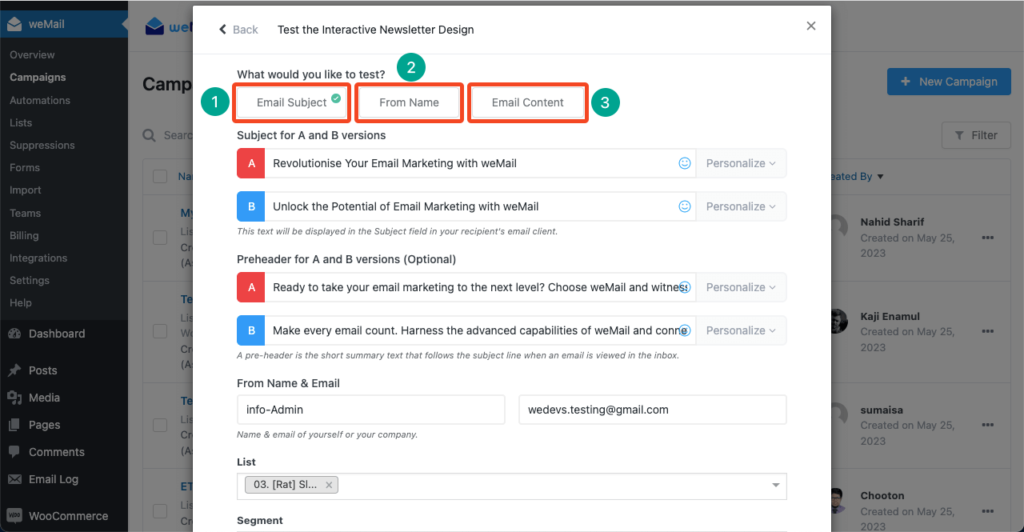
- There are three elements you can A/B test with weMail.
- They are Email Subject, Form Name, and Email Content.
- And you can A/B test single element one by one.
- You can’t A/B test multiple elements at once.
You can see below we have added two variations of the subject line.
- Add email lists.
- Make sure to add only a minimal number of subscribers, as this is a test email.
- Scrolling down the pop-up a bit, you will get the button to start the campaign.
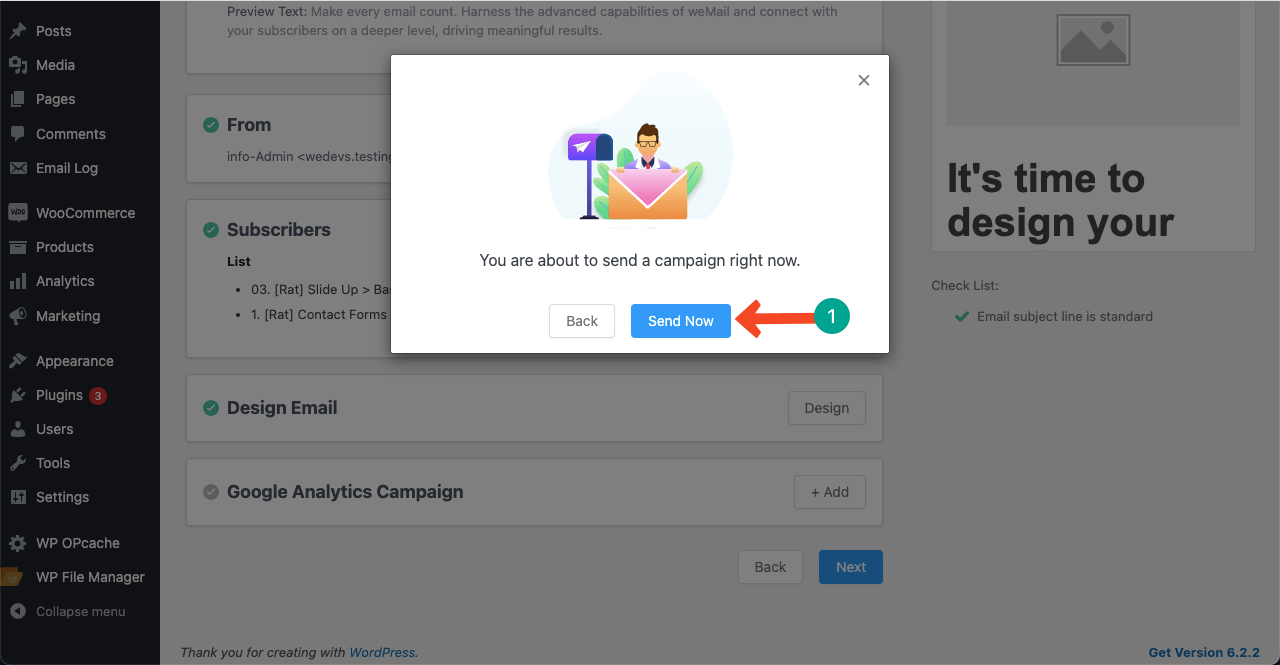
- Then, come to the Confirm tab, as we showed you above.
- Send the email campaign.
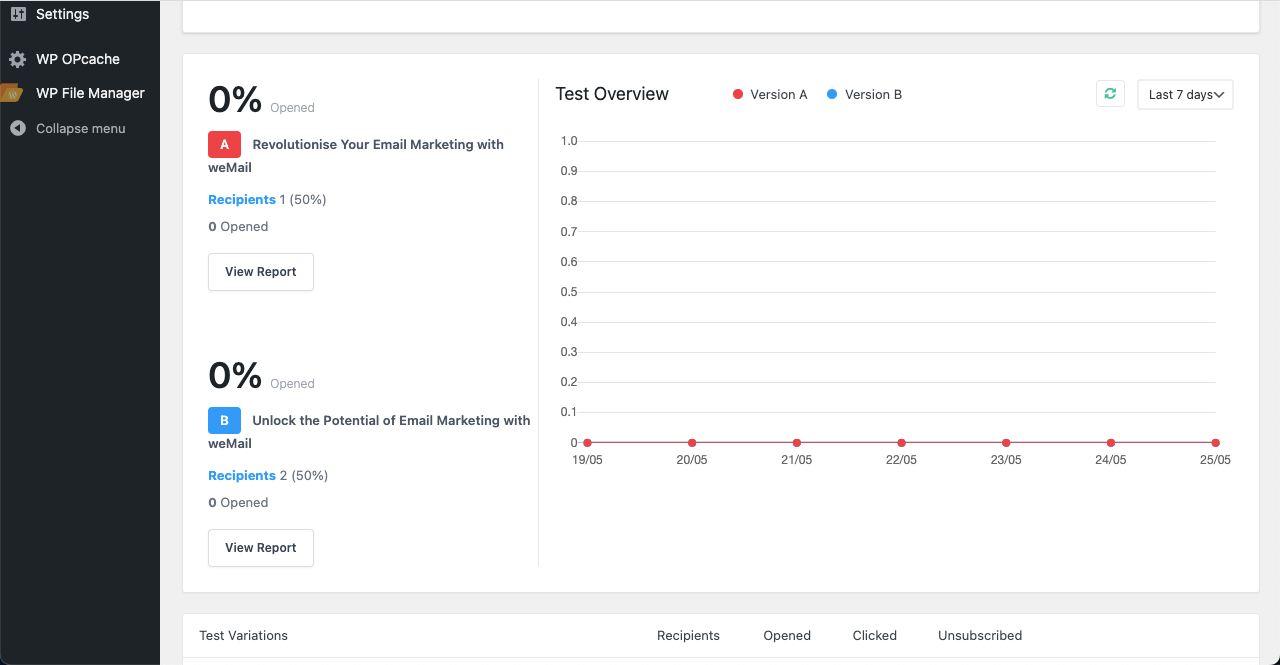
- Once the campaign period ends, you can check which version has worked best from the analytics.
# Analytics
- Go to weMail > Campaigns.
- Click the campaign you created for A/B testing.
- You’ll see the overall performance of each version scrolling down a bit.
Note: Since you have run the campaign on a demo account, you are seeing 0% of performance. But when you run the campaign on real subscribers, you’ll get the real data.
Step 10: Ensure Email Deliverability
Ensuring high email deliverability is an ongoing process starting from the beginning. You can’t do much at the final stage. There are some best practices that you must follow right from the beginning of any email marketing campaign for high email deliverability. They are:
- Build Quality Email Lists Through Double Opt-In
Often some people may mistakenly subscribe to your newsletters. Use double opt-in to cross-check they are interested in your services and newsletters.
- Never Purchase Email Lists from Third Parties
Creating email lists organically from scratch is time-consuming. So, some marketers go for buying email lists to get quick traction. But doing this can severely harm your brand value.
- Use a Reputable Email Service Provider (ESP)
We already talked about weMail, a reliable email service provider (ESP). You’ll find many other ESP solutions online. Whichever you choose, be sure it has the necessary infrastructure to maintain high email deliverability.
- Clean Non-Responding Email Lists Regularly
Clean out those email addresses that aren’t responding to your newsletters in the last several campaigns. You may mark them as inactive users. Removing them will remarkably improve your email deliverability rate.
- Test Before Sending
Before sending bulk emails to the entire email list, do some experiments to see if there are any formatting issues, broken links, and deliverability problems. Fix them accordingly before the campaign.
Final Takeaways!
Interactive newsletters are a powerful way to boost engagement and drive conversions. But it requires careful planning and thoughtful approaches to connect audiences to ensure expected returns. You must take time to understand your audiences and craft interactive newsletters.
Plus, you must stay updated with the latest trends and updates. We have tried our best to show you almost everything about how to create interactive email newsletters and reach audiences.
If you have further insight and suggestions to make this post more resourceful, we request you share them in the comment box. Thanks for taking the time to be with us.
