How to Create a Booking System in WordPress for Free
Building a strong relationship with customers is a key requisite for the success of any business. Customers today value their time more than ever. This is why businesses that prioritize efficiency and respect customers’ time excel in providing excellent service.
Appointments play a crucial role as a bridge for fostering connections between businesses, suppliers, and customers. By scheduling appointments, businesses can ensure timely service delivery without long waiting times. This can significantly contribute to a positive customer experience.
WPBookster is a plugin by which you can create a wonderful booking system on your WordPress site. It can help you create a memorable booking experience for customers and keep them connected. This post will explain how to create a booking system in WordPress for free of cost.
Types of Major Booking Systems and Their Market Sizes
There are different types of booking systems that you’ll find on websites online. Each of them holds a unique market share with considerable financial value. In this section, we’ll list the top five booking systems with their market shares.

1. Hotel Booking
Hotel booking allows customers to browse, compare, and book accommodations conveniently. They offer a wide range of options and provide competitive pricing.
- Market Size: around $76.9 billion in 2020, with a projected CAGR of 4.9%.
- Key Players: Booking.com, Expedia, Agoda, Airbnb, Hotels.com.
- Facts: Booking.com reported over 1.5 billion guest arrivals since its inception.
2. Travel Booking
Travel booking enables users to plan and book entire trips, including flights, accommodations, activities, and transportation, all in one place.
- Market Size: estimated at $817.1 billion in 2020, with a projected CAGR of 11.6%.
- Key Players: Expedia Group, Booking Holdings, Tripadvisor, Travelocity, Kayak.
- Facts: Expedia Group reported gross bookings of approximately $107.9 billion in 2020.
3. Car Rental Booking
Car rental booking platforms offer customers a convenient way to compare prices, choose vehicles, and make reservations online.
- Market Size: at $82.89 billion in 2020, with a projected CAGR of 4.8%.
- Key Players: Enterprise Holdings, Hertz Global Holdings, Avis Budget Group, Europcar Mobility Group.
- Facts: Enterprise Holdings reported global revenues of around $19.4 billion in 2020.
4. Event Ticket Booking
Event ticketing platforms allow users to discover, purchase, and manage tickets for various events, concerts, sports games, and performances.
- Market Size: at $54.9 billion in 2020, with a projected CAGR of 4.1%.
- Key Players: Ticketmaster, Eventbrite, StubHub, AXS, Vivid Seats.
- Facts: Ticketmaster sells over 500 million tickets annually.
5. Restaurant Reservation
Restaurant reservation platforms enable diners to book tables, view menus, and read reviews, enhancing the dining experience.
- Market Size: at $2.07 billion in 2020, with a projected CAGR of 14.3%
- Key Players: OpenTable, Resy, Yelp, Bookatable, TableAgent.
- Facts: over 2 billion diners annually across 80,000 restaurants.
Introducing WPBookster – A Free Booking System for WordPress
Bookster is a versatile and comprehensive WordPress plugin for managing schedules for businesses across different industries. It can help you efficiently oversee tasks ranging from initial booking and rescheduling to managing cancellations.
It’s commonly used by consultants, therapists, coaches, healthcare practitioners, and various service-based businesses to streamline their scheduling processes and client management. There are some reasons to use this plugin on your booking site/system:
- Let clients book and cancel appointments flexibly
- Arrange WordPress appointments in list view and booking calendar
- Automatically send booking confirmations and reminder emails
- Reduce distances between you and your potential clients
- Track bookings, agent performance, revenue, and more
How to Create a Booking System in WordPress for Free Using WPBookster
Creating a WordPress booking system for free using WPBookster is a straightforward process. Here’s a step-by-step guide to help you get started:
Step 1: Install and Activate the Bookster Plugin
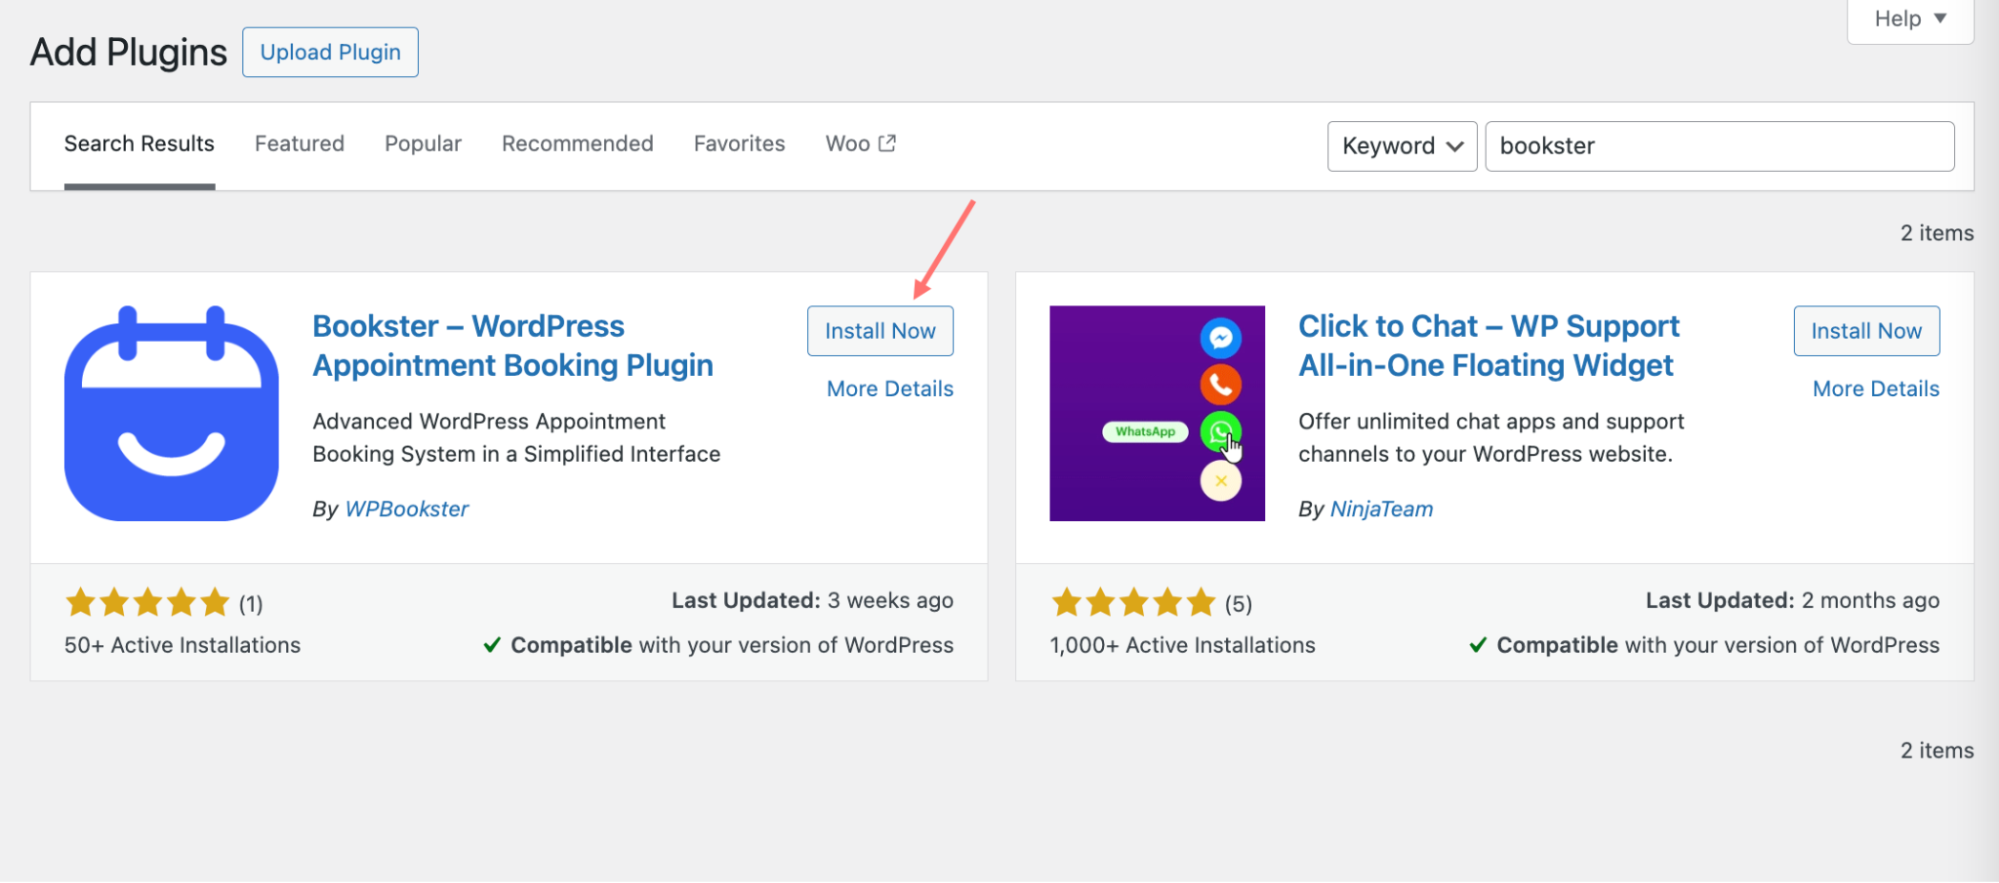
Bookster is now available as a free WordPress plugin. You can install and activate it directly from the repository without filling out any license.
Note: Upon installing the Bookster plugin for the first time, you’ll get a setup wizard. This wizard will guide you through making initial settings.
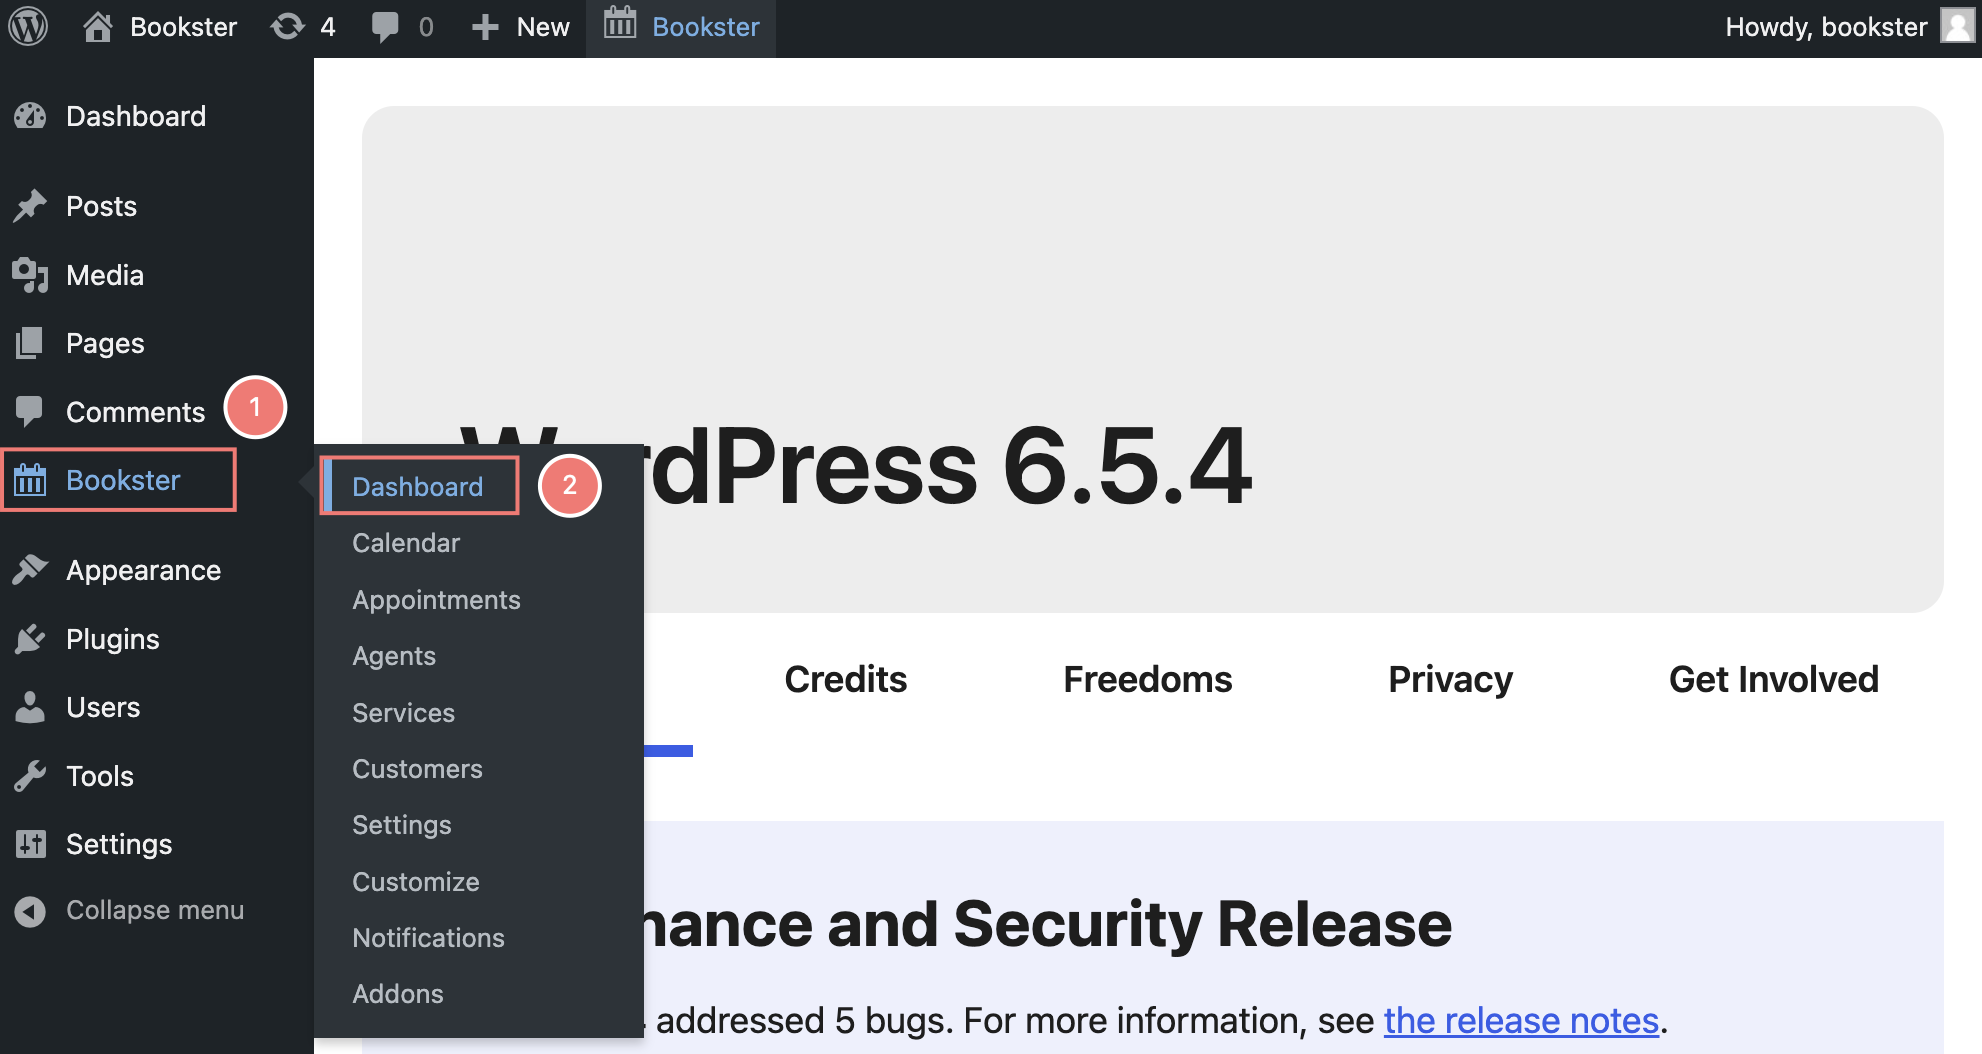
After activation is complete, you’ll find the plugin’s menu on the admin menu bar. Go to the plugin’s dashboard.
Step 2: Create your Schedule
In this guide, we choose yoga class as a primary example. Decide on the duration of each class based on the style of yoga and the preferences of yogis. While most classes typically run for 60 to 90 minutes, you may also offer shorter sessions for those with time constraints or longer workshops for deeper exploration.
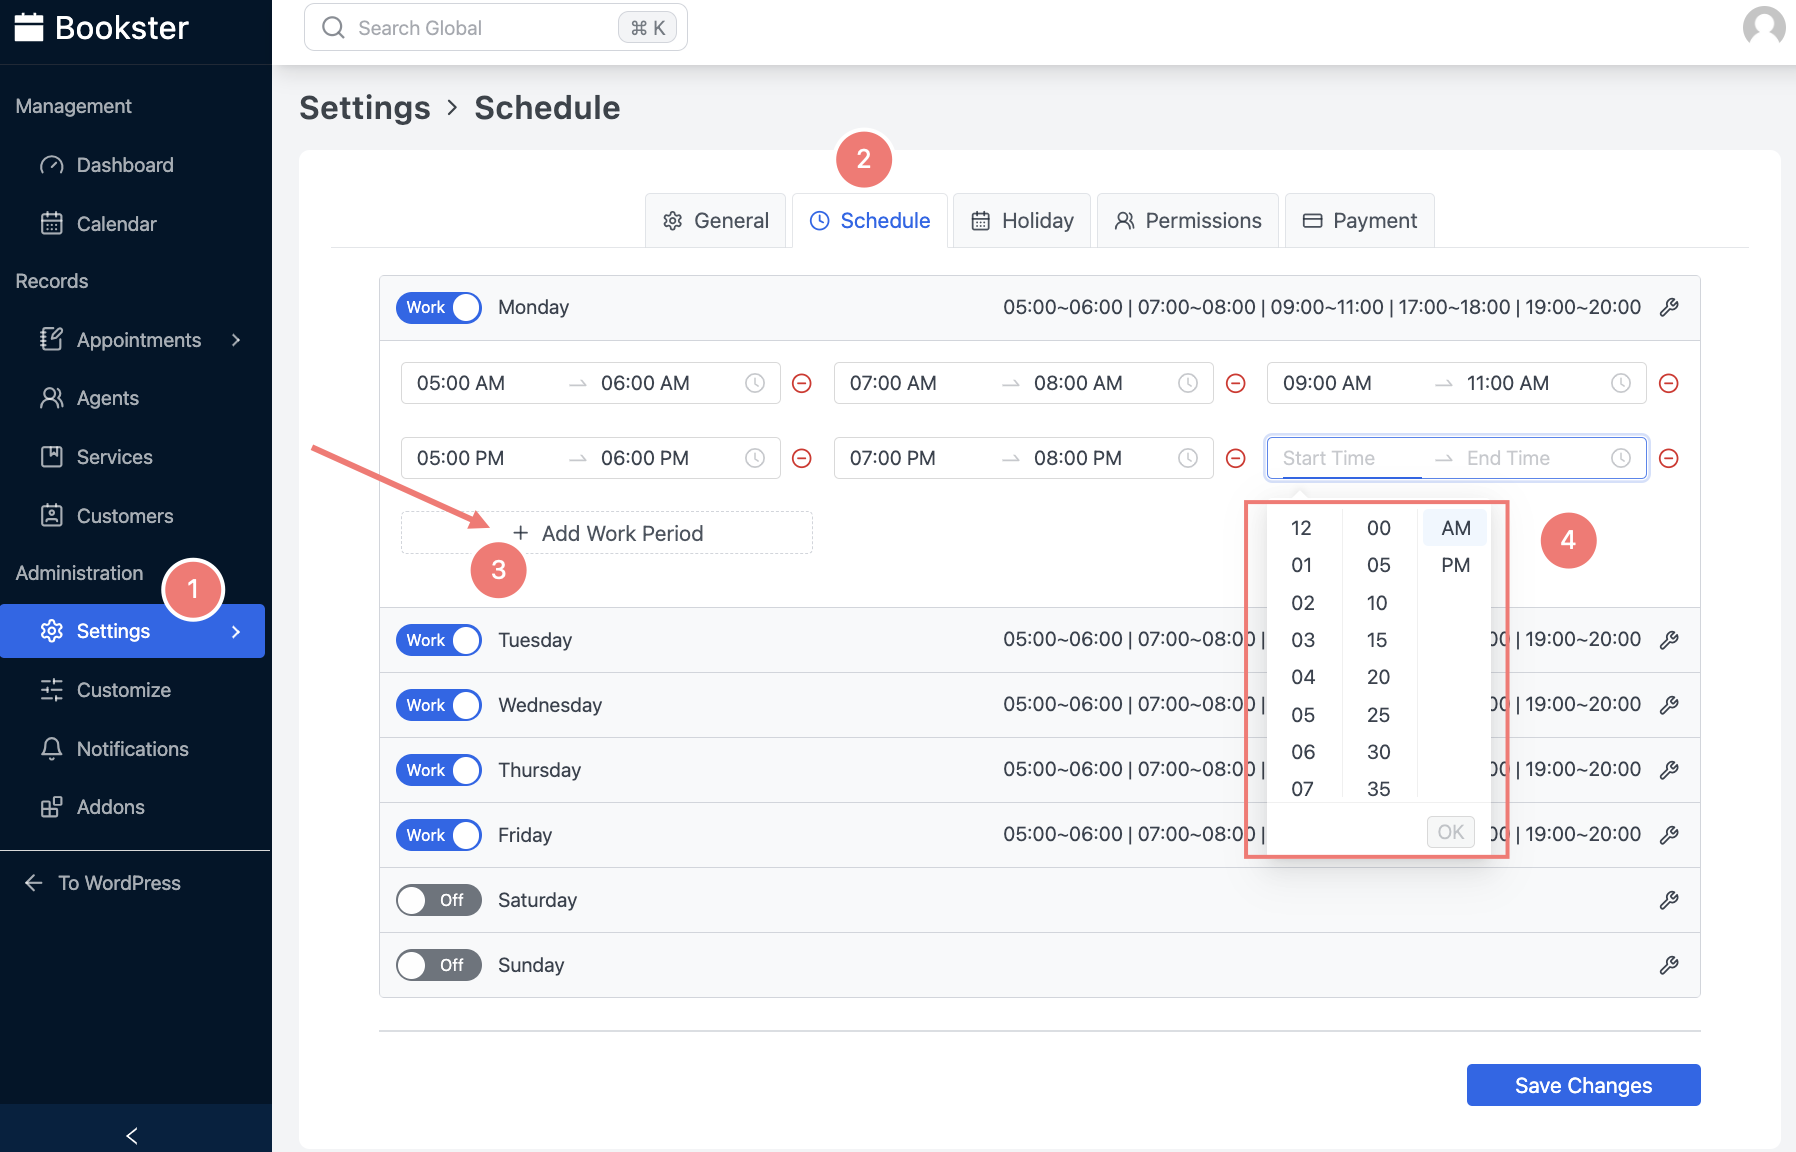
In Bookster, you have the flexibility to choose the days you’re available for bookings. You can select your working days and set your preferred work period. For instance, if you want to be available every day except weekends, you can easily configure your schedule accordingly.
This ensures that your WordPress booking system reflects your availability accurately, making it convenient for your clients to schedule appointments or reservations with you.
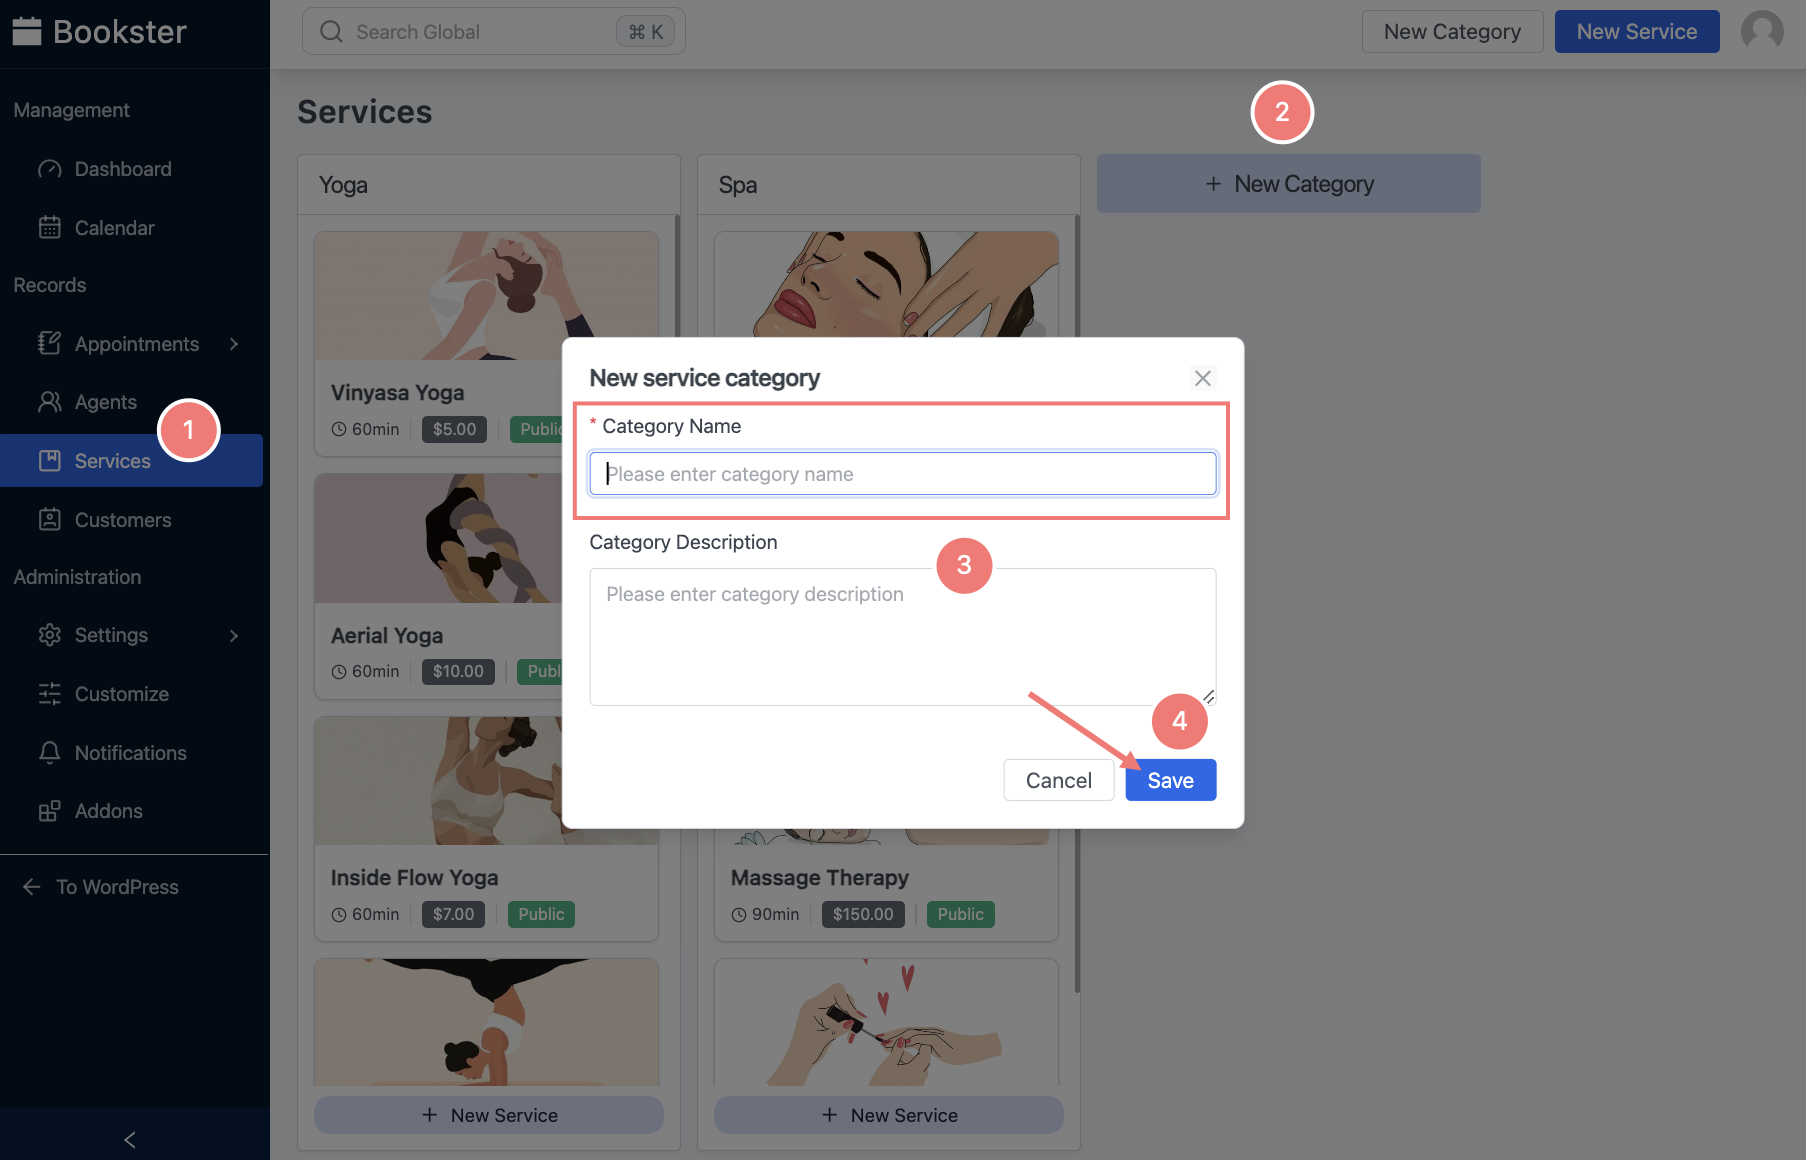
Step 3: Add your Categorized Services
Begin by evaluating the types of yoga classes you plan to offer. Consider various styles such as Hatha, Vinyasa, Ashtanga, Aerial, or specialized sessions like prenatal yoga or yoga for seniors.
Feel free to add many types of yoga options you want, cause Bookster gives you a chance to do that with no limit. This allows your prospects to easily select the desired option when booking a session with you.
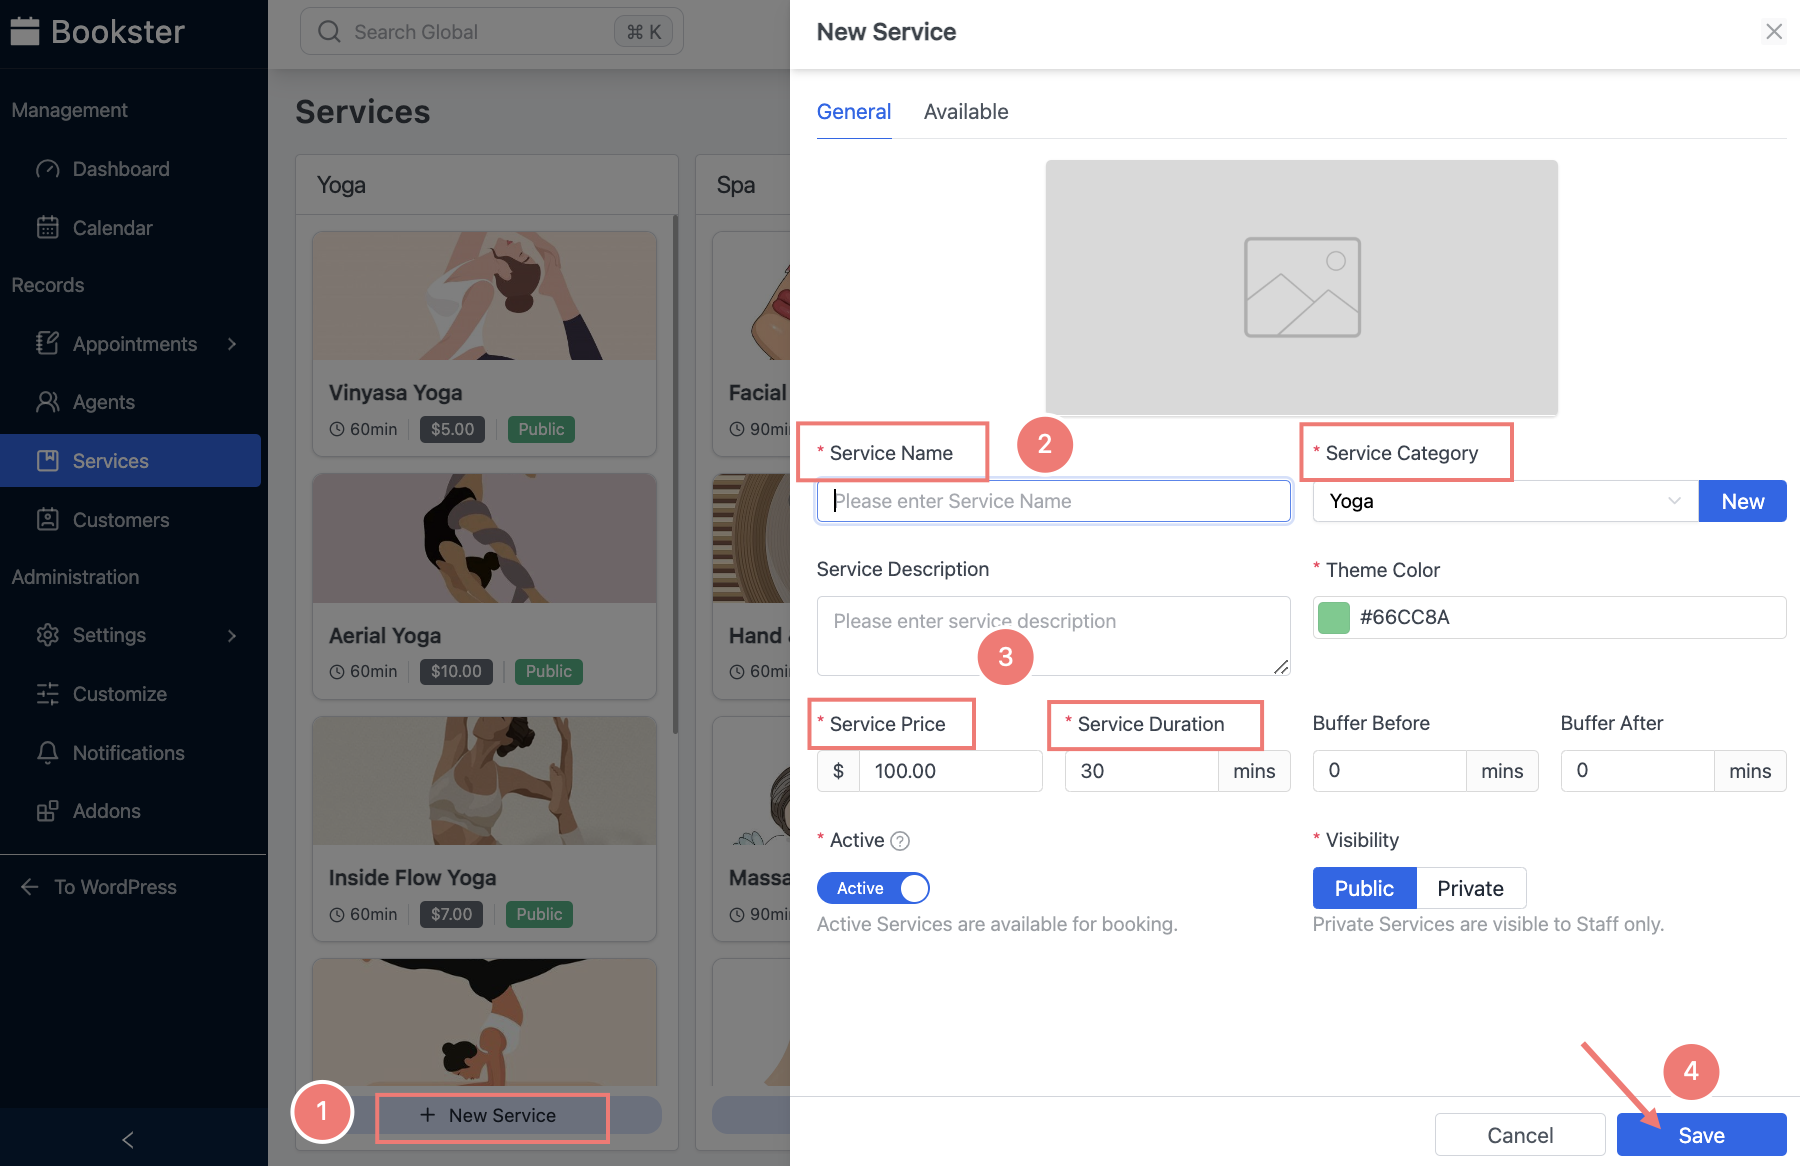
When adding a new service with WPBookster, you have the flexibility to configure it according to your business needs:
- Upload an Inspiring Image: Enhance the appeal of your services by uploading captivating and informative images that reflect the essence of each yoga style or class.
- Set Service Duration: Specify the duration of each yoga session in minutes to provide clarity to your clients and ensure smooth scheduling.
- Buffer Before/After (if needed): Optionally, add buffer time before or after each session to accommodate setup, cleanup, or transition periods between appointments.
- Add Price: Define the price for each service to streamline the booking process and provide transparency regarding your pricing structure.
- Optional Description: Include a descriptive overview of each yoga style or class to educate and engage potential clients. Highlight the unique benefits and features of each offering to help them make informed decisions.
- Noted by Customer/Staff: These notes serve as valuable communication tools, allowing for important information to be recorded and referenced as needed.
This includes special requests from customers, additional instructions for staff members, or any other important details.
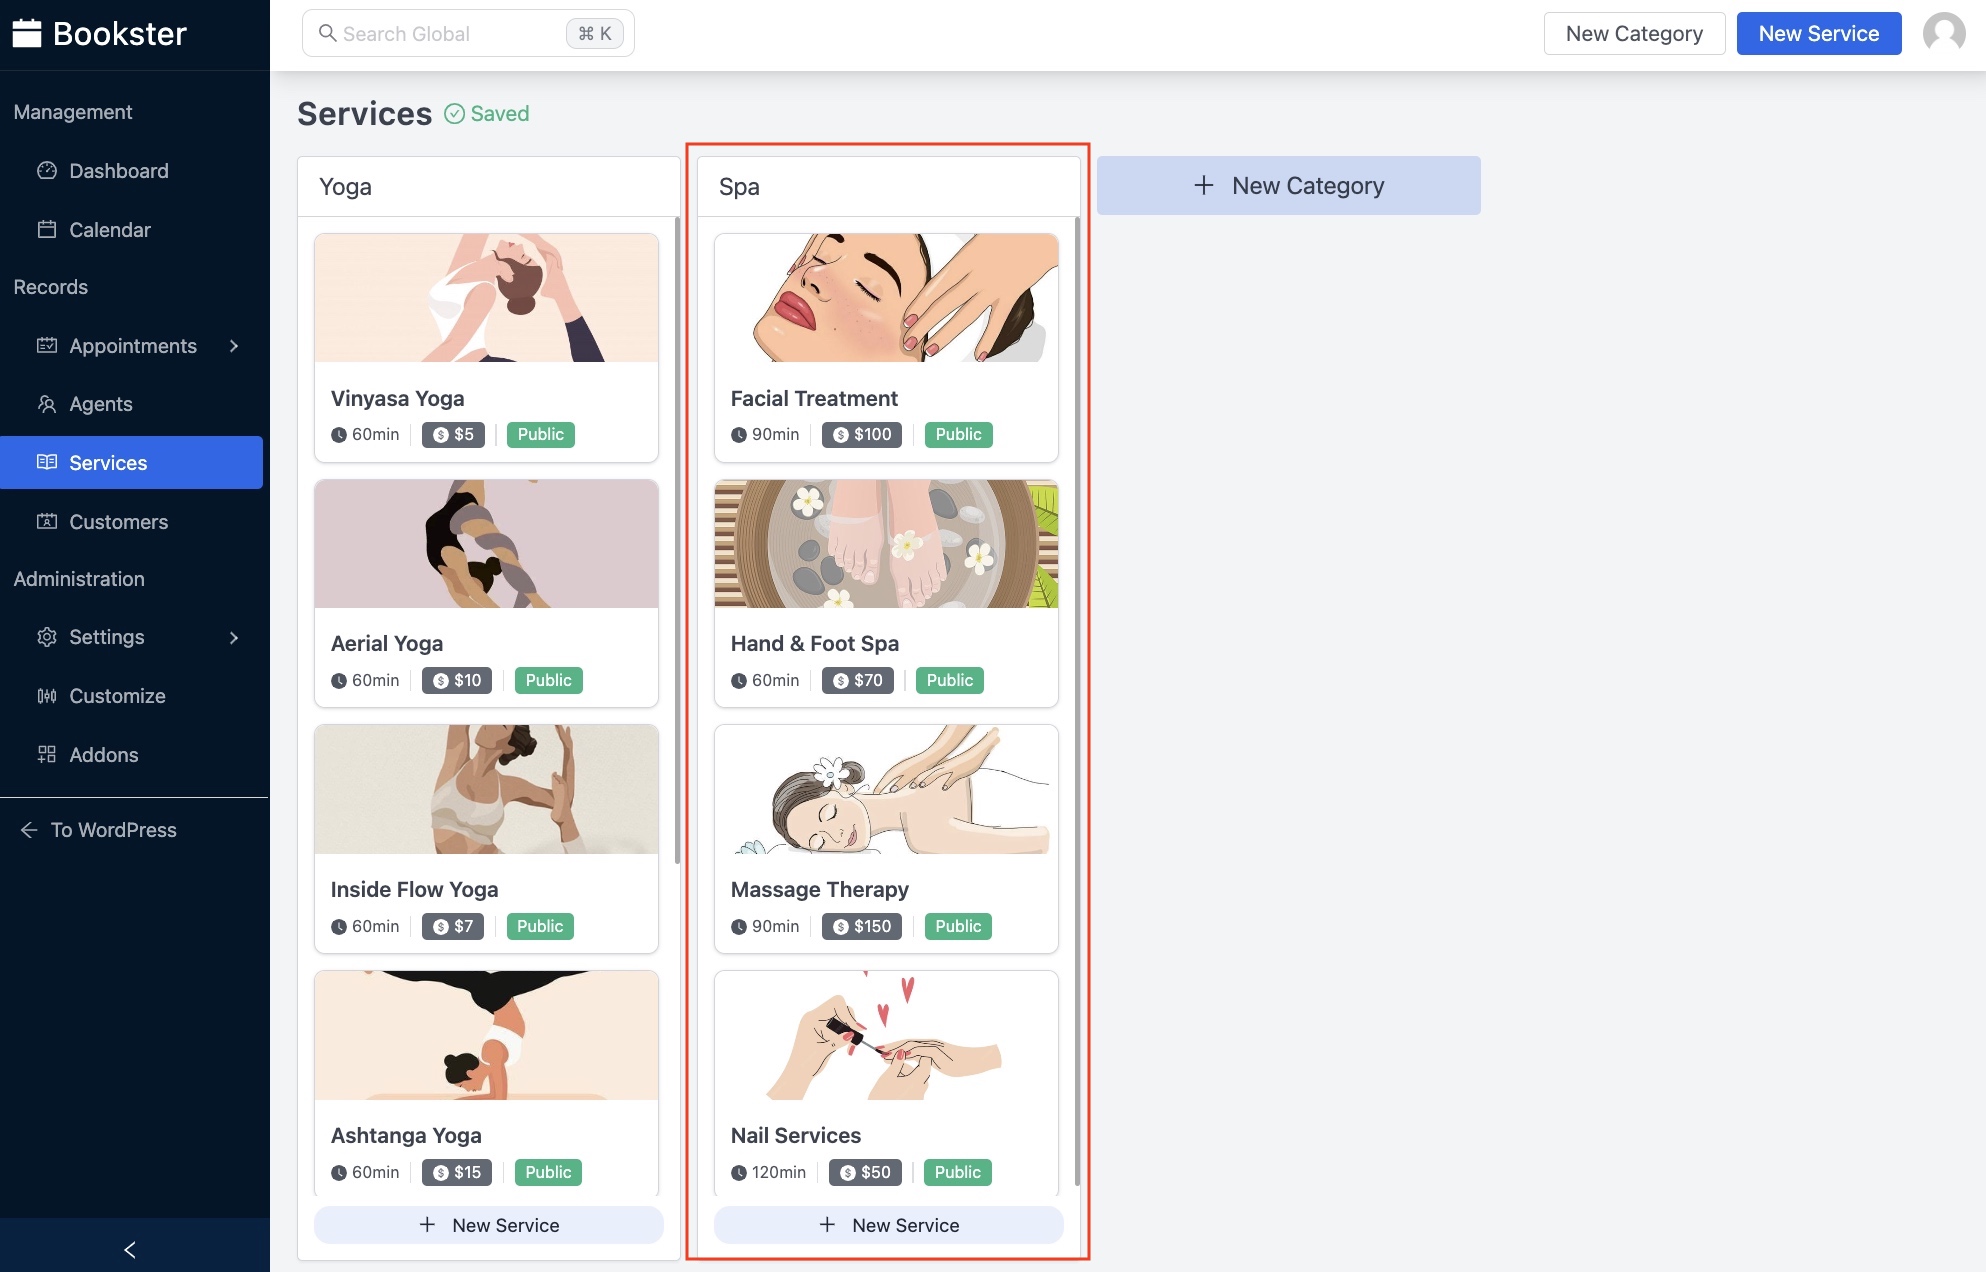
You can effortlessly list additional categories and services to provide a diverse range of options. In addition to yoga, we’ve incorporated a category titled ‘Spa’ into the offerings.
Step 4: Set up Your Agents
Once you’ve finished these steps above, you can create as many agents as you need for your services. Agents here in my example can be coaches or therapists.
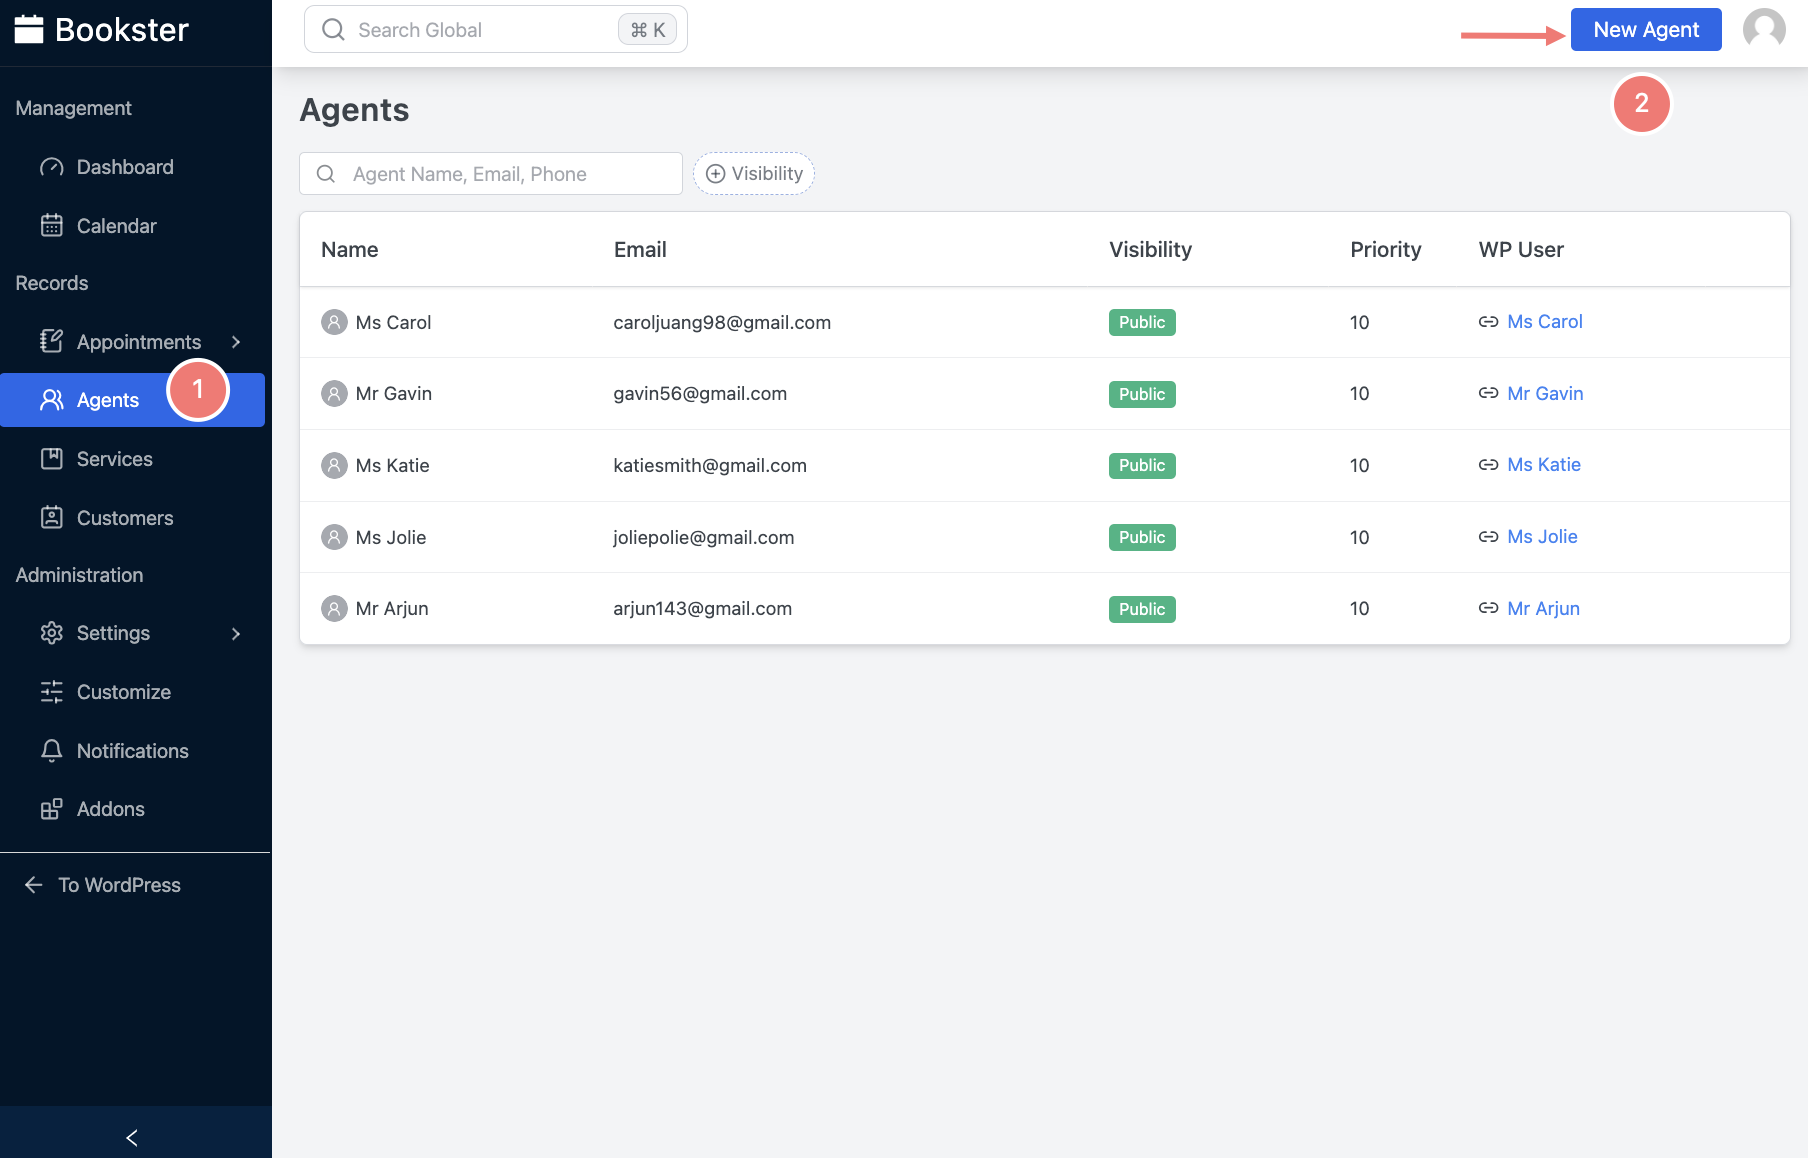
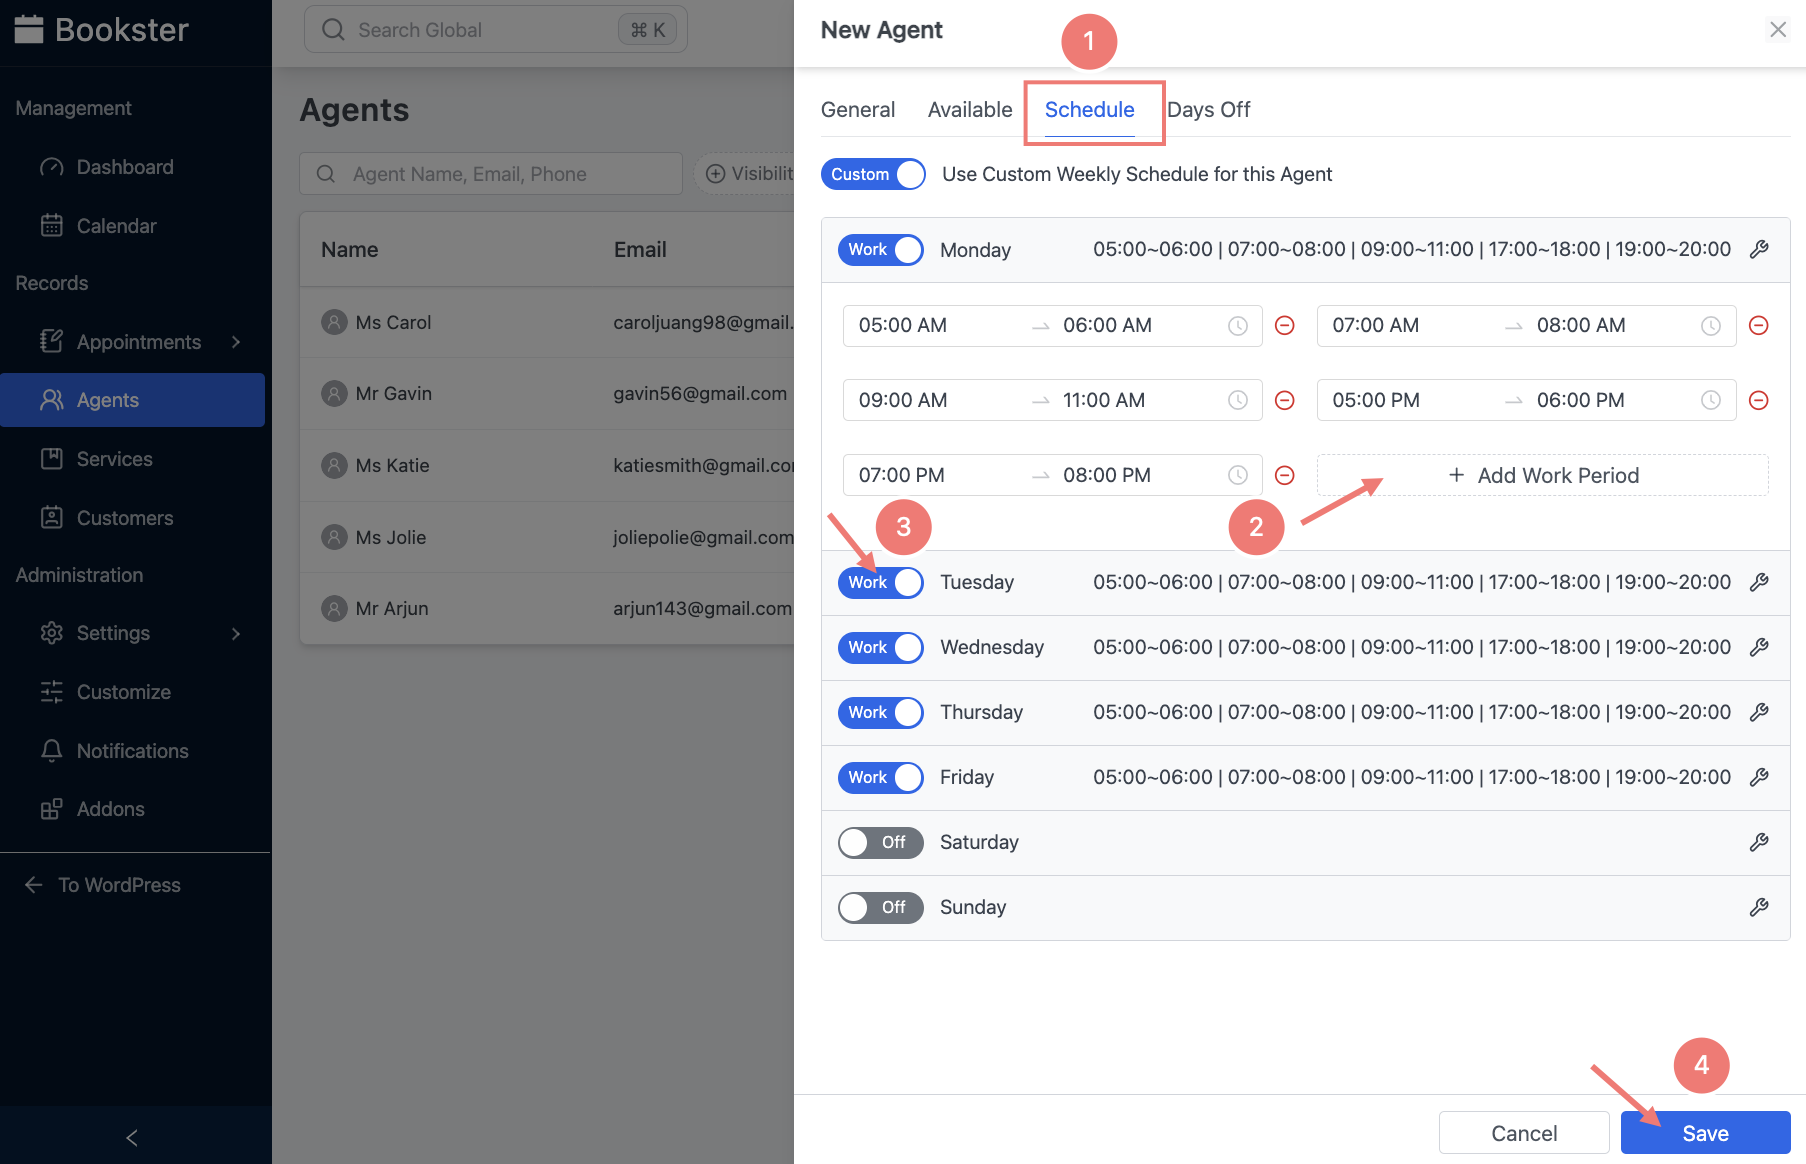
Click on the ‘New Agent’ button to add an agent. In the General tab, you need to fill in some obligatory information such as Name, Email and Phone.
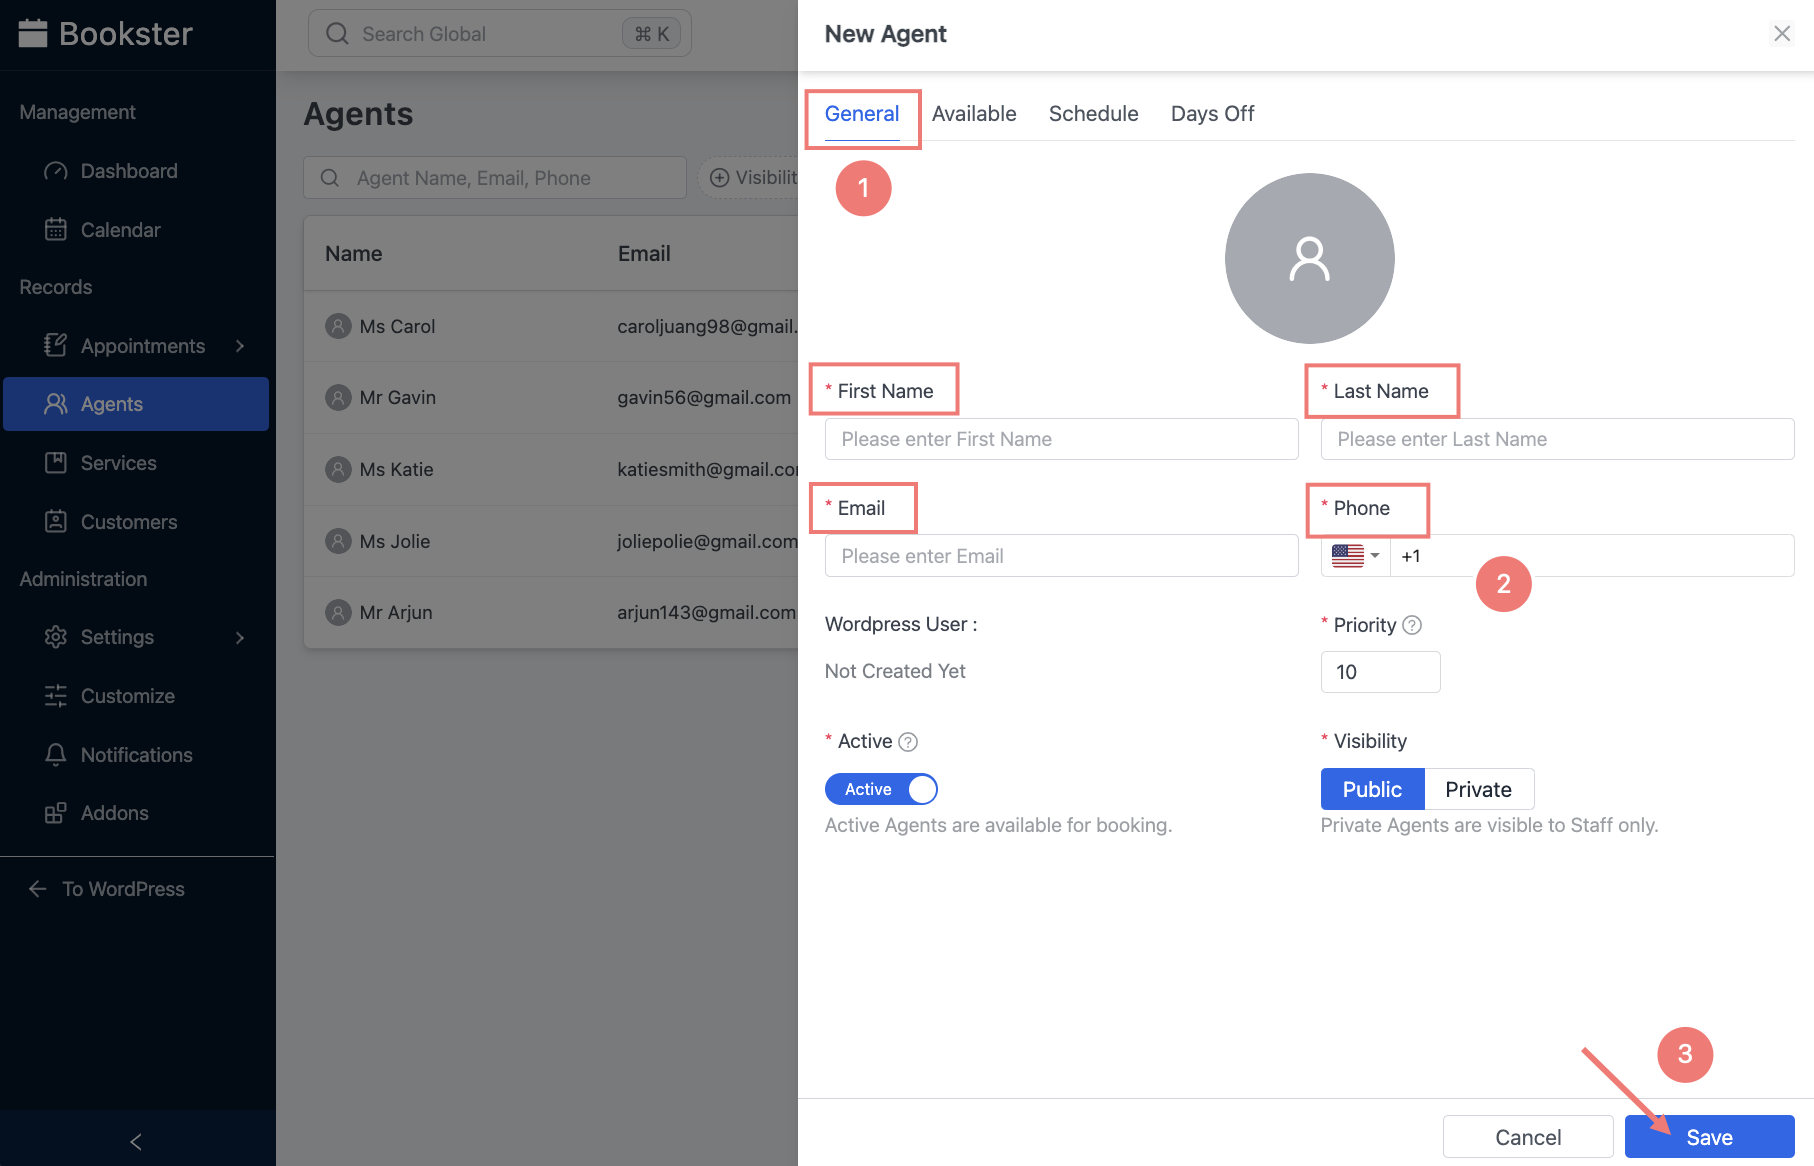
The Available tab allows you to choose the services the agent can perform.
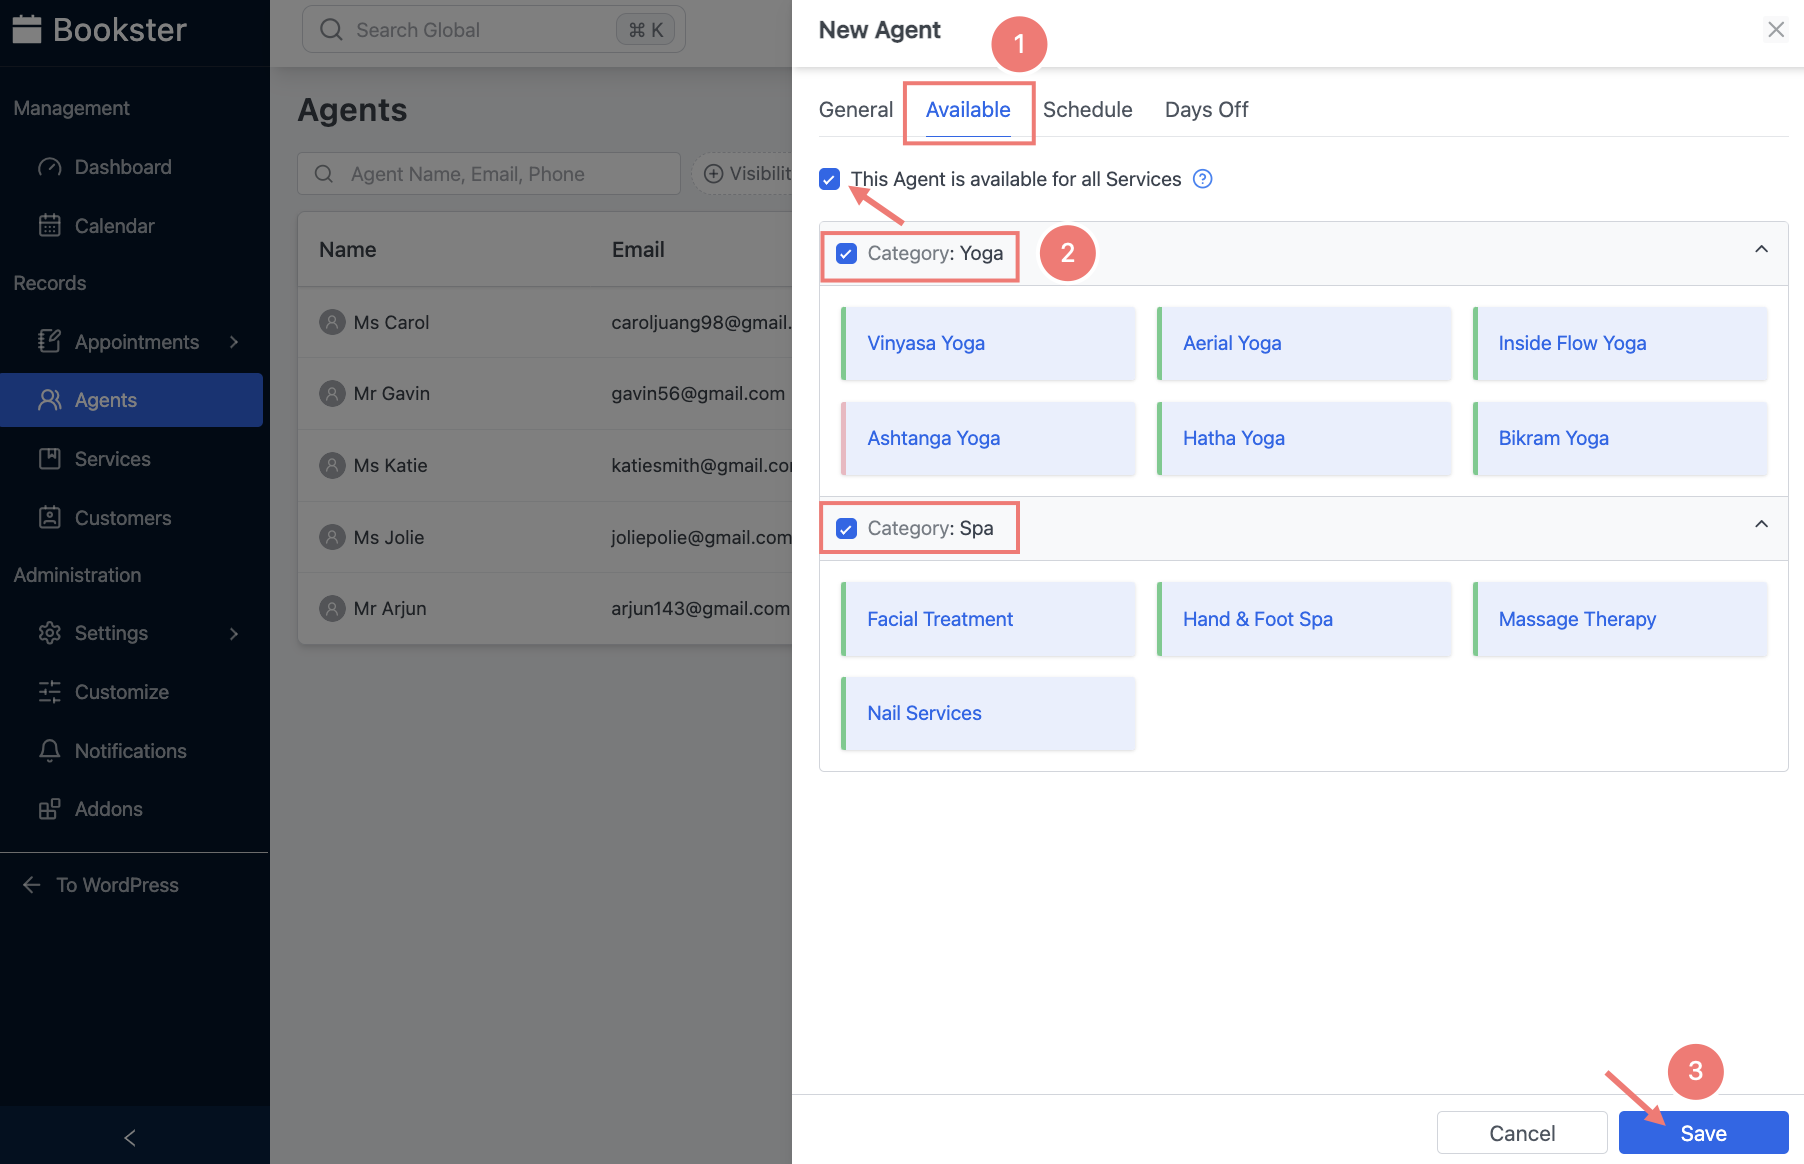
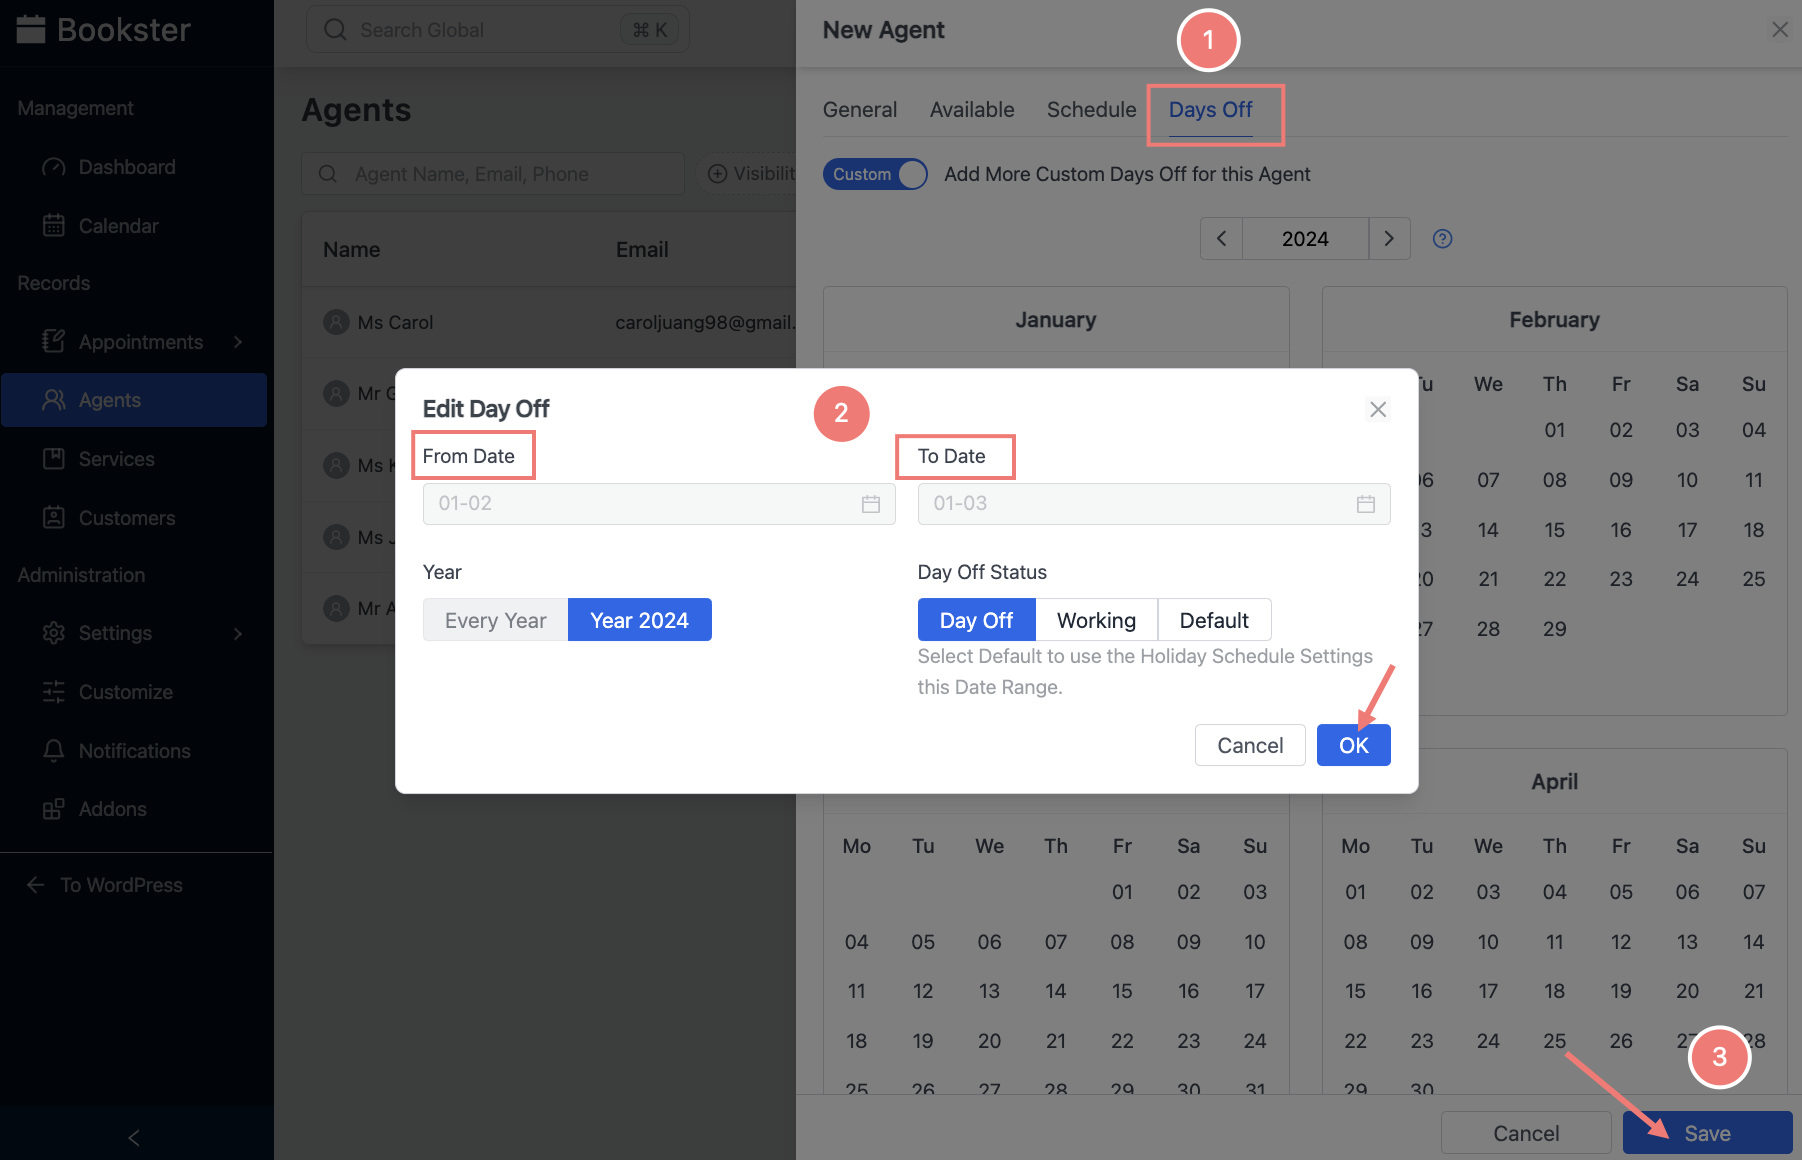
About the Schedule tab, you have the freedom to set a custom weekly schedule for each agent and give them days off in the Days Off tab.
In this tab, you need to locate the date picker for the start date and end date of agents’ day off. Click on the respective days on the calendar. This will trigger a window to pop up with additional options (years, day off status).
Step 5: Display the Booking Form on your Website
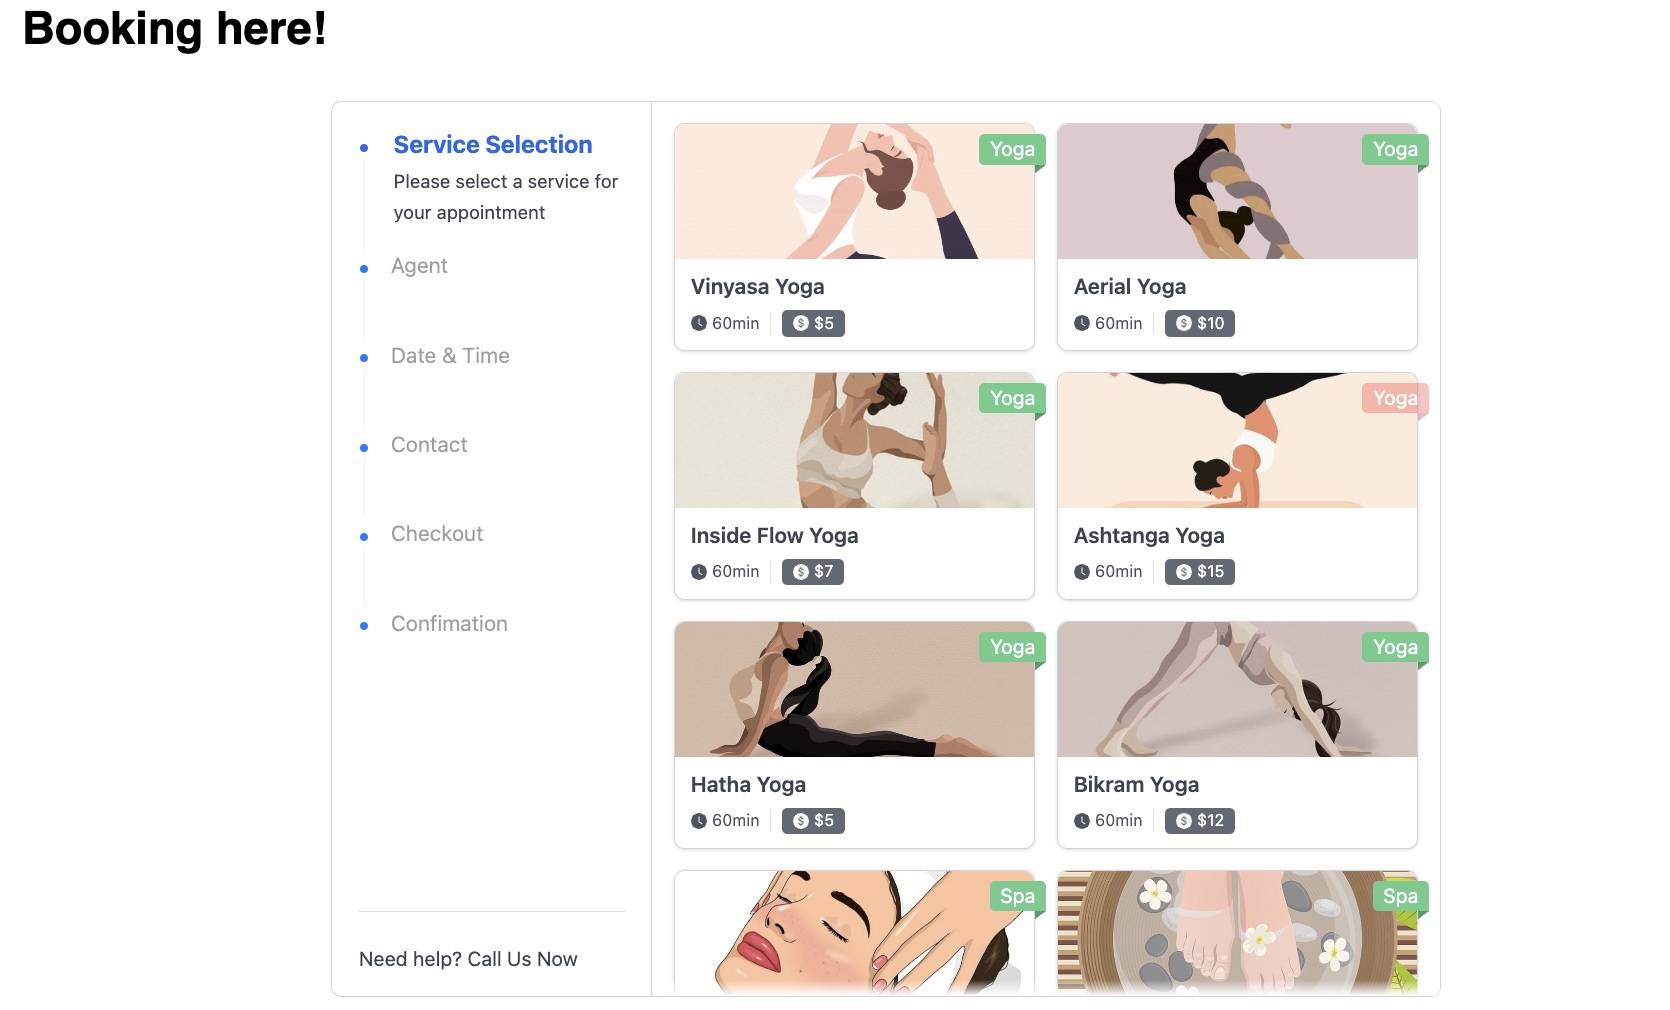
Whenever you need to integrate the booking form seamlessly into your website, simply grab the [bookster_booking_form] shortcode. This shortcode allows you to embed the booking form effortlessly, ensuring a smooth and convenient booking experience for your clients directly from your website.

Now, let’s check the front end to see if the booking form is live on your website.
Step 6: View the Calendar or Upcoming Appointments
In Bookster’s Dashboard, you can view a graph demonstrating revenue, appointments, agents and their bookings, clients in a separate database, cancellation cases, and more.
On the backend side, when a customer books an appointment using the form, their booking details will be recorded and they will be listed under ‘pending customers’ in the dashboard. These pending appointments await your review and approval.
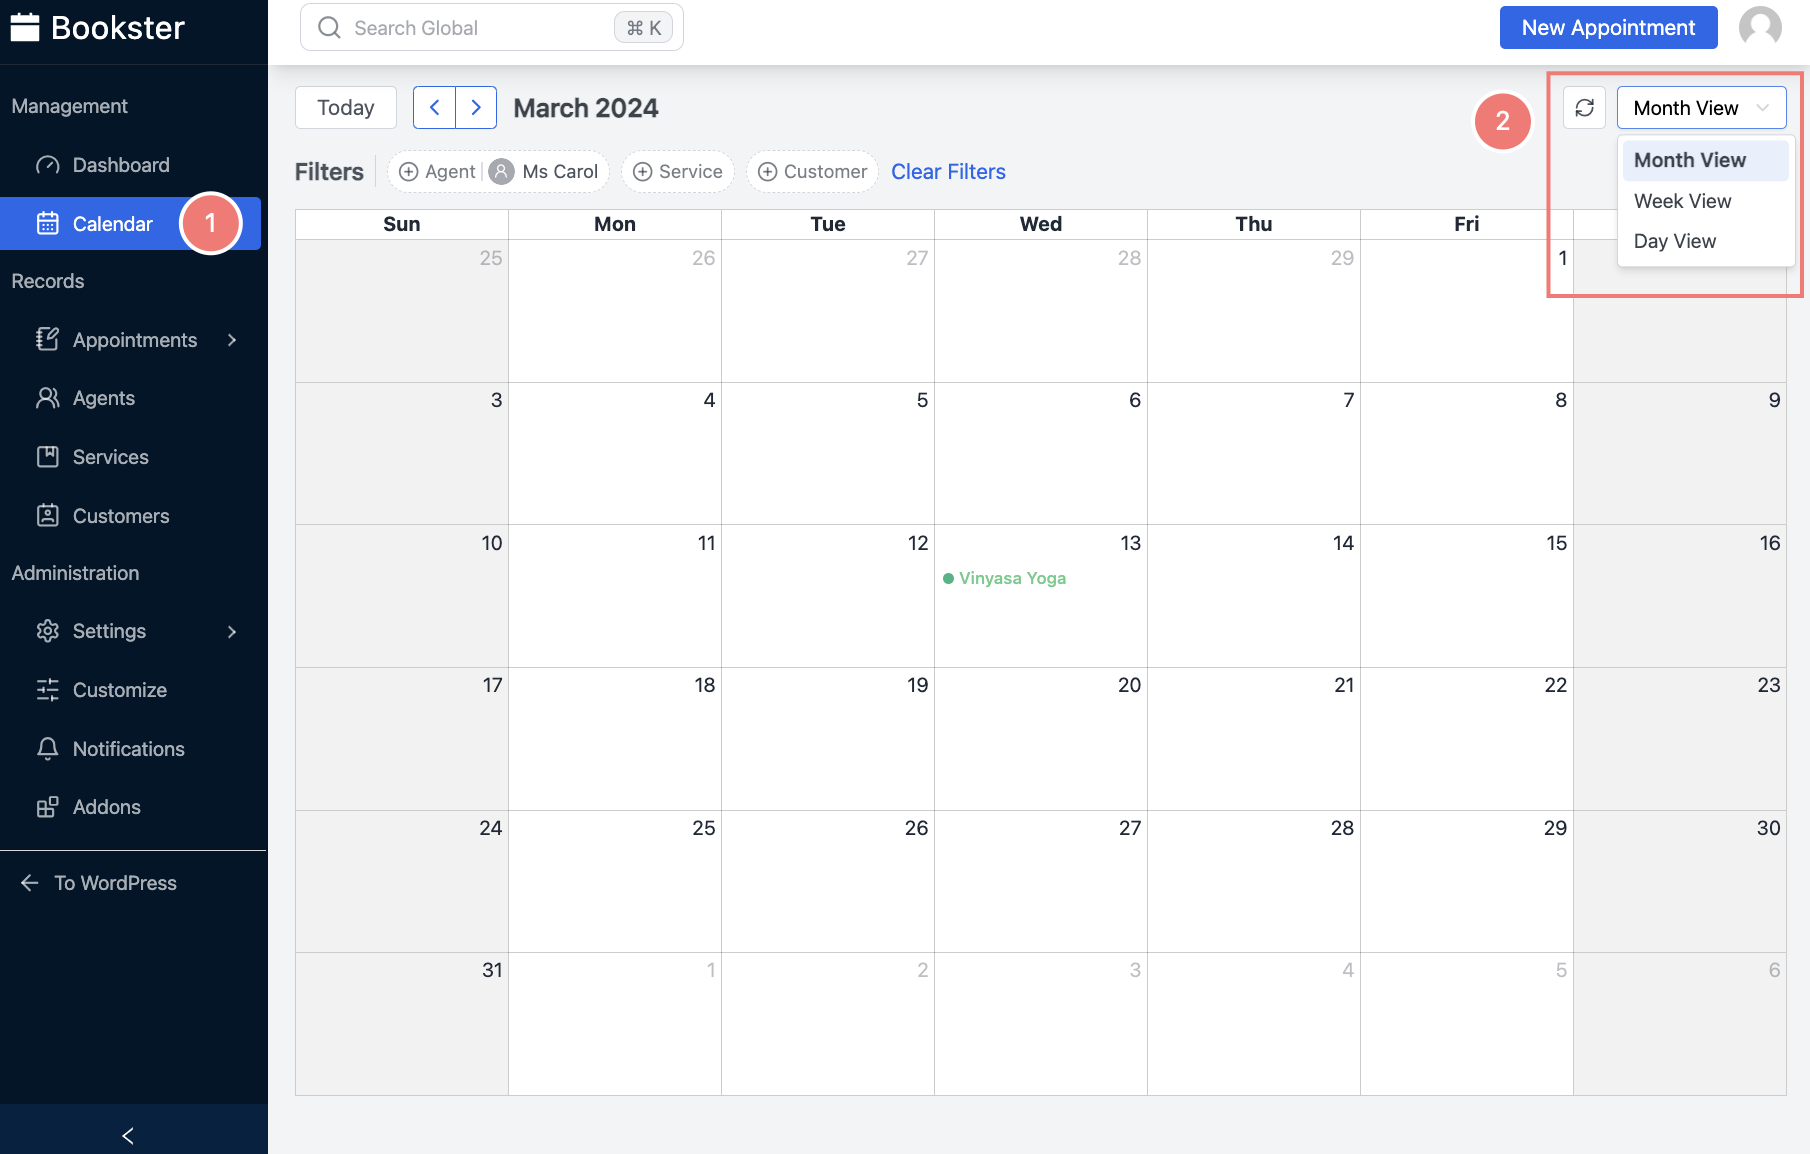
In the calendar section, you have access to view all reservations at a glance. You can select from day views, week views, or month views using the dropdown menu. This feature provides a comprehensive overview of all scheduled appointments, allowing you to easily track and manage bookings.
By navigating through the calendar view, you can quickly identify upcoming appointments, view appointment details, and manage scheduling efficiently. When someone utilizes the appointment booking form, all pending appointments will be listed on this page.
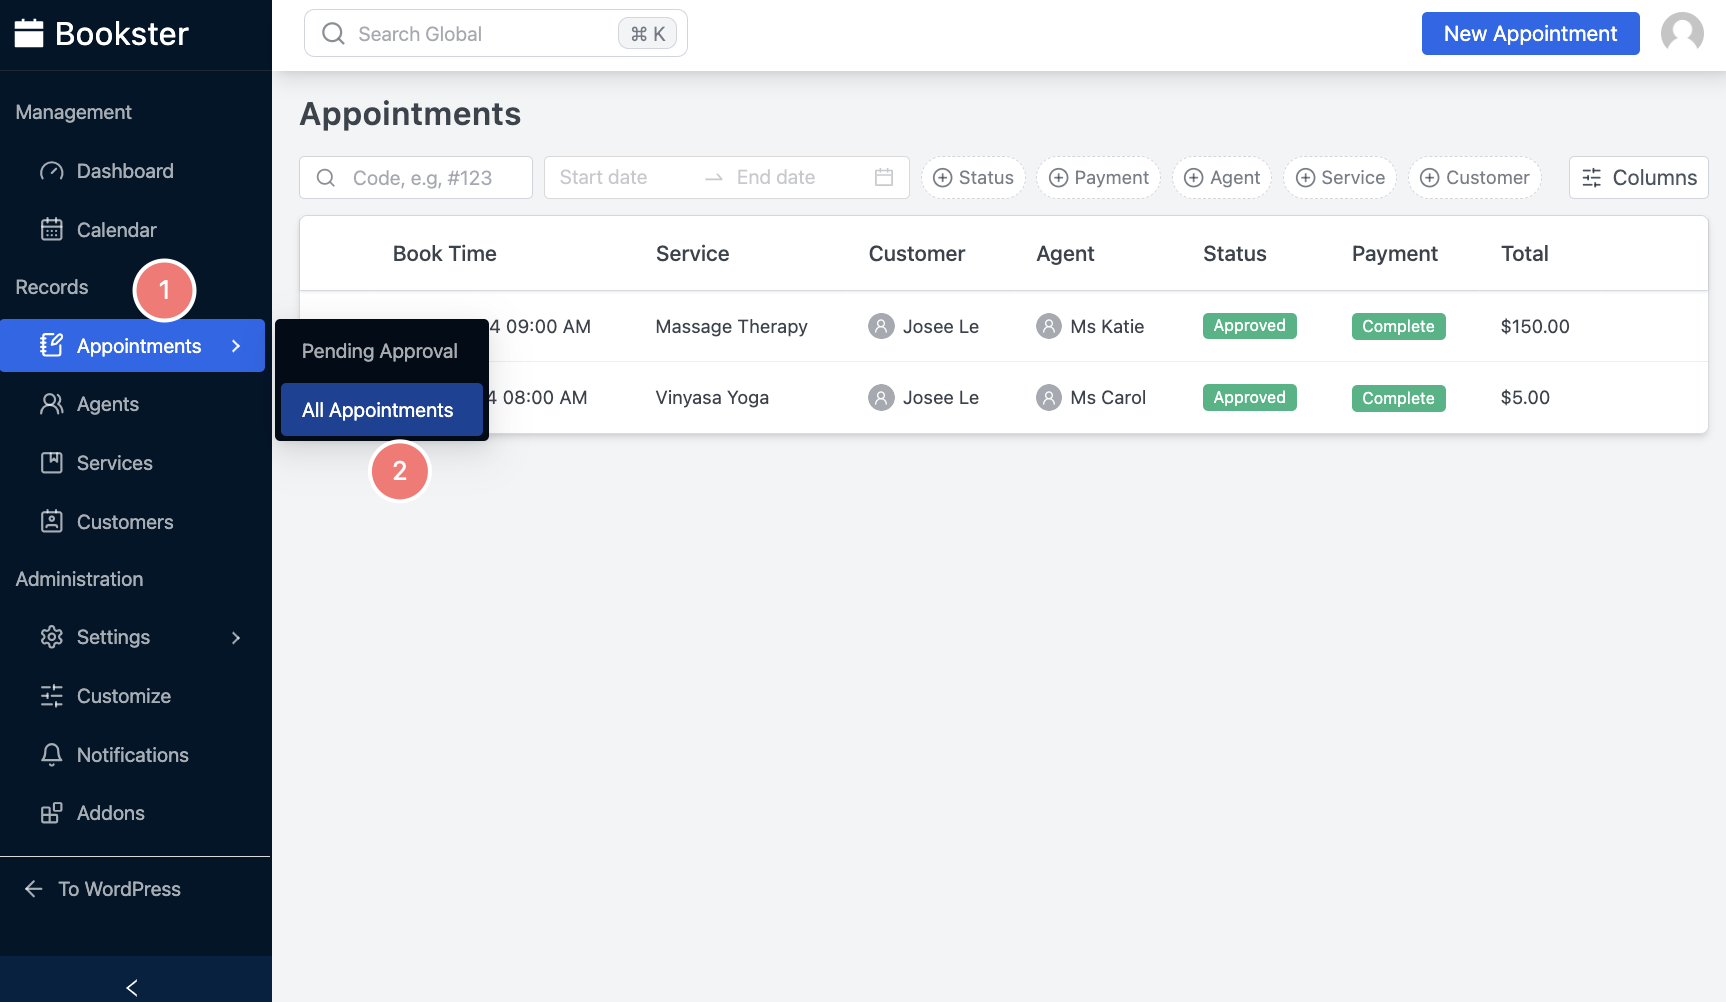
Here, you have the capability to review each pending appointment and take action accordingly. You can either approve the appointment to confirm it or cancel it if necessary.
Learn how to create an email campaign to retarget customers on your booking site.
Let’s Create Your Booking Site Now
Why not let clients find you first and book directly on it? By providing them a personal experience through your process of service. It’s also a smart way to help clients remember their appointments naturally. Whether you’re a freelancer, small business owner, or service provider, Bookster is the ideal partner for optimizing scheduling tasks and strengthening client relationships.




1Comments
Morocco tours
Thanks for sharing! I really enjoyed reading this. Appreciate it!