How to Use Newsletter Plugin in WordPress – A Short Guide

Newsletters are one of the best ways to grow your website visitors. You can create an email list of interested people and send newsletters to keep them engaged with your website and business activities.
Therefore, if you have a WordPress site, using a newsletter plugin would be the most viable solution in this regard.
In this blog, we will be showing you how to use a newsletter plugin in WordPress, and some tips to make your newsletter marketing fruitful. Keep reading.
How to Choose a WordPress Newsletter Plugin

WordPress is the largest open-source CMS in the world. Right now, it has a 65% CMS market share, and 43% of all websites are built by WordPress. The reason behind its immense popularity is its ease of use, and obviously the openness to utilize a plethora of free and premium plugins.
So, when you are on to choose a newsletter plugin in WordPress, usually you may find yourself stranded. There are plenty of newsletter plugins right there in the WordPress repository, and choosing one of them for your business is tricky.
However, you need to consider the following things in such a case –
- The scope of your website and business
- The number of subscribers you want to reach
- The platform your website is built upon (Like – WordPress, Drupal, Joomla, Magento, etc)
- Budget
As here we are talking about a WordPress newsletter plugin, the main consideration should be the number of your subscribers and budget. Take a look at some of the top WordPress based newsletter plugins right now –
- weMail
- WP Mail SMTP
- Rafflepress
- MailPoet
- The Newsletter Plugin
- Send Press
- Newsletter Glue, etc
Well, let’s follow through with the next step.
Best Ways to Use Newsletter Plugin in WordPress

weMail is one of the simplest and most powerful newsletter plugins. You can use it both as a WordPress user or SaaS (Software as a service). In the following steps, we choose weMail because it is easy to use, and the free version includes almost everything (a handful of SMTP integrations, newsletter editor, email list segmentation, optin form builder, etc) you need to start your email or newsletter marketing right away.
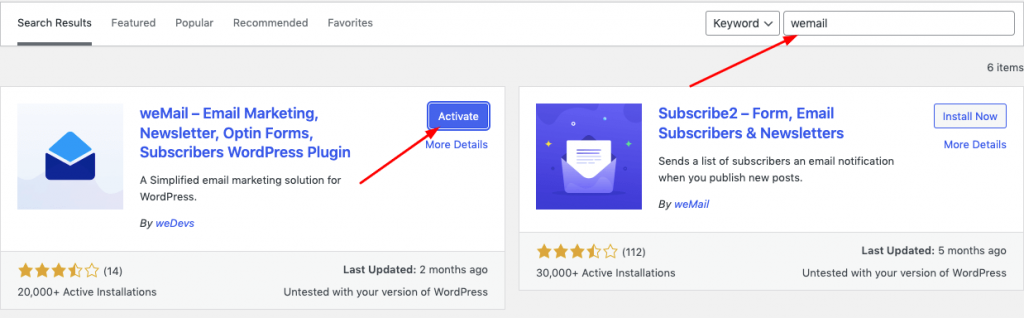
Step 1. Download and Activate weMail
Go to your WordPress dashboard, and search for weMail. Download and activate it within a few clicks.
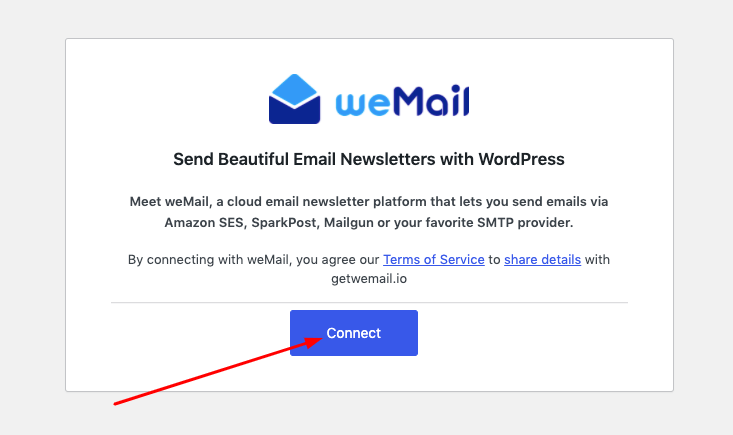
After you click on the “Activate” button, it will take you to the activation window. Click on the “Connect” button.
In the next step, you can log in to your existing email account which you have used in your WordPress site. Or sign up with a new address. After you logged in, weMail will ask to allow you to integrate your website with it.
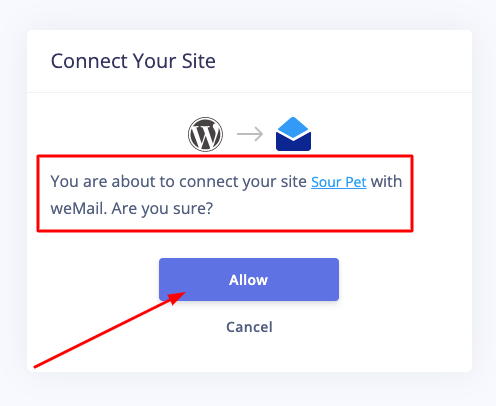
Now, click “Allow” and connect your site with weMail. It will take you to the following window where you can do all the necessary setups.
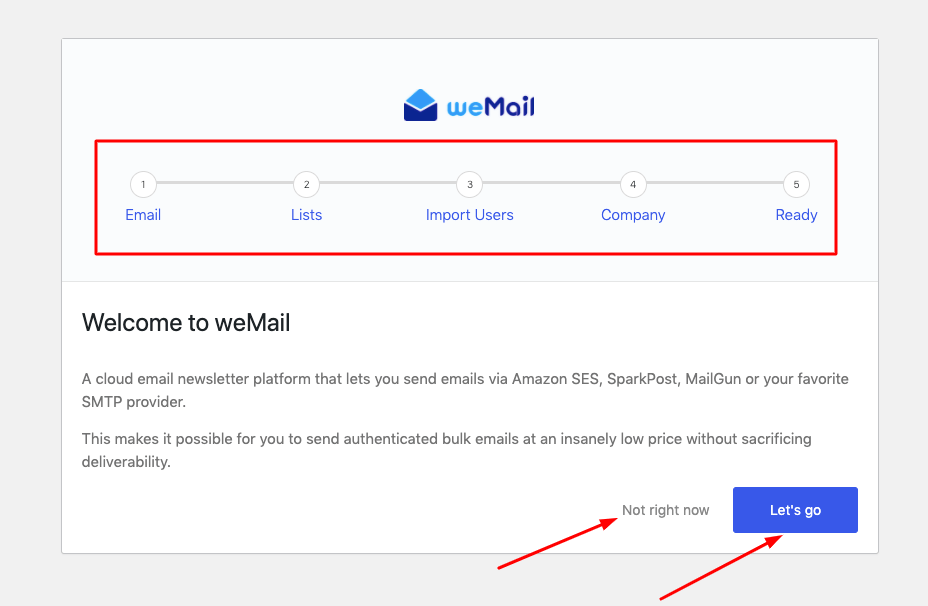
In the above window, you can see five steps to set up weMail. You can start setting up instantly by clicking “Let’s go”, or clicking on “Not right now” to do this later. However, the setup process only takes a few minutes.
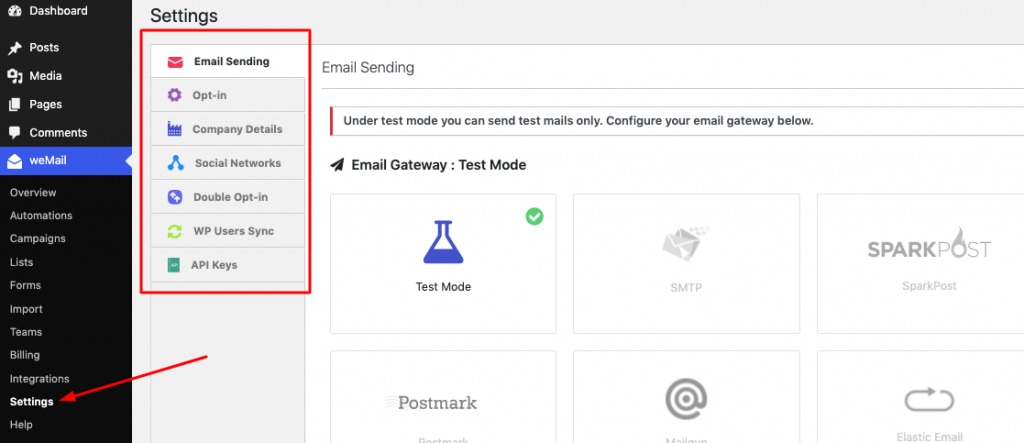
What you need is to connect your favorite SMTP server as weMail requires a sending gateway to send newsletters. You don’t need to worry in this regard, weMail support all the popular SMTPs like Amazon SES, SMTP, Mailgun, Postmark, Sendgrid, or Elastic Mail.
In the next step, you need to add an email list or import users to whom you will be sending your newsletters, add your company info, and start customizing before start sending.
To see the whole setup process, check out the complete installation guide of weMail.
Step 2. Customizing Your WordPress Newsletter
Now that you have set up weMail to your WordPress site, it’s time to customize your newsletter before sending it to subscribers.
From your dashboard, go to Campaign and Click on Create New.
You need to name your newsletter campaign. And choose a list of subscribers. If you want segmentation, you can select a premade segment for your list. Or create a completely new segment. Here, we will be skipping that step, as we are showing you this for testing purposes.
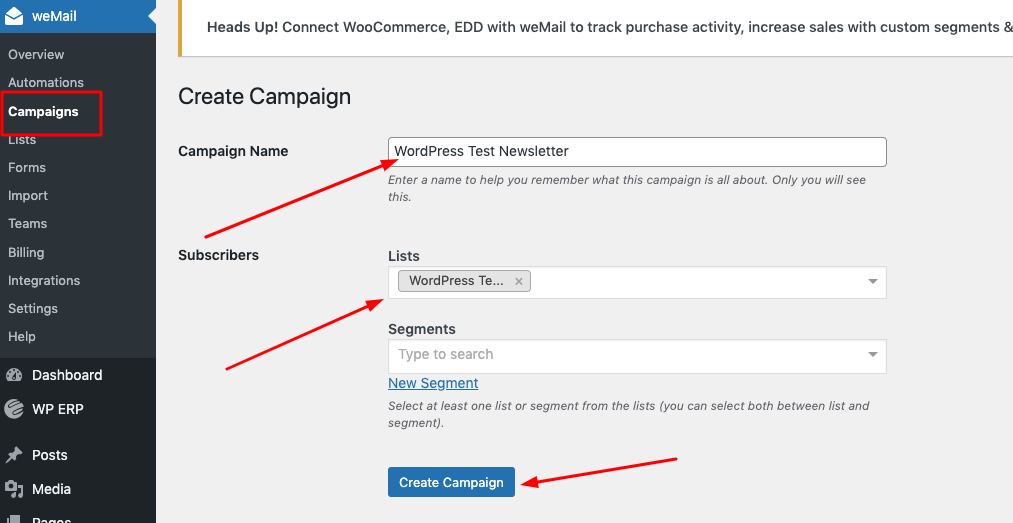
After you named your newsletter campaign, and select email list, click on Create Campaign. The next page will take you to the campaign editor. There you need to select a template for your campaign. The good news is that weMail has a collection of beautiful premade newsletter templates. Select anyone you like, and start customizing.

Customizing is easy, and you can add/remove images and anything you want to convey your message besides adding a link or CTA button. After you’ve done editing, click on Save and Close.
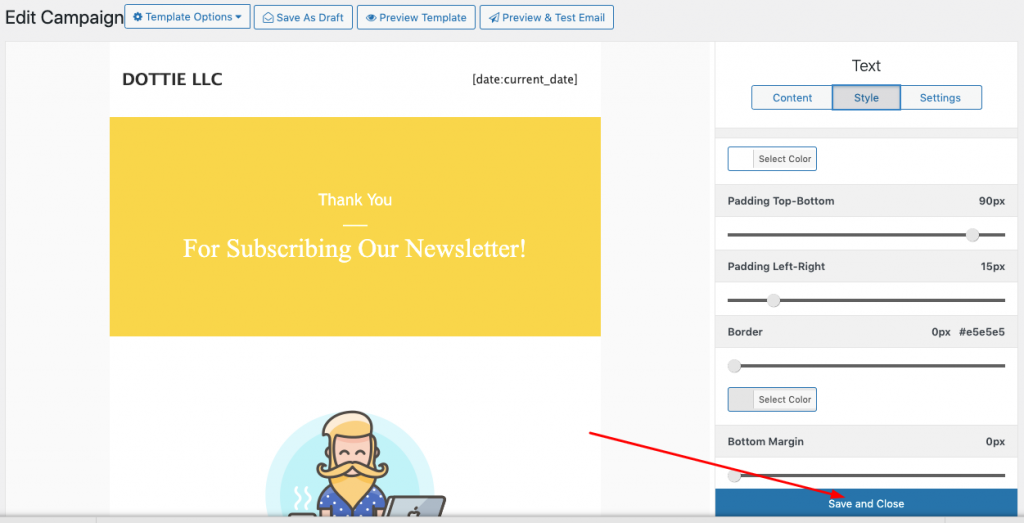
You can choose different template options, and preview your designed template before sending it. The preview and test option let you check whether your newsletter is ready and free of any visual or technical glitch.
Step 3. Sending Your Newsletter
Well, we are almost there to the final part – Sending. After you complete your customizing and previewing, you can go for setup your sending option.
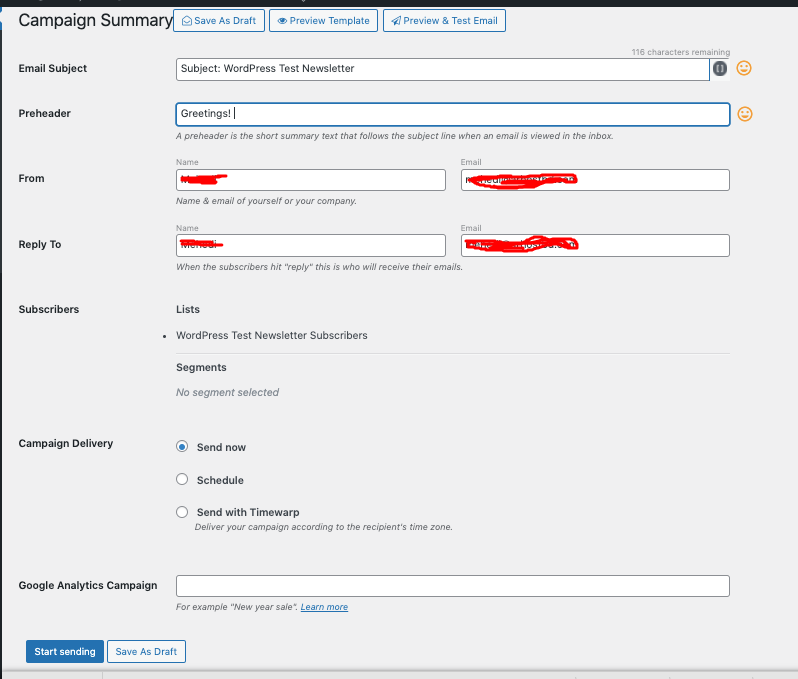
In this final part, you need to write down your newsletter subject line and preheaders. It will show you which list you have selected and whether they are segmented or not.
Also, there are three sending options to choose from. You can send your WordPress newsletter campaign right now, or schedule it. There is another option named Timewarp, it will help you to send a campaign following a user’s specific timezone.
And finally, click on Start Sending.

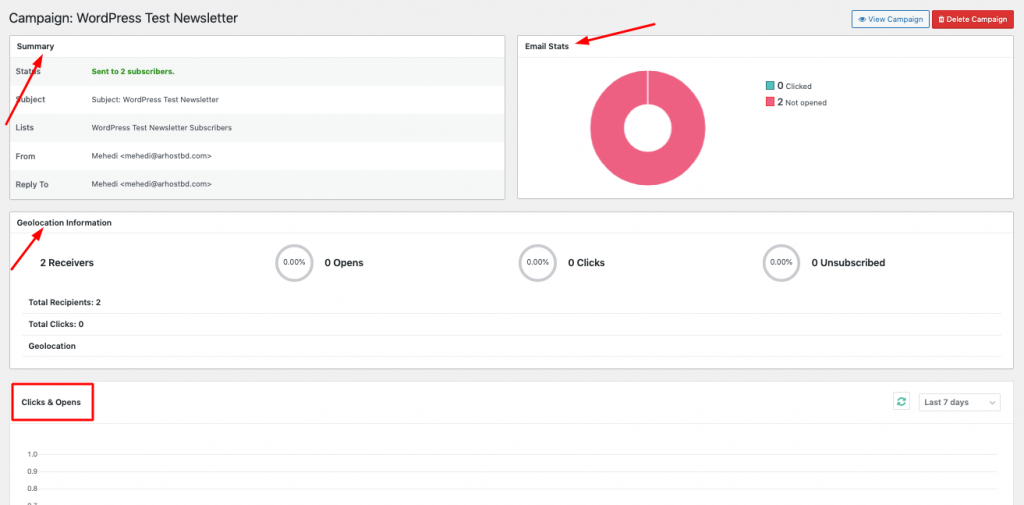
Now that you are sending your WordPress newsletter campaigns, you can easily track your progress and report with weMail Analytics.
Also Read: All-New Advanced Email Automation Launched by weMail
How To Build A Subscriber List with a WordPress Newsletter Plugin
There is no better method than using various forms, pop-ups, and funnels to grow your email list. As you are already gearing up with weMail in WordPress, it’s only a matter of time to fill your lists with real people and prospects. Hence, weMail also offers list management services and a welcome email sequence which helps a lot to maintain better relationships with your leads.
Well, to create a manual list, go to your WordPress dashboard and then click on weMail. Then go to the list option.

Now, click on “add new” to create a new list. Give a name to the list, and add a description. And, you are done creating your email list. Whenever you create an optin form or a way to increase subscribers, you can select any of the lists you have created, that’s how you will be growing it gradually.
Therefore, you can import an existing email list to add up to your current list anytime you want.
Creating a List by Using an Optin Form
Using an optin form is one of the best ways to grow your email list. With email, the job is even easier. Just follow through the below steps –
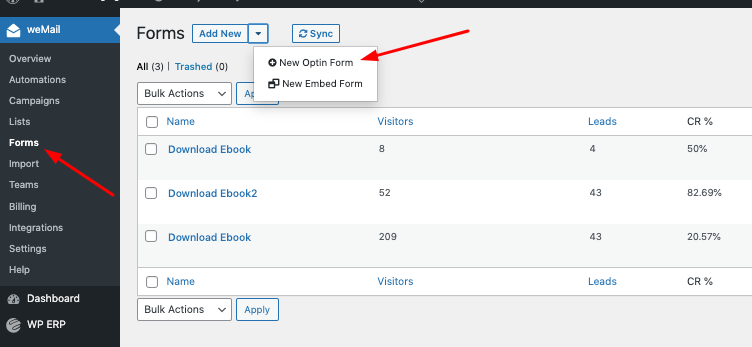
1. Go to forms from your weMail menu.
2. Click on Add new. And select the New optin form.
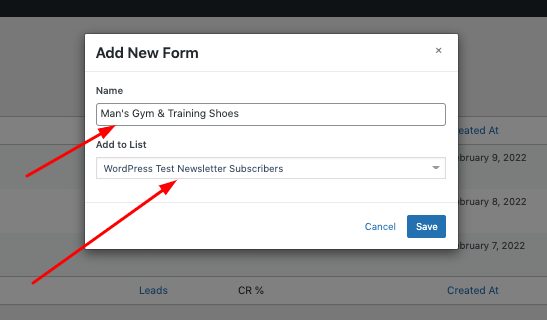
3. Choose a premade template you like.
4. Write a name (Anything aligned with your newsletter campaign), and select the email list you want to add your subscribers to.
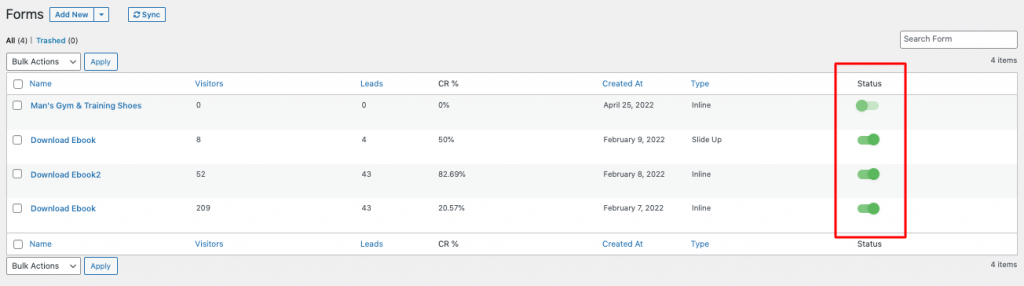
4. Start Customizing. And Save it. You can activate the form or deactivate following your plan.
While creating your optin form, you can follow some crucial tips we’ve sorted out for you.
- Place the optin form on the sidebar of your site, or you can use a modal and floating bar. weMail have all the display option you need.
- Don’t ask for too much information
- Use attractive CTAs on your site, blog, or videos.
You can include the optin form on all the pages you want. Hence, the best way is to include it on all the right landing pages. For example, If it were for the blog subscription, you can set it only on the blog pages.
FAQ on How to Use Newsletter Plugin in WordPress
1. What is a Newsletter Plugin
A newsletter plugin is an automated email marketing software. It helps you to send strategic and generic email marketing campaigns or newsletters to people who have subscribed to your email list. A newsletter plugin is easily integrable with your WordPress site. For example, a Newsletter plugin like weMail comes for free, and it also offers premium plans for advanced users.
2. How do I set up a Newsletter Plugin
Go to your WordPress dashboard, search for weMail, and install and activate it. Go for the setup process, add subscribers to your list, and customize your newsletter before sending the email campaign. Check this guide to getting started with the weMail Newsletter Plugin. Watch the video to learn more.
3. Does WordPress Has a Newsletter Plugin
Yes. WordPress repository has a lot of suitable newsletter plugins for you. Here’s a list of some of the best newsletter and email marketing tools right now.
Final Thoughts
So there you go. Using a WordPress newsletter plugin is not that complex task. All you need is to understand how a newsletter plugin works, and which plugin suits your business most. The rest followed only some extent of process and steps.
From choosing a plugin, installing it, creating an email list, to sending newsletters – you should care about your goal, that’s all. Hence, when you have a WordPress newsletter plugin like weMail, you can enjoy a hassle-free experience.
Have some further questions in mind? Let us know in no time.


1Comments
Vishwas
Love your content