5 Simple Design Tips to Make Your Emails Look Professional (No Designer Needed)

Picture this: You’re scrolling through your inbox, and two emails catch your eye. One looks like it was slapped together in five minutes with mismatched fonts and colors that hurt your eyes. The other? Clean, polished, and screams “professional business.”
Which one are you more likely to trust with your money?
Here’s the thing – professional email design isn’t about having a massive budget or years of design school under your belt. We’ve seen countless WordPress users transform their amateur-looking emails into polished, conversion-driving machines using nothing more than smart choices and free tools.
The difference between emails that get deleted and emails that get results often comes down to five simple design principles. No designer required, no expensive software needed. Just practical tips that work whether you’re running a small business, launching a side hustle, or managing marketing for your company.
Ready to make your emails look like they cost thousands when they actually cost nothing? Let’s dive into the five design secrets that’ll have your subscribers thinking you hired a professional team.
Why Professional Email Design Matters (Even on a Budget)

We get it – you’re probably thinking, “Does email design really make that big of a difference?”
Short answer: absolutely.
Studies show that people form an opinion about your email (and by extension, your business) within 50 milliseconds of opening it. That’s faster than you can say “professional email layout.” If your email looks thrown together, subscribers assume your business is too.
But here’s where most advice gets it wrong. You don’t need to spend hundreds on a designer or invest in expensive design software. We’ve watched small businesses increase their email click-through rates by 40% just by applying basic design principles using tools they already had.
The real cost isn’t hiring a designer – it’s losing customers because your emails look unprofessional. Every time someone opens your email and immediately thinks “spam” or “amateur,” you’re losing potential revenue. That’s money walking out the door because of design choices that take five minutes to fix.
WordPress users have a particular advantage here. You already understand good web design principles from managing your site. Email design follows many of the same rules – clean layouts, consistent branding, and user-friendly navigation.
The best part? Once you nail these five design principles, every email you send reinforces your professional image without any extra work.
The 5 Professional Email Design Tips
- 1 Master the Art of Visual Hierarchy (Your Reader’s GPS)
- 2 Choose Colors Like a Pro (Using Free Tools You Already Have)
- 3 Typography That Doesn’t Scream “Amateur Hour”
- 4 White Space Is Your Secret Weapon
- 5 Images That Elevate (Without Breaking the Bank)
Tip 1 – Master the Art of Visual Hierarchy (Your Reader’s GPS)
Ever wonder why some emails feel effortless to read while others make your brain work overtime? It’s all about visual hierarchy – basically creating a roadmap that guides your reader’s eyes exactly where you want them to go.
Think of your email like a newspaper front page. The biggest headline grabs attention first, subheadings break up the content, and everything flows logically from most important to least important. We call this the “inverted pyramid” approach, and it works like magic for email design without a designer.
Here’s how to nail it:
Start with your most important message above the fold. This is the content people see before scrolling – usually the top 300-400 pixels on mobile. Put your main offer, announcement, or value proposition right here. Don’t bury the lead in paragraph three.
Use size to show importance. Your headline should be the biggest text element, followed by subheadings, then body text. It sounds obvious, but you’d be surprised how many emails treat everything as equally important (spoiler: nothing is equally important).
Create visual breathing room between sections. White space isn’t wasted space – it’s your friend. We’ve seen cluttered emails get 25% fewer clicks than the same content with proper spacing.
Guide the eye with strategic placement. People read in a Z-pattern (top left, across, down diagonally, then across again). Place your most important elements along this path.
The magic happens when readers don’t have to think about where to look next. They just naturally flow through your content, hit your call-to-action, and click. That’s visual hierarchy working exactly as designed.
Professional tip: Squint at your email design. The elements that stand out when your vision is blurred? Those are your hierarchy winners.
Tip 2 – Choose Colors Like a Pro (Using Free Tools You Already Have)

Colors make or break your professional email design faster than anything else. We’ve all seen those rainbow emails that look like a unicorn exploded – don’t be that sender.
The secret professionals use? The 60-30-10 rule. Pick three colors max: 60% neutral (white, light gray, or soft background), 30% your brand color, and 10% accent color for buttons and highlights. That’s it. Simple, clean, professional.
Start with your existing brand colors. If you already have a website or logo, use those colors in your emails. Consistency builds trust, and trust drives sales. Your subscribers should instantly recognize your emails as yours, even before reading your name.
Don’t have brand colors yet? No problem. Head to Coolors.co (completely free) and generate palettes until one feels right for your business. We recommend starting with one strong color you love, then letting the tool suggest complementary options.
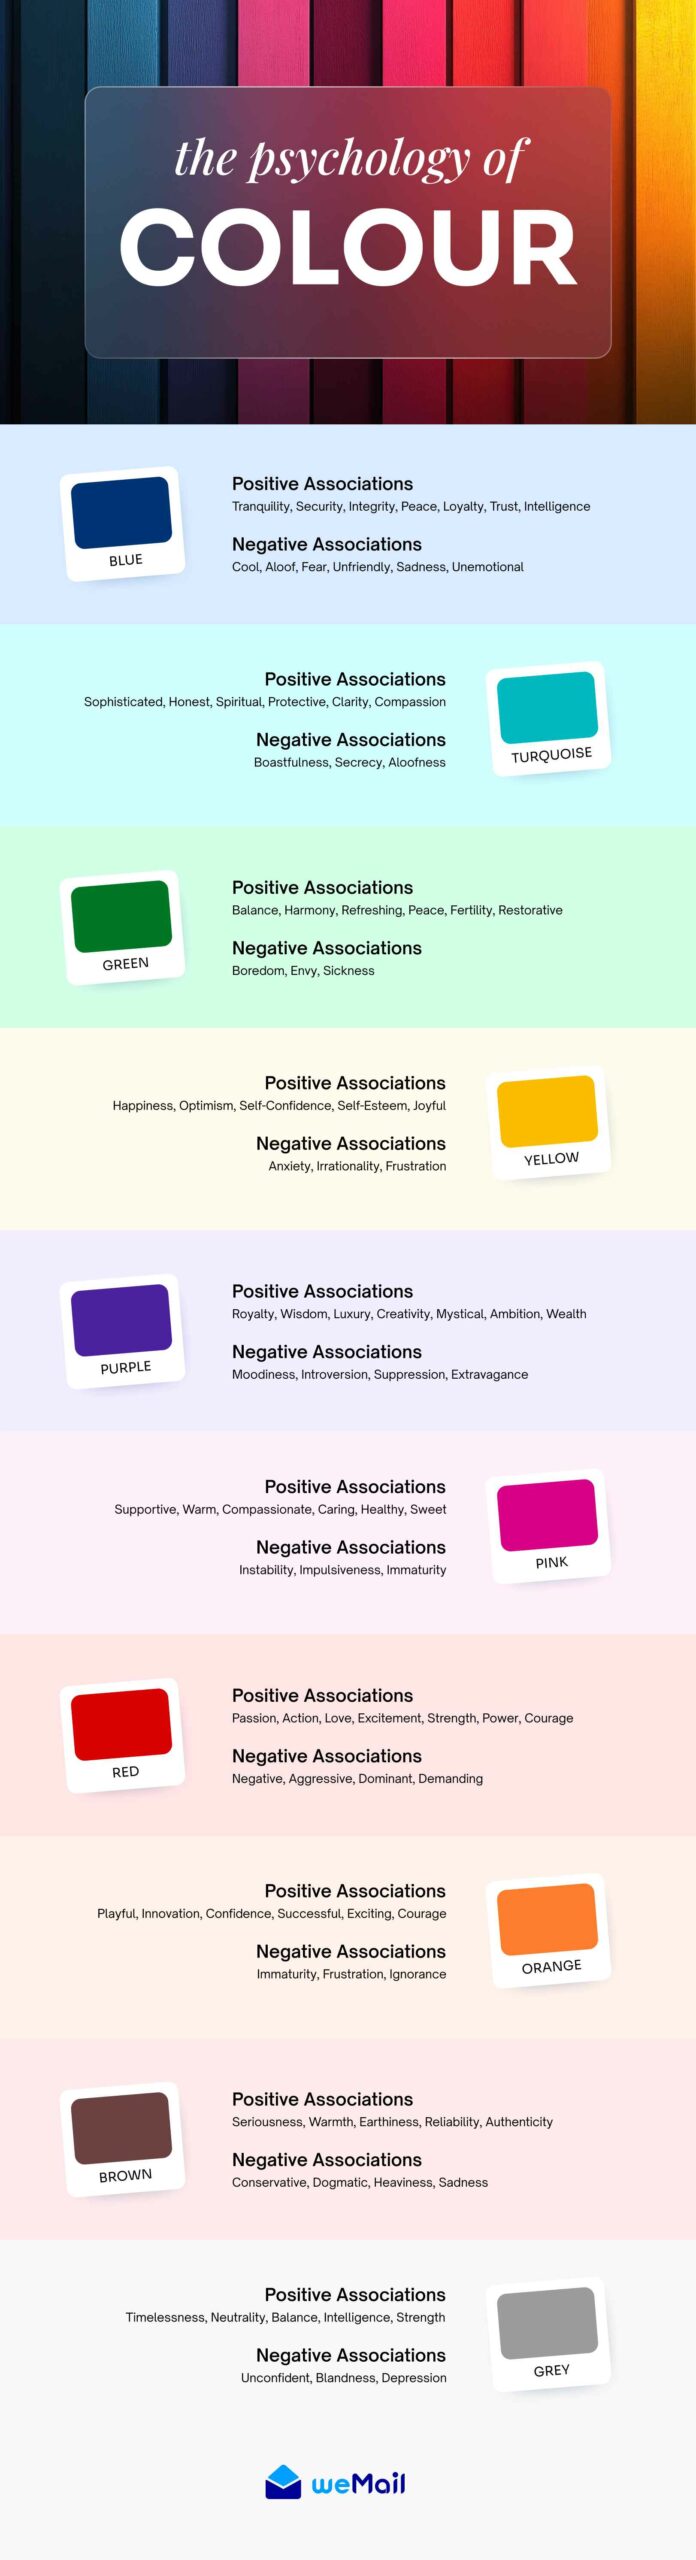
Here’s the color psychology shortcut: Blue builds trust (think banks and tech companies), green suggests growth and money (perfect for financial advice), red creates urgency (great for sales), and purple feels premium (luxury brands love it). Pick the emotion you want to trigger, then build from there.
Test your colors on different backgrounds. What looks great on your white computer screen might be invisible on someone’s dark-mode mobile phone. Always check contrast – your text needs to be readable in all conditions.
Pro move: Once you pick your colors, stick with them for at least 6 months. We’ve seen businesses confuse their subscribers by constantly changing color schemes. Consistency equals professionalism, and professionalism equals trust.
The goal isn’t to win design awards – it’s to look intentional and trustworthy. Three colors, used consistently, will make you look more professional than 90% of the emails in any inbox.
Tip 3 – Typography That Doesn’t Scream “Amateur Hour”

Nothing screams “I made this in five minutes” like mixing Comic Sans with Times New Roman in hot pink. We see this all the time, and it hurts every time.
Typography is where most DIY email designers go wrong, but it’s actually the easiest fix. Follow one simple rule: two fonts maximum. One for headlines, one for body text. That’s it. Professional designers have been using this approach for decades.
Stick to web-safe fonts that work everywhere. Arial, Helvetica, Georgia, and Verdana might seem boring, but they’re reliable. They load fast, look clean on every device, and never cause weird formatting issues. We’d rather have “boring” fonts that everyone can read than fancy ones that break on mobile.
Size matters more than you think. Your body text should be at least 14px for mobile readability – 16px is even better. Headlines can be 24px or larger. If your subscribers need reading glasses to see your content, they’ll just delete it instead.
Line spacing is your secret weapon. Cramped text looks amateur and hard to read. Set your line height to about 1.4 times your font size. So if you’re using 16px text, use roughly 22px line spacing. This simple change makes everything look more professional instantly.
Keep your brand personality in mind. Serif fonts (like Georgia) feel traditional and trustworthy – great for financial advice or professional services. Sans-serif fonts (like Arial) feel modern and clean – perfect for tech companies or creative businesses.
Mobile-first thinking wins. More people read emails on phones than computers, so test everything on a small screen first. If it’s readable on mobile, it’ll look great on desktop too.
The best email typography is invisible – readers focus on your message, not your font choices. When typography works right, people don’t notice it at all.
")
Subscribe for email
marketing hacks, free
ebooks, and product updates
Tip 4 – White Space Is Your Secret Weapon
White space isn’t empty space – it’s breathing room for your content. We’ve tested this extensively: emails with proper white space get 35% more engagement than cramped ones. Yet most people are terrified of it.
Here’s why white space works: it makes everything else look more important. When you surround your call-to-action button with plenty of space, it naturally draws the eye. Cram it between paragraphs, and it disappears into the noise.
Think margins and padding. Every element in your email needs room to breathe. Text blocks, images, buttons – give them all at least 20-30 pixels of space around them. It might feel like you’re “wasting” space, but you’re actually making everything more readable.
Break up long content blocks. Nobody wants to read a wall of text in their inbox. Use short paragraphs (2-3 sentences max), bullet points, and section breaks. Each chunk of content should have clear separation from the next.
Strategic white space guides attention. Want people to notice your discount code? Surround it with white space. Need them to click your button? Give it room to stand out. White space is like a spotlight – it makes important elements pop.
Mobile devices love white space even more. Thumbs are bigger than mouse cursors, so mobile users need extra space around clickable elements. What looks fine on desktop can be impossible to tap on a phone.
The professional secret? Good white space feels intentional, not accidental. Every gap should serve a purpose – separating ideas, highlighting important content, or making navigation easier.
Remember: people scan emails more than they read them. White space makes scanning effortless, which means more people actually consume your content.
Tip 5 – Images That Catch the Eye (Without Breaking the Bank)
The right image can make your email look like a million bucks. The wrong one screams “I grabbed the first free stock photo I could find.” We’ve seen businesses transform their entire email perception just by upgrading their image strategy.
Ditch the obvious stock photos. You know the ones – overly happy people pointing at laptops, handshakes in boardrooms, diverse groups laughing at salads. These images instantly signal “generic business content” to your readers.
Instead, try these budget-friendly approaches: Use your actual products, behind-the-scenes shots of your workspace, or simple graphics you create in Canva. Authentic beats polished every time. We’ve seen handmade graphics outperform expensive stock photography consistently.
Optimize for mobile first. Your beautiful header image might look stunning on desktop, but if it takes 10 seconds to load on mobile, people will delete your email before seeing it. Keep images under 100KB when possible, and always include alt text for accessibility.
Create a consistent visual style. Pick a filter or color treatment and stick with it. Instagram-style consistency works for emails too. When subscribers see your images, they should instantly know it’s from you.
Strategic image placement drives action. Place your most important image near your call-to-action. People’s eyes naturally flow from images to nearby text and buttons. Use this pattern to guide readers exactly where you want them to go.
Free tools that actually work: Canva for graphics, Unsplash for high-quality stock photos, and Figma for simple layouts. These tools have everything you need to create professional-looking images without spending a dime.
The goal isn’t photography awards – it’s supporting your message and looking intentional. Better to use a simple, relevant image than a fancy irrelevant one.

Putting It All Together: Your Professional Email Checklist

Before hitting send, run through this quick audit. We use this checklist for every email, and it’s caught countless mistakes that would’ve screamed “amateur.”
Visual Hierarchy Check:
- ✓ Most important content appears first
- ✓ Headlines are larger than body text
- ✓ Call-to-action stands out clearly
- ✓ Content flows logically from top to bottom
Color and Typography Audit:
- ✓ Using maximum of 3 colors consistently
- ✓ No more than 2 fonts throughout
- ✓ All text is readable on mobile devices
- ✓ Brand colors match your website/logo
White Space and Layout:
- ✓ Every element has breathing room
- ✓ Paragraphs are short and scannable
- ✓ Clickable elements are easy to tap on mobile
- ✓ Nothing feels cramped or cluttered
Image and Media Review:
- ✓ All images load quickly
- ✓ Photos support your message
- ✓ Alt text included for accessibility
- ✓ Consistent visual style maintained
💡 WordPress Integration Tip: If you’re using weMail, these principles are built into the templates. But even with great templates, understanding these fundamentals helps you customize smartly.
The difference between amateur and professional isn’t perfection – it’s consistency and intentionality. Every design choice should have a reason.
FAQ(s) on Email Design Ideas
How do I make my emails look professional without a designer?
Focus on the fundamentals: clean typography, consistent colors, proper white space, and clear hierarchy. Professional design is more about restraint than fancy effects.
What are the best free tools for email design?
Canva for graphics, Coolors.co for color palettes, and your email platform’s built-in editor. Most modern email tools (like weMail) include professionally designed templates that follow best practices.
Can I create professional emails with WordPress?
Absolutely. WordPress email plugins like weMail integrate seamlessly with your existing workflow. You can manage everything from your familiar WordPress dashboard without learning new software.
How much should email design cost for small businesses?
With the right approach, virtually nothing. Free tools and built-in templates can create results that rival expensive custom designs. Time investment matters more than money.
What email design mistakes should I avoid?
Too many fonts, clashing colors, walls of text, tiny mobile fonts, and overly complex layouts. Simple consistently beats complicated.
Great Email design Isn’t Art, It’s a System
Professional email design isn’t about artistic skill—it’s about adopting a simple system. This approach is built on five core principles that build trust and work for every campaign you send.
Once you implement these principles, they become second nature, reinforcing your professional image with every email. Your subscribers judge your business on all touchpoints, and great design ensures you’re always putting your best foot forward.
💡 Ready to see these principles in action? weMail’s templates have professional best practices built right in, giving you a proven design system that works from day one.
Subscribe for email marketing
hacks, free ebooks, and
product updates