Introducing Top Email Gateways Integrated with weMail with Basic Configurations

Email marketing is like a blessing to develop and grow your business fast. It is arguably the cheapest marketing procedure to promote your products globally.
However, in cases, it can be a curse if you don’t know how to use it appropriately. Because not only you have to collect subscribers, but you also need to manage them properly. Also, you should send emails regularly, share content otherwise your subscribers might unsubscribe.
Don’t be panicked. You can avoid this situation easily using an email marketing solution. If you ever come across the email marketing solution called weMail, then you already know the capability of this tool.
With top email gateway integrations, weMail makes the process even easier to build and manage your email subscribers list and send them tons of email newsletters regularly. To know how this email gateway works with weMail, keep reading this article to the end.
How Email Gateways Make Process Easier to Send Unlimited Emails

The first and foremost responsibility of an email gateway is to send your bulk emails to your subscribers easily. You can send thousands of emails at a time through gateways. Moreover, you can receive, and track emails as well using an email gateway.
It allows you to track email sending statistics, including email deliveries, bounces, and feedback loop results, help you to measure the effectiveness of each email outreach. Additional insights like email open or click-through rates measure how engaged your customers are in your email communications.
Security is a big concern here while sending bulk emails. No worries! Email gateways have covered you here too. It analyzes emails for threats. If they consider the inspected emails as clean, they send them to the internal server or service for the user to receive. If they believe the emails as spam or containing a threat, they quarantine those on the email gateway itself.
So, these are how an email gateway can help you to send and track your email campaign process a lot more easier.
7 Email Gateways for weMail

The weMail has been introduced with seven email gateways so far. Each of the gateways is popular, top-rated, and comes with easy to use functionalities. You can build and manage your email lists or groups easily with these below-mentioned email gateway integrations.
- MailGun
- Postmark
- SparkPost
- SendGrid
- Amazon SES
- SMTP
- Elastic Email
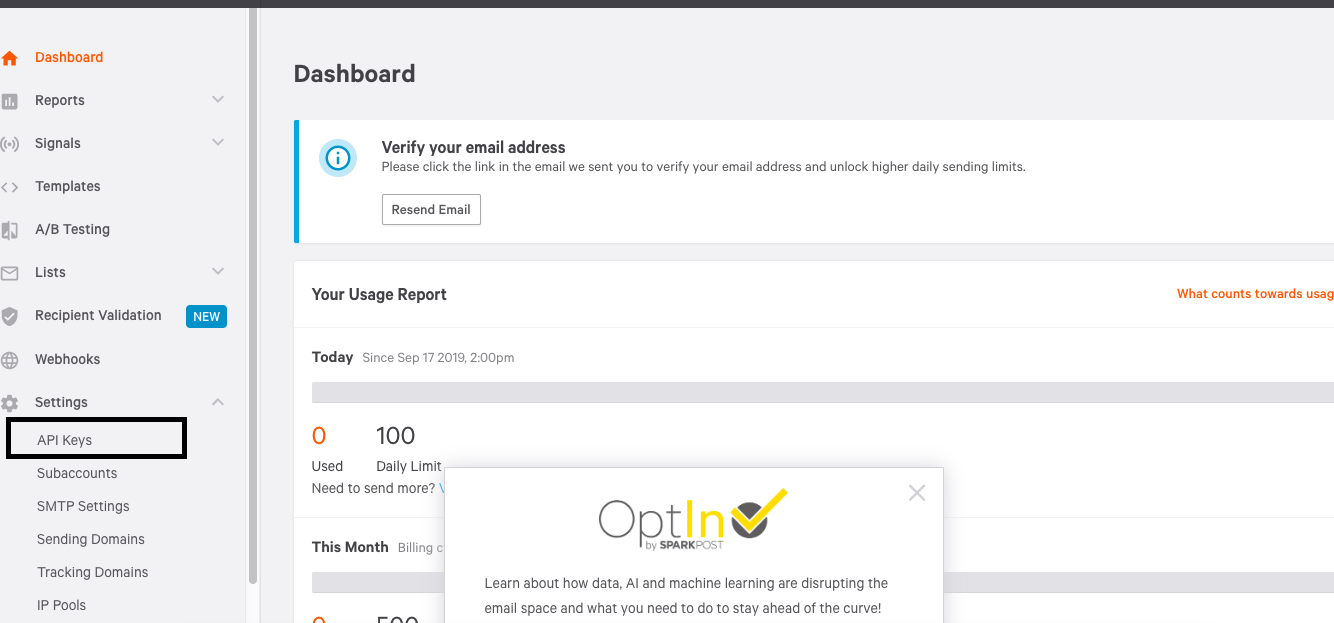
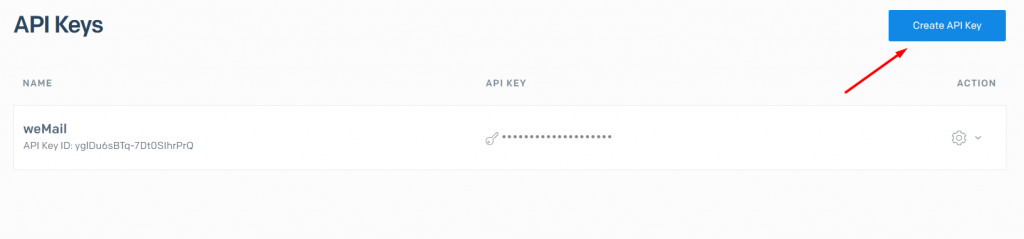
To use these gateways, go to weMail→Settings→Email, you will find all the email gateways there. Just select any of the gateways with your API Key and go ahead with configuration.
Now, we’ll see the configuration part of each of the gateways.
1- MailGun
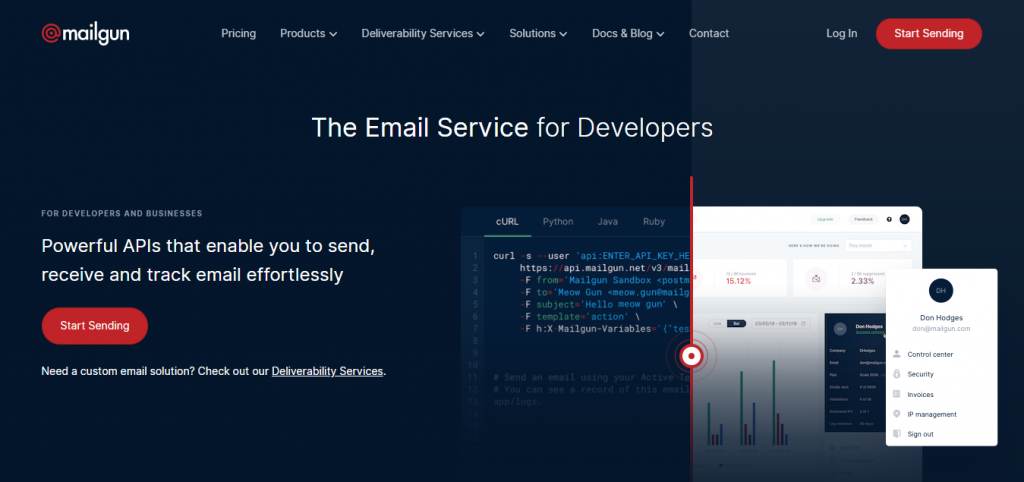
MailGun is a well known powerful transactional email API. Developers can use it to send out transactional emails, monitor their performance, and optimize emails for higher engagement rates. It also supports various programming languages like Python, Java, Ruby, and the PHP framework to help developers set up Mailgun in a familiar programming language.
How to Configure MailGun
Click on Enable MailGun. Copy the API key from your MailGun Account and paste it to use Mailgun as your gateway.
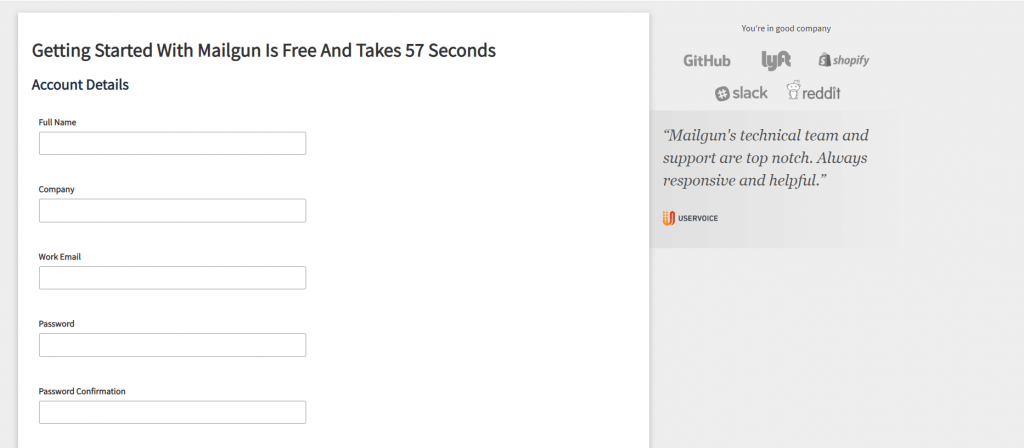
To get the API key from your Mailgun account, you have to create an account in Mailgun.
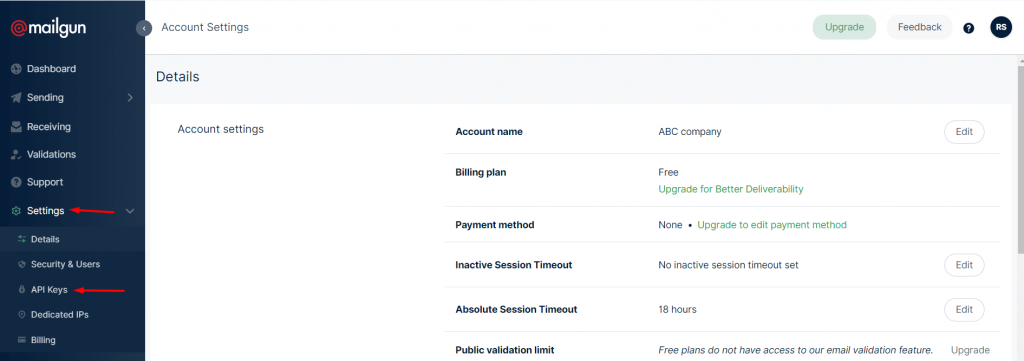
Here is the MailGun Account opening dashboard.
After opening the account, go to Settings→API Keys.
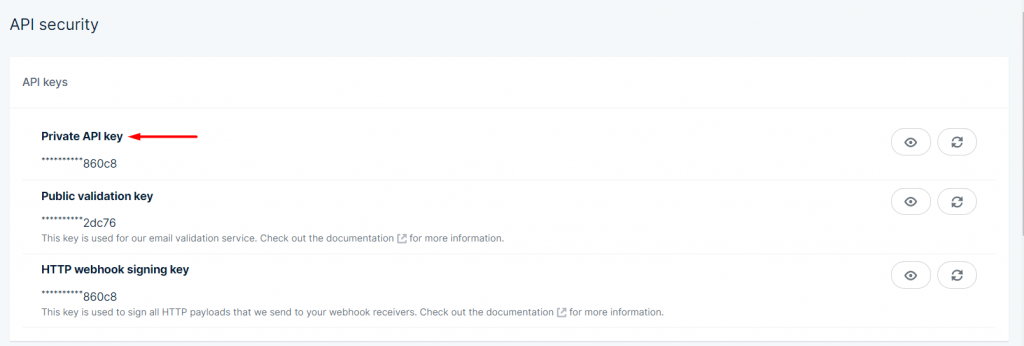
Next, copy the Private API key.
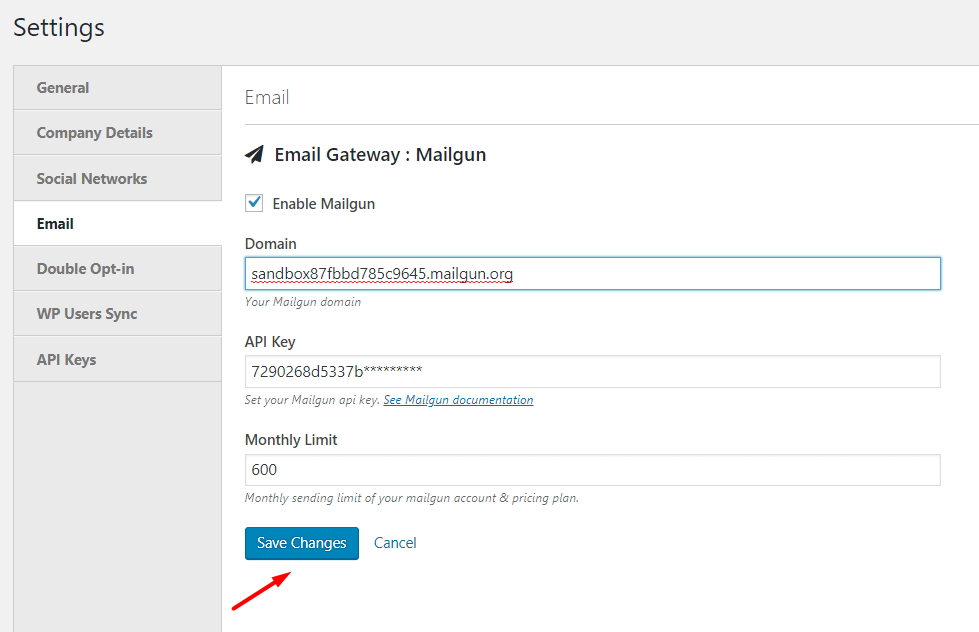
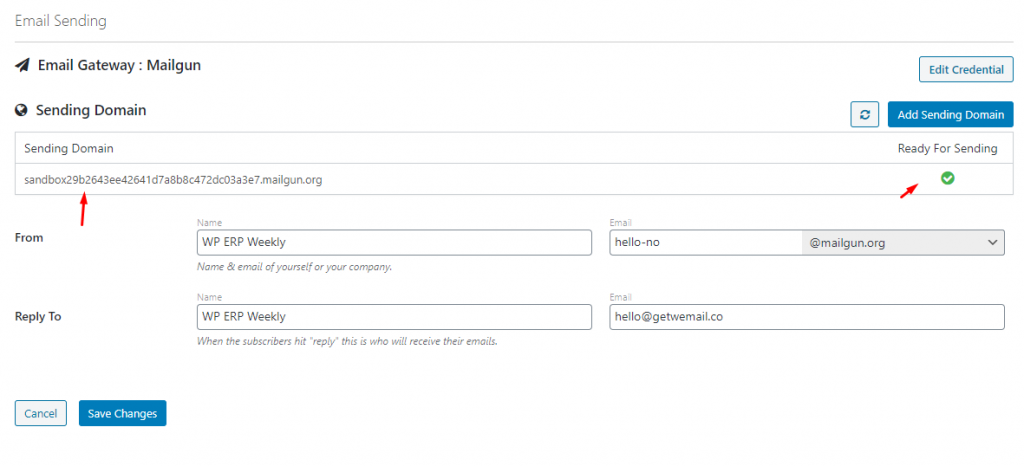
Go to weMail→Settings→Email. Click on Mailgun.
Enable Mailgun, type in your Domain name, paste the API key, set the Monthly Limit then hit on Save Changes. You are good to go.
Verifying Domain
Login to your Mailgun account, click Domains on the left-hand side and then click the green Add New Domain button.
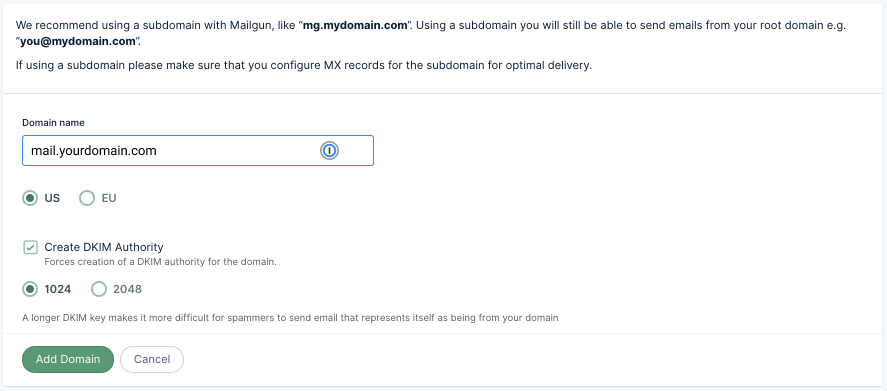
Enter your domain name into the box. Here we recommend you for using a subdomain to get a better email deliverability rate. Here, we have used mail.yourdomain.com as an example. But your use your domain name.
After you click Add Domain, you’ll be redirected to the page where you can get DNS records to your domain.
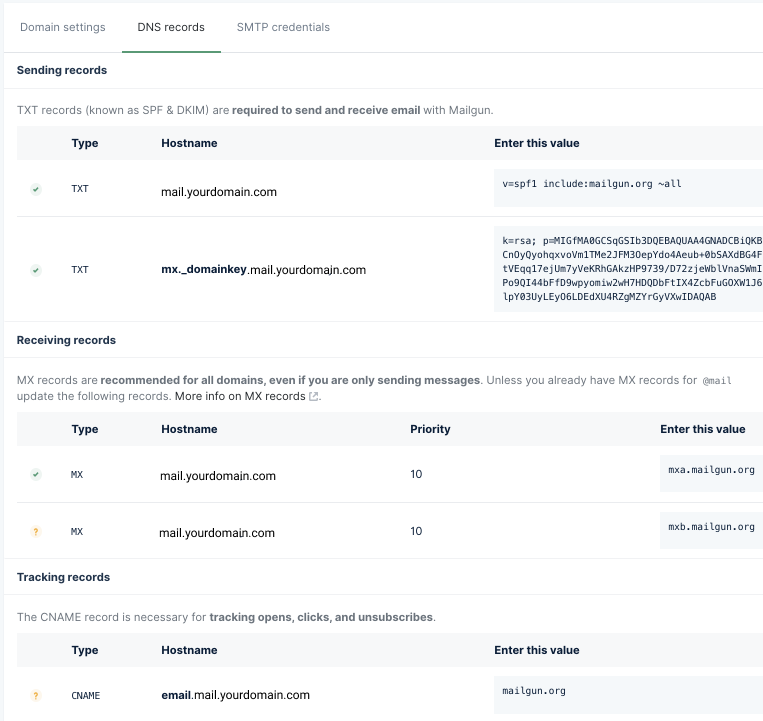
Now login to your hosting provider & navigate to the DNS section.
Now paste the Hostname & Value here and click on the Add Record.

Note: It will take up to 24 hours for DNS changes to propagate across the internet. Usually, it takes time to add the DNS record. But in case if it doesn’t happen immediately, don’t get panic.
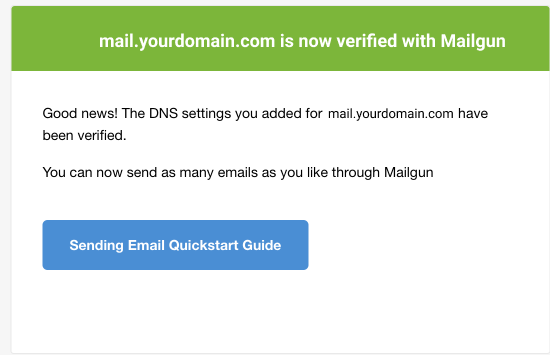
Now back to the weMail>Sending Emails. And click on the refresh button to connect with the Mailgun. And it will show the green tick mark sign.
That’s it!
2- Postmark
Postmark is an email service provider focused exclusively on transactional email delivery. By not allowing bulk promotional email, Postmark maintains one of the best delivery reputations in the industry. It automatically converts email replies into simple JSON documents and sends them into your application for processing.
It also supports various programming languages like Python, Java, Ruby, and the PHP framework for making tasks easier for developers.
How to Configure PostMark
- To get the API key first, create an account in Postmark. And then log into your account.
- After logging tap on the account page. Here you will need to click on the API Tokens page.
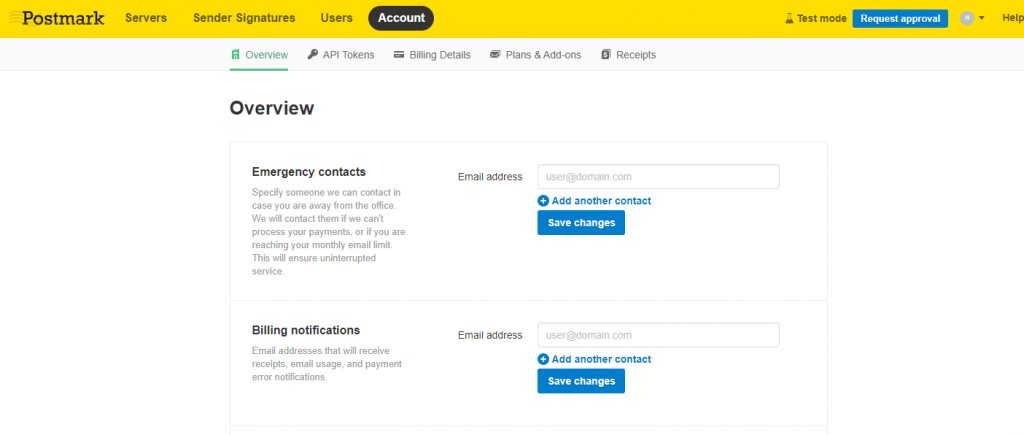
- Here you’ll need two types of API keys. Server API Token; Account API Token. So copy the tokens from here.
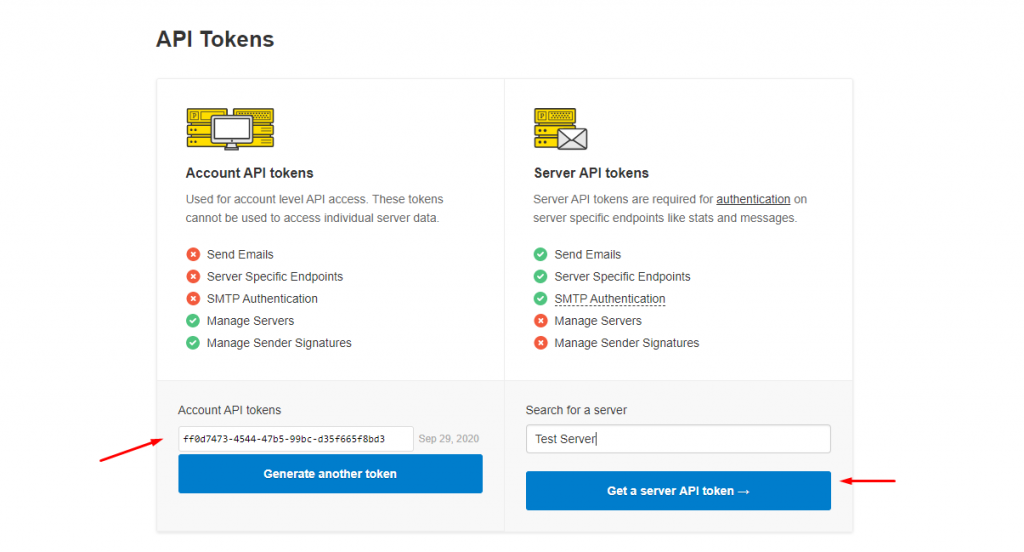
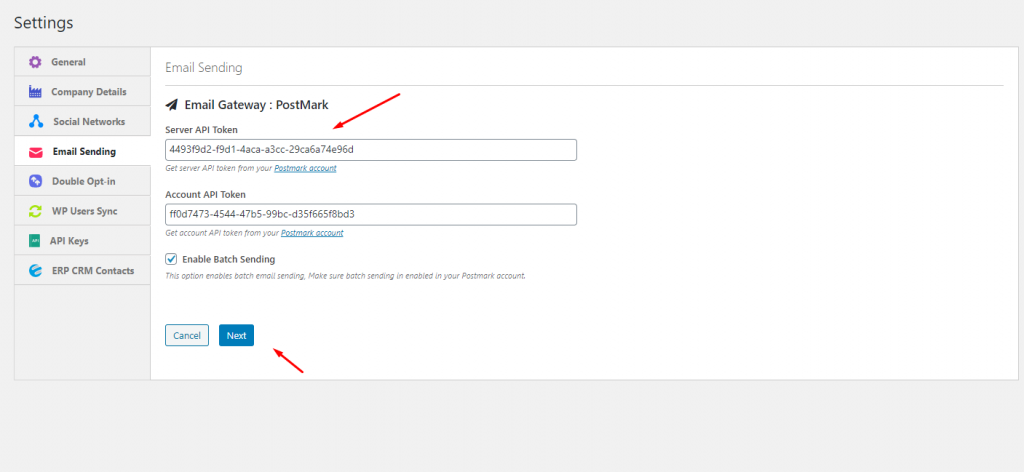
- So after copying the Server & API token, navigate to Go to weMail→Settings→Email Sending> Postmark. And here paste the tokens here and then click on the save changes.
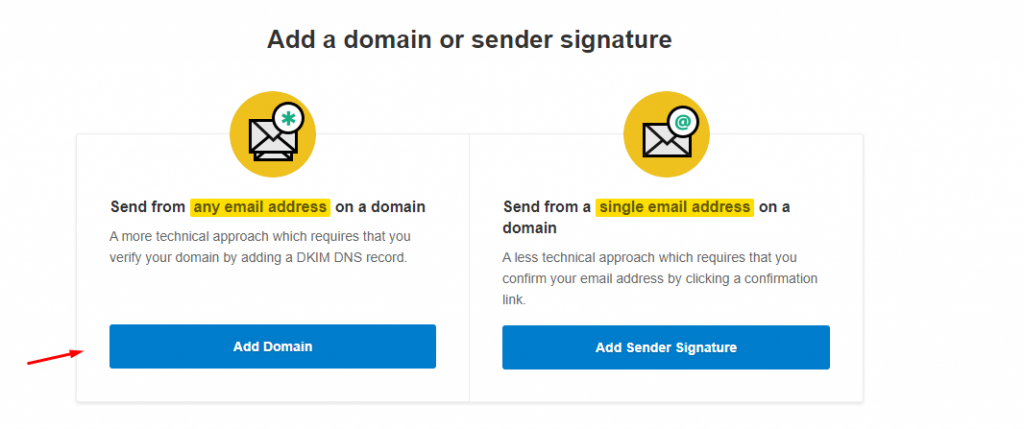
Adding & Verifying Domain
Now again ‘login‘ to your Postmark account and then navigate to Sender Signatures. Here click on the Add Domain or signature.
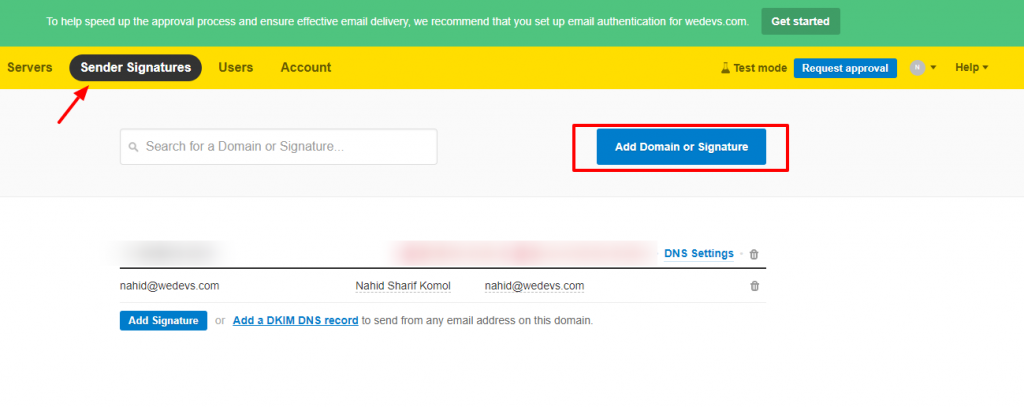
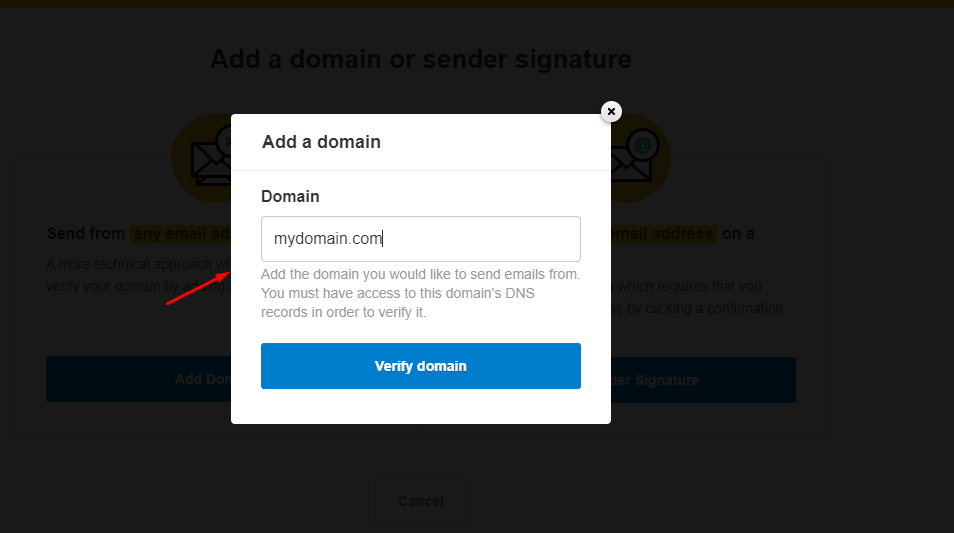
Next. click on the Add Domain
Now type your domain name here, and then click on Verify Domain.
After that Postmark will create a DKIM record that you need to add it on your DNS for verifying your.
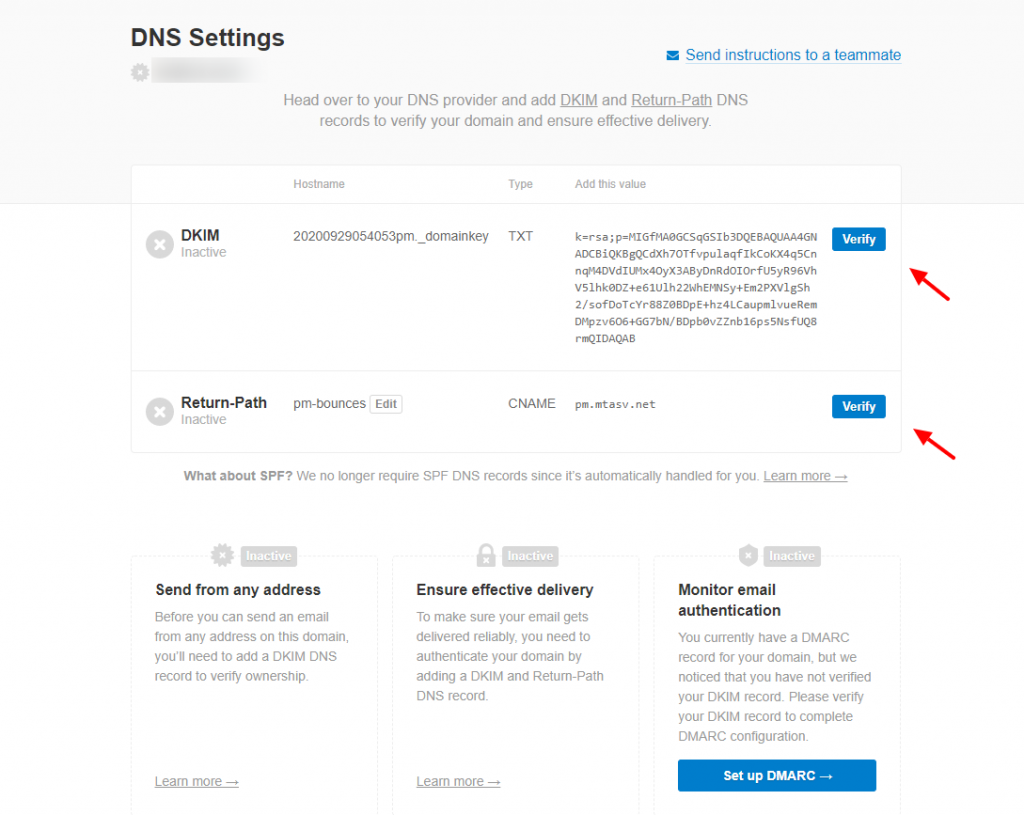
So now add the DKIM Hostname and Value to your DNS, and then choose Verify.
Note: It can take up to 48 hours for the DNS changes to propagate. After DKIM is verified, you can immediately begin sending from any email address on the domain.
After verifying the DKIM, Postmark will show a green checkmark next to the domain in your Sender Signatures.

3- SparkPost

SparkPost is an email delivery platform that helps businesses of all sizes predict and monitor ISP responses, email bounce rates, and spam traps in real-time. The inbox tracker enables marketers to create and send emails using multiple methods, including subject line prediction, blacklist monitoring, and brand impersonation protection.
Its competitive tracker allows organizations to benchmark and compares engagement metrics, subject lines, customer segmentation, and email frequencies with key business competitors.
How to Configure SparkPost
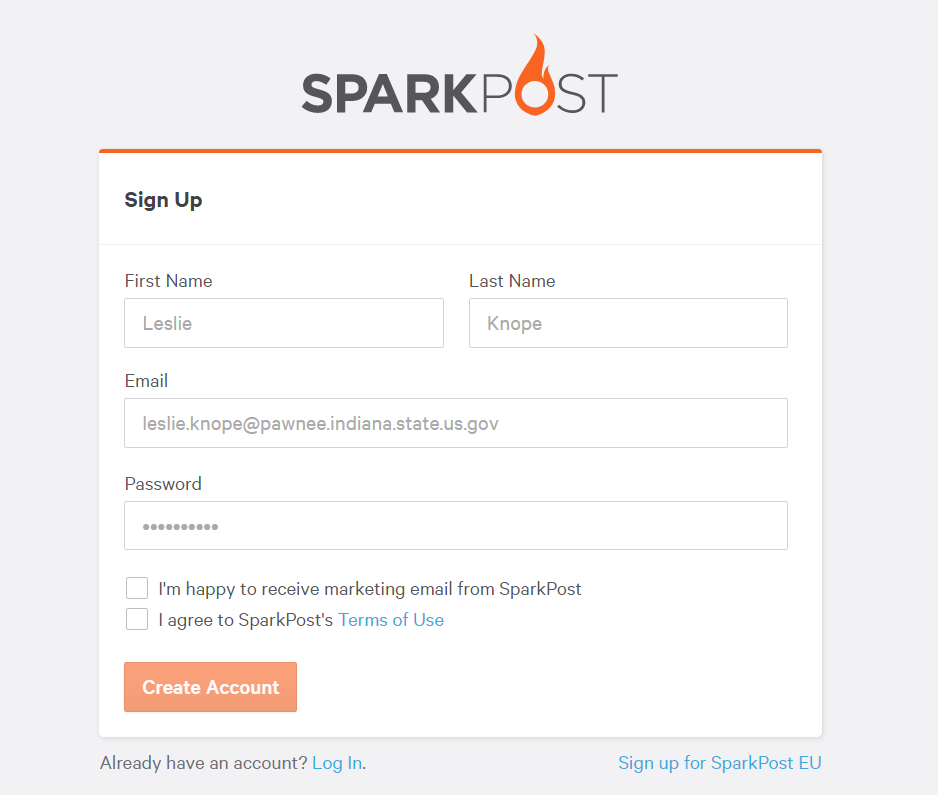
First, create an account on SparkPost.
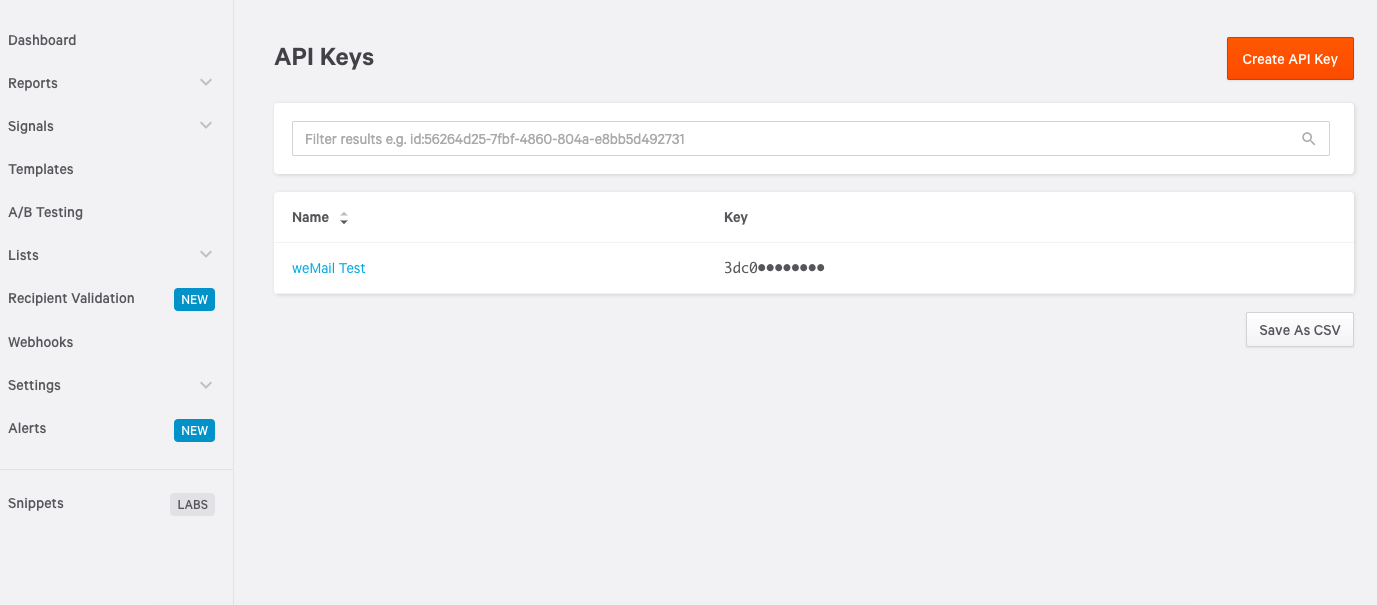
Next, go to Settings→API Keys.
Click on Create API key and your API key will be generated. Copy the API key.
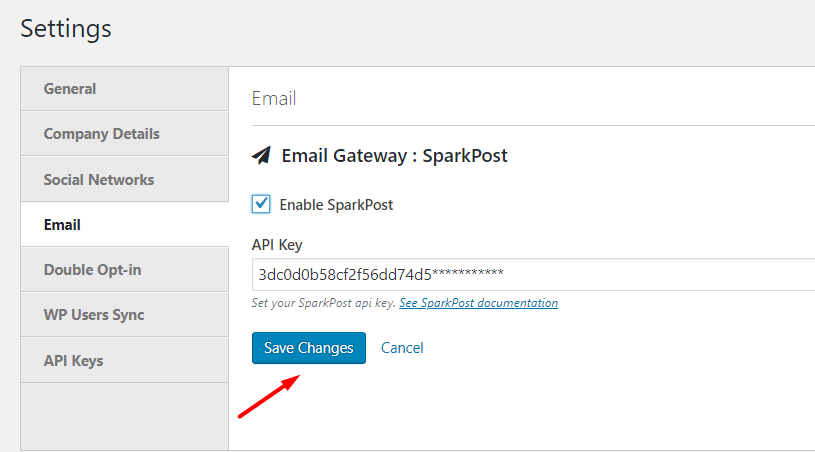
Go to weMail→Settings→Email.
Enable SparkPost and paste the API key. Then hit the Save Changes button. You are good to go.
Check out this detailed documentation on how to create the SparkPost API key.
Domain Verification
In order to send emails through the SparkPost email gateway, you need to verify your domain first.
To verify domain,
- Log in to your SparkPost account and navigate to Settings-> Sending Domains
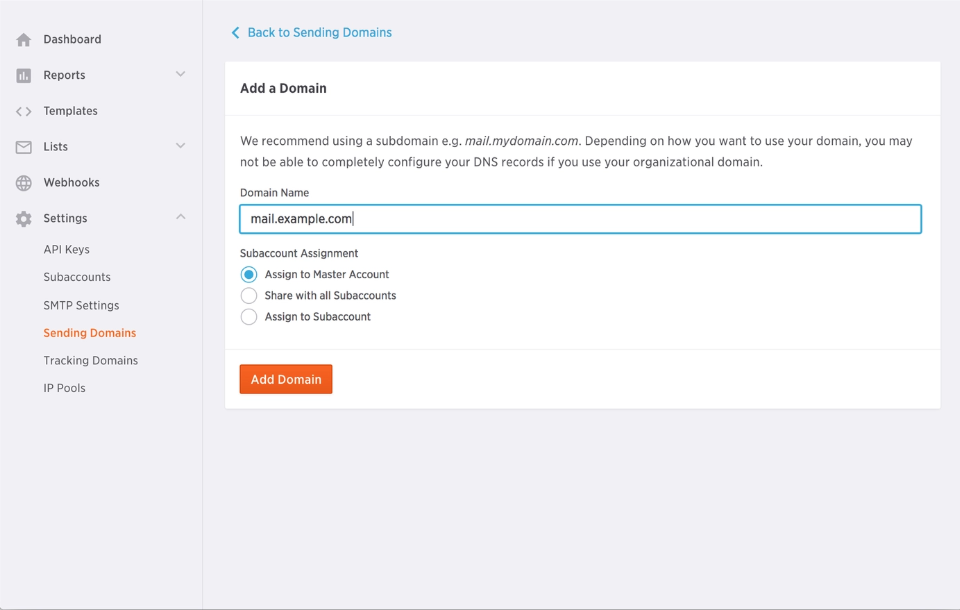
- Type your sending domain in the box, and then choose your subaccount options for the sending domain.
- In order to verify the domain, you must place the DKIM TXT record displayed in the Set Up For Sending section into DNS
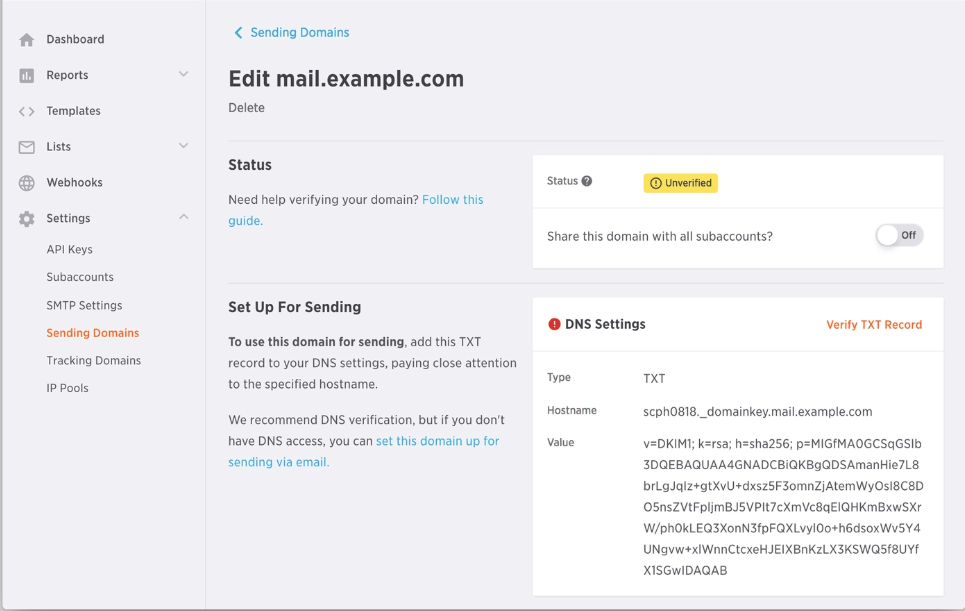
- There will be a TEXT field, and you can put the DKIM record in the text fields
- To add the DKIM record to your DNS, first copy the “Hostname” portion provided in the Set Up For Sending section of the SparkPost UI and paste it in the “Host” section of your DNS TXT record
- Next copy the “Value” portion provided in the Set Up For Sending section of the SparkPost UI and paste it in the “Value” section of your DNS TXT record
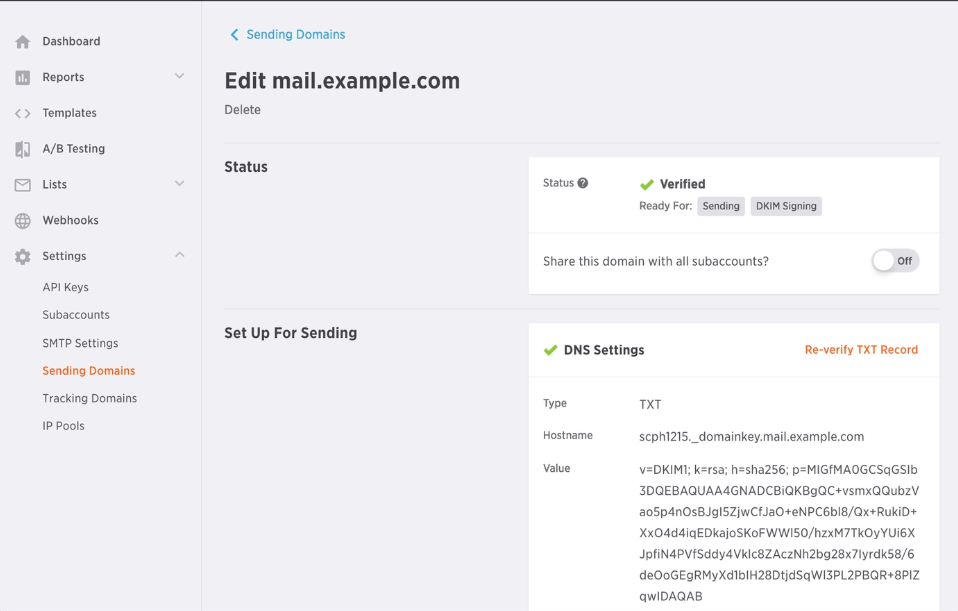
- It can take a bit of time for DKIM records to propagate. You can check the TTL (time to live) amount within your DNS provider – usually, they are beside the record type. It can take up to that time both to be propagated and ready to go. Once they do, you may click the orange “Verify TXT Record” in the UI. If the domain validates successfully, this is what it should look like:
4- SendGrid

SendGrid is a cloud-based email sending gateway that assists marketers and developers with campaign management and audience engagement. Its key features include A/B testing, mailing list management, predefined templates, image library, and reporting.
SendGrid lets marketing teams segment contacts based on engagement metrics and customer data. Further, the system includes domain authentication, compliance and ISP outreach to optimize email delivery.
How to Configure SendGrid
- First, create an account on SendGrid.
- Next, go to Settings→API Keys.
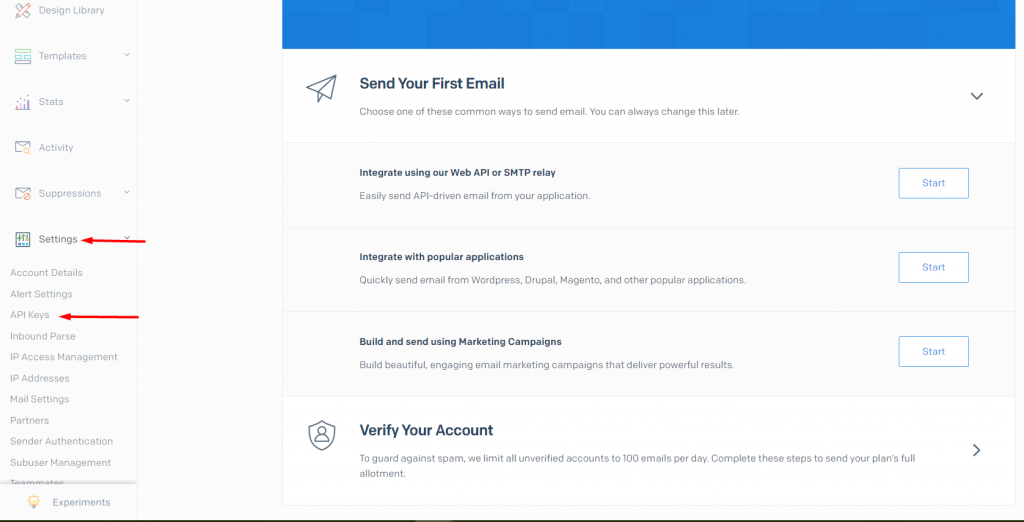
You will be directed to a page, where you can create your API key.
- Just click on Create API Key and your API key will be created. Copy the API key.
- Now go to weMail→Settings→Email.
Enable SendGrid. Paste the API key and hit Save Changes. You are good to go.
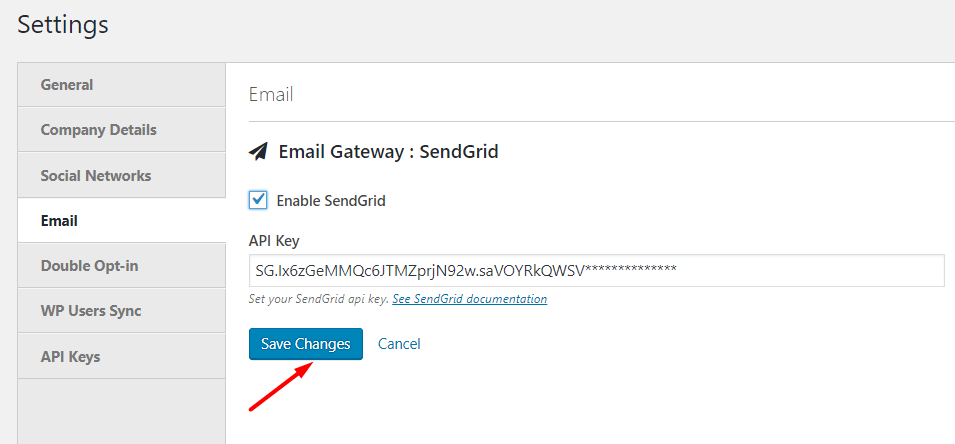
Congratulations! You’re done with SendGrid configuration.
Domain Verification
You need to setup Domain verification in order to start sending emails using the SendGrid email gateway.
You must submit the DNS records provided by SendGrid to your DNS or hosting provider
To authenticate your domain, you need to follow the below steps,
- Login to your SendGrid account and navigate to Settings-> Sender Authentication
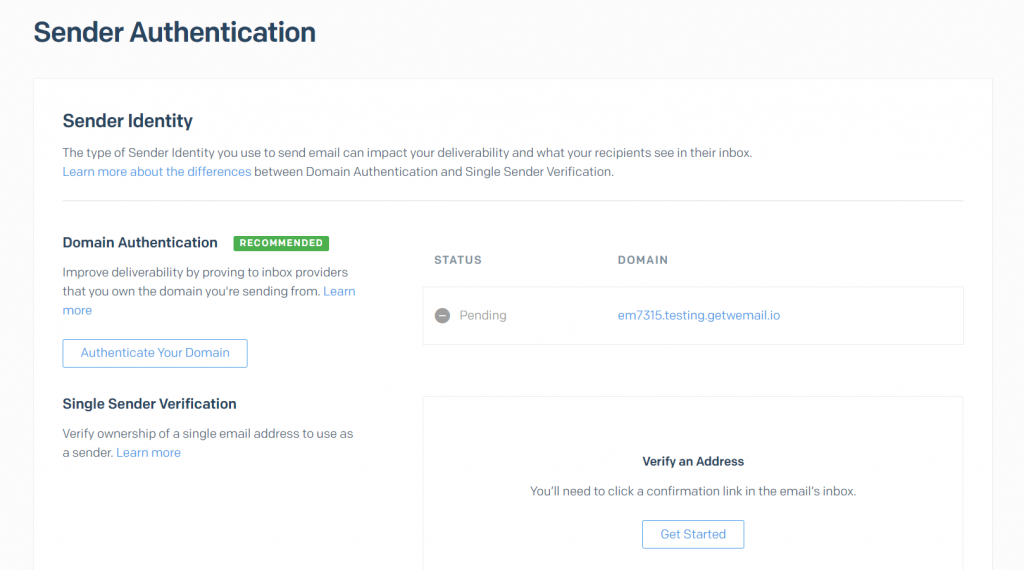
- In the domain authentication section, click Authenticate Your Domain
- Now, you need to add the information about your DNS host
- You need to add the Domain name that you are using to send emails from. Make sure you only enter the root of the Domain. Like, instead of [email protected], write weMail.com
- Next, you need to add all of the CNAME records on this screen to your DNS host. This process varies depending on your DNS host
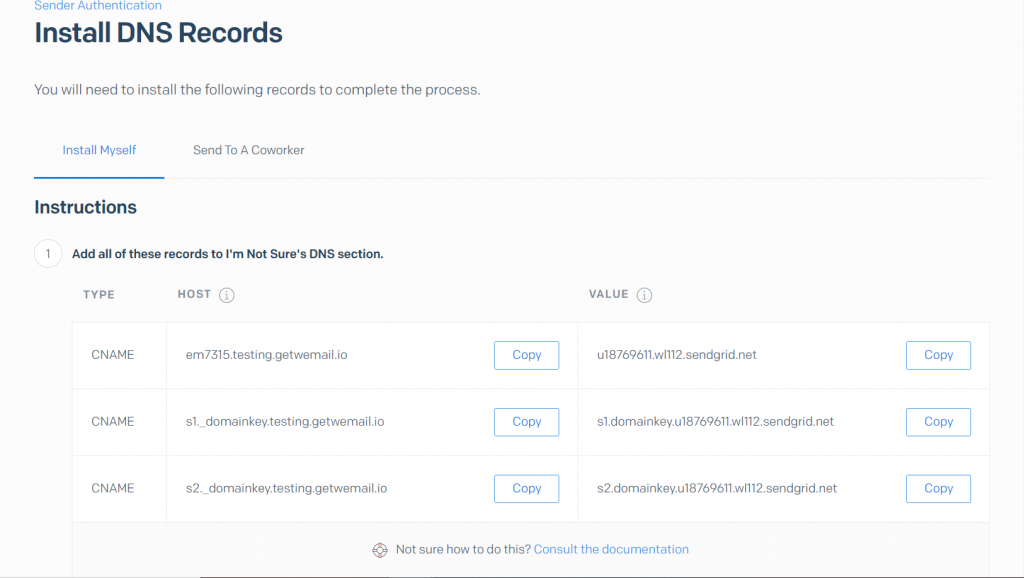
- Once you add the CNAME records to your DNS host, return to the Sender authentication page and click Verify.
It can take up to 48 hours for the records to verify after you upload them into your DNS host, so you will likely have to come back later to verify.
5- Amazon SES

Amazon Simple Email Service (SES) by Amazon Web Services is an email sending solution that helps application developers and digital marketers send transactional, marketing, and notification emails. The solution provides built-in notifications and statistics for deliveries, bounces, and complaints to optimize the campaigns.
How to Configure Amazon SES
- First, create an Amazon SES account.
- Go to your Amazon SES personal dashboard. Mouse over your to account name and go to security credentials.
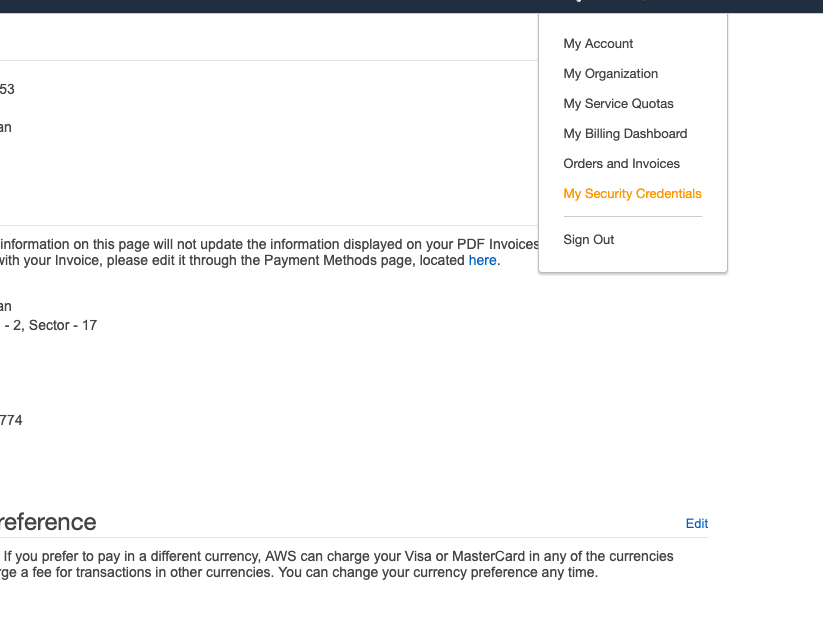
Choose IAM from the service section.
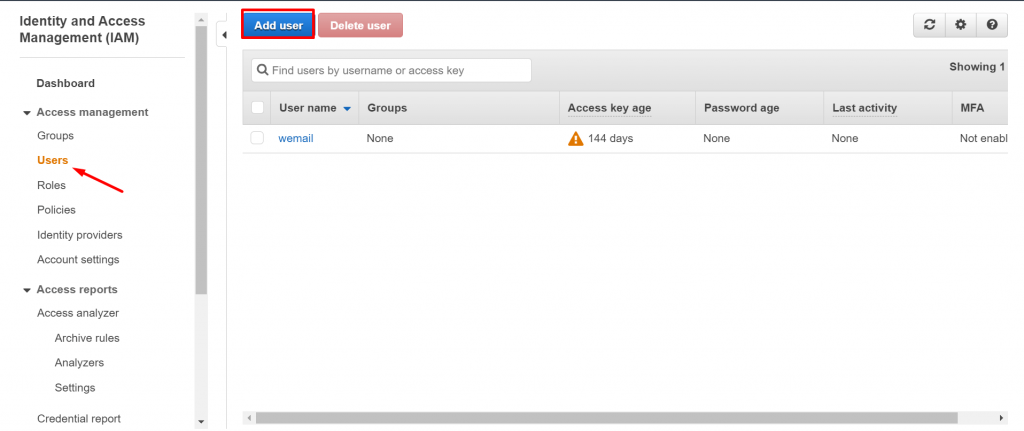
- Click on “Users” – “Add User“
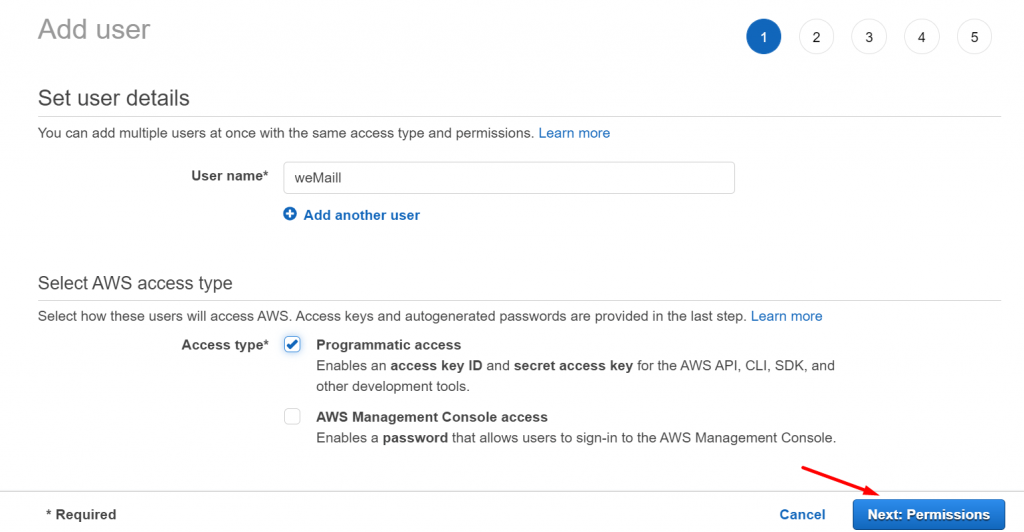
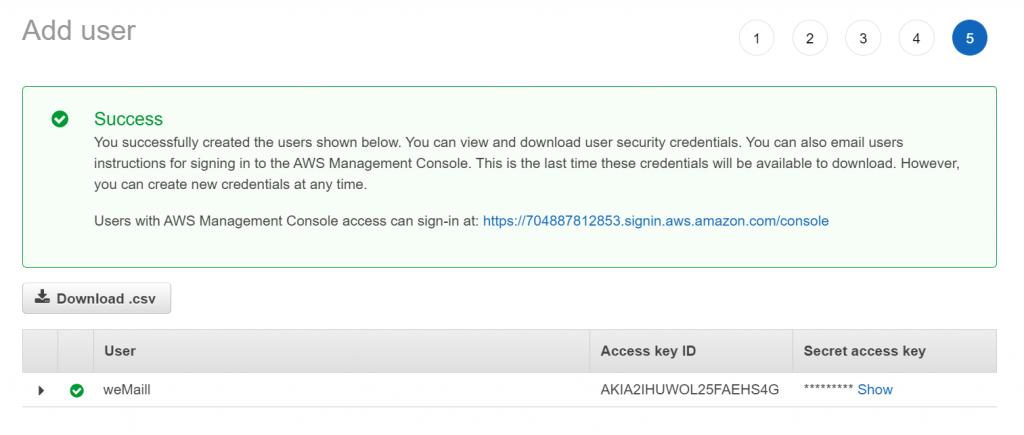
- Click on Access keys (access key ID and secret access key). Then, click Create New Access Key.
- Type a username and tick on “Programmatic Access” from Access Type and click “Next: Permissions” button at the bottom right corner
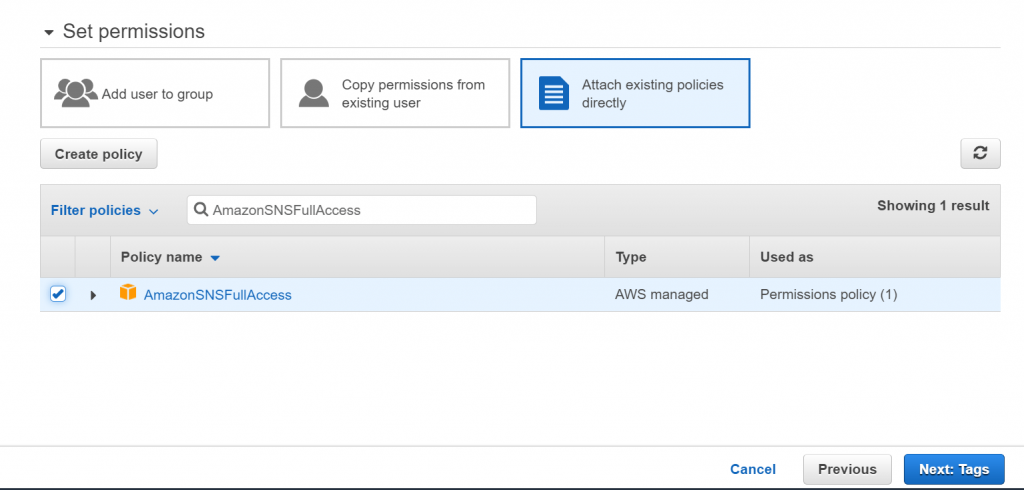
- Click “Attach existing policies directly” and then search and tick on “AmazonSESFullAccess” and “AmazonSNSFullAccess“
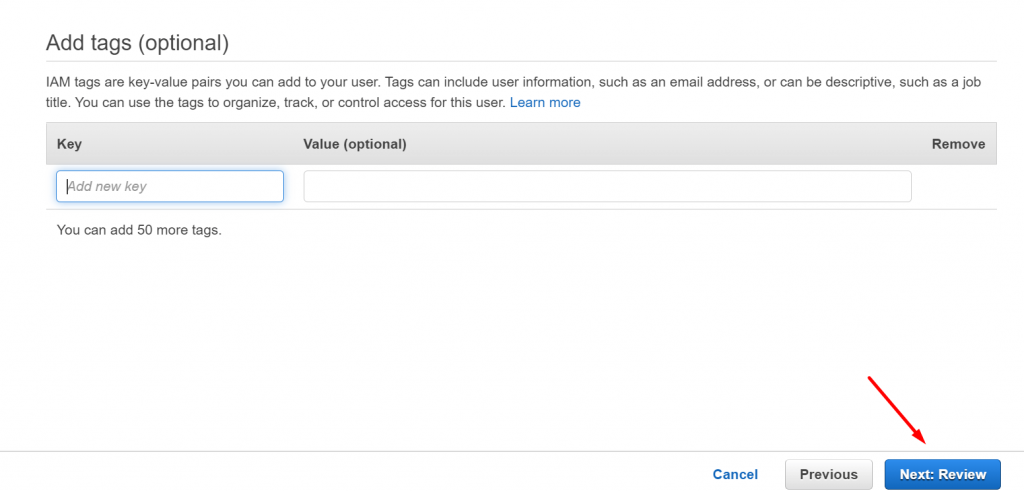
- Click “Next: Tags” button at the bottom right corner
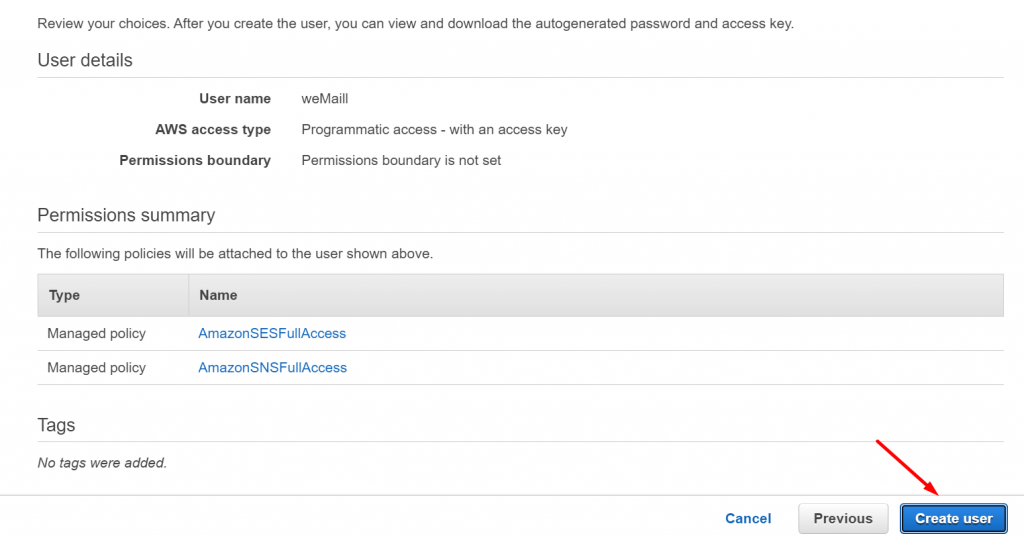
- Then click “Next: Review” button at the bottom right corner
- Click “Create: User” button and you’re done.
- Finally, Go to weMail→Settings→Email. Enable Amazon SES. Paste the Access Key and hit Save Changes. You are good to go.
Domain Verification
In order to send emails through the Amazon SES, you need to verify your domain.
To verify domain,
- Sign in to the AWS Management Console and open the Amazon SES console. In the navigation pane, under Identity Management, choose Domains
- Now, you need to click on the Verify a New Domain button
- A dialog box will appear, enter your domain name
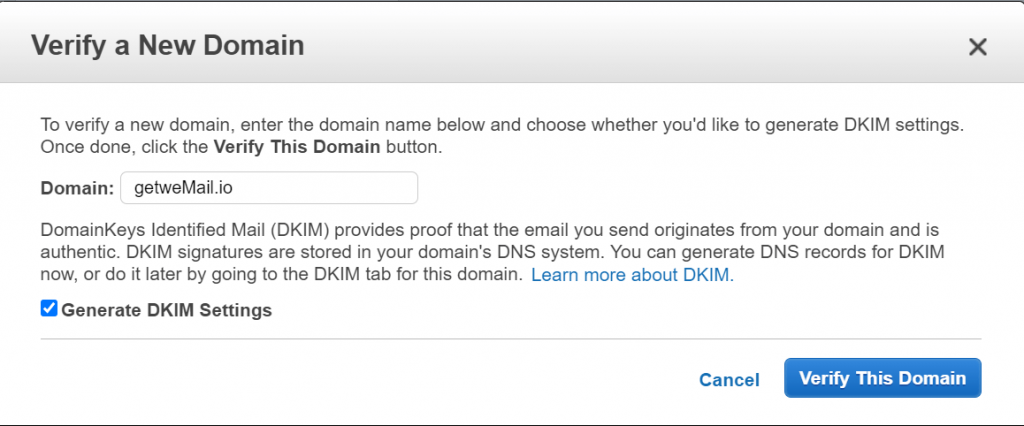
- If you want to set up DKIM signing for this domain, choose Generate DKIM Settings
- After adding the domain name click Verify This Domain
- In the Verify a New Domain dialog box, you will see a Domain Verification Record Set containing a Name, a Type, and a Value
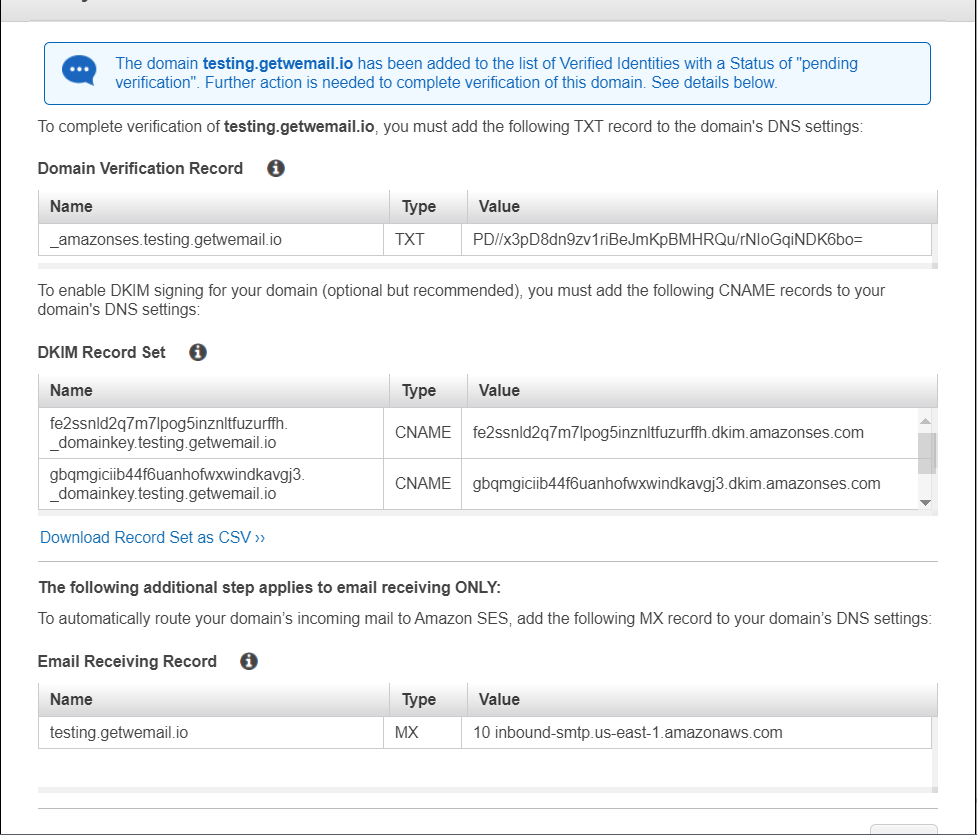
- To complete domain verification, add a TXT record with the displayed Name and Value to your domain’s DNS server
- When verification is complete, the domain’s status in the Amazon SES console changes from “pending verification” to “verified,” and you receive a notification email from Amazon SES.
You can now use Amazon SES to send email from any address in the verified domain. To send a test email, check the box next to the verified domain, and then choose Send a Test Email.
6- SMTP

Simple Mail Transfer Protocol (SMTP) is a protocol for sending-transferring e-mail messages among servers. Most e-mail systems that send mail over the Internet use SMTP to send messages from one server to another. With weMail, you can use SMTP as your gateway.
How to Configure SMTP
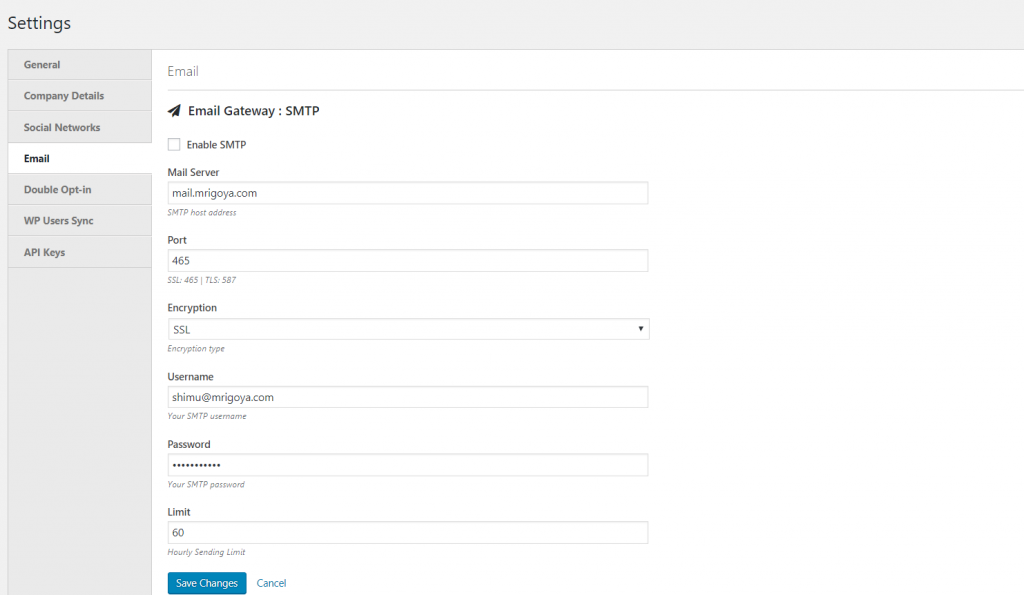
- Go to weMail→Settings→Email
- Click on SMTP
- Enable SMTP
- Type your Outgoing Mail Server. Port number
- If it is SSL/TSL, the port number will be 465 and if it’s not the port number will be 587
4. Type your username and password.
5. Hit Save Changes, and you are good to go.
And you’re done!
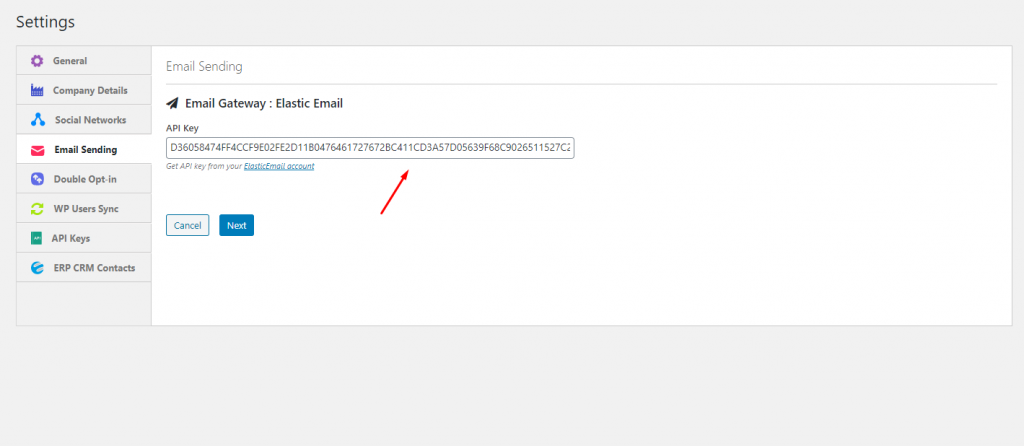
7- Elastic Email
weMail has integration with Elastic Email, a popular email marketing platform. You just need to get & use the API key from your Elastic Email account and paste it in weMail, then you can use Elastic Email as your gateway.
How to Configure Elastic Email
- Create an account with Elastic Email

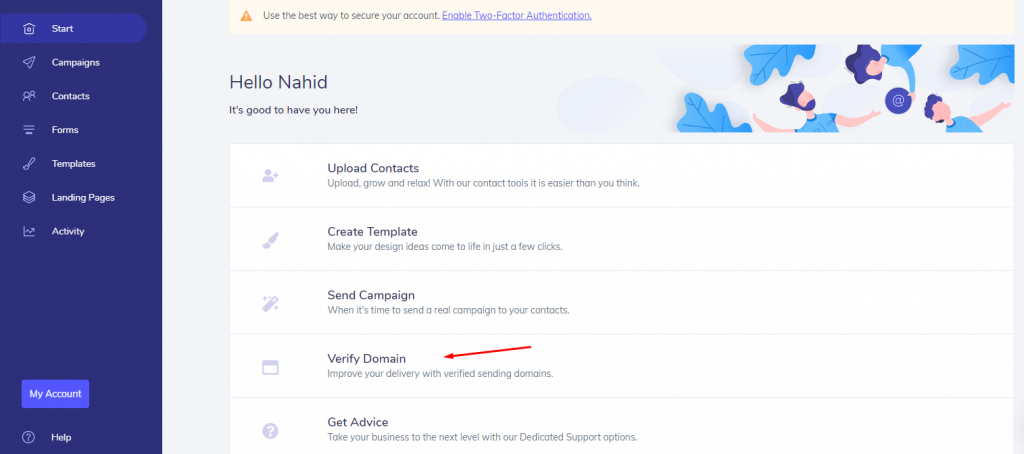
- After you enter the Elastic Email account, you’ll see the dashboard. Then, click on the Start button and Verify Domain
- Next navigate to Verify Domain>API>Add API
- Simply copy the API from here.

- Next, go to weMail→Settings→Email Sending. Click on Elastic Email. Enable Elastic Email and paste the API key there. Hit Save Changes to finish.
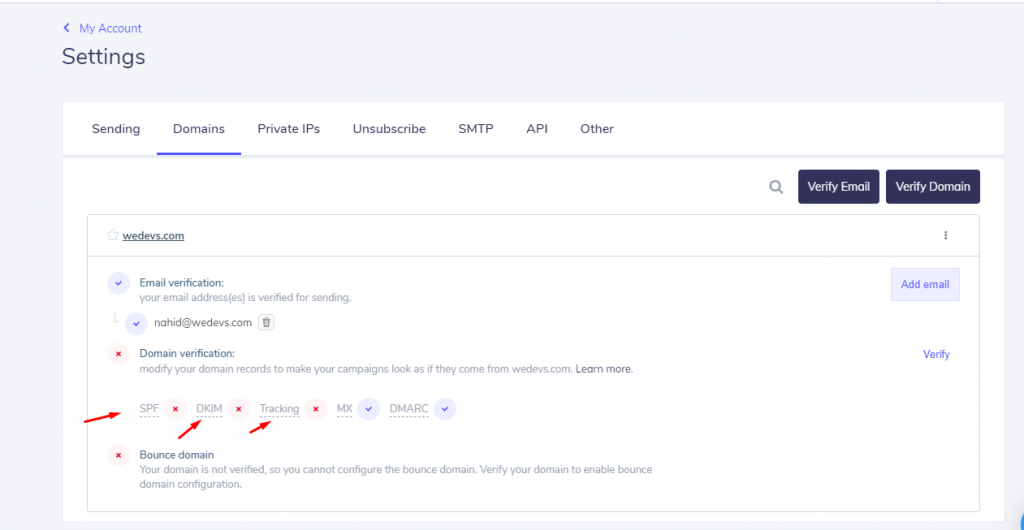
Verifying Domain
To verify your domain in Elastic Email, you’ll need to navigate to the Domain tab.
Here you can verify two things. One is your email and another is your domain. So after clicking on the verify email button, you’ll receive an activation link. Simply click on the link and activate your email.
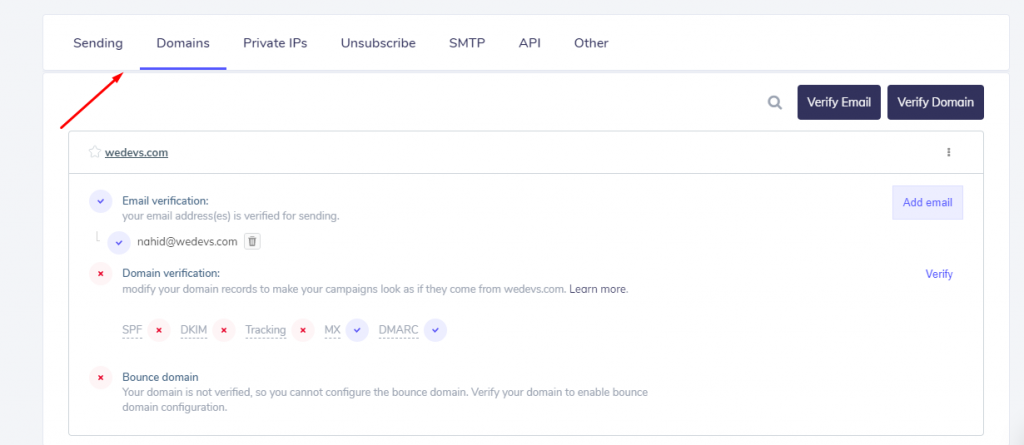
To verify domain, you’ll need take help of your website DNS server in this case.
So click on SPF, DKIM, and Tracking one by one.
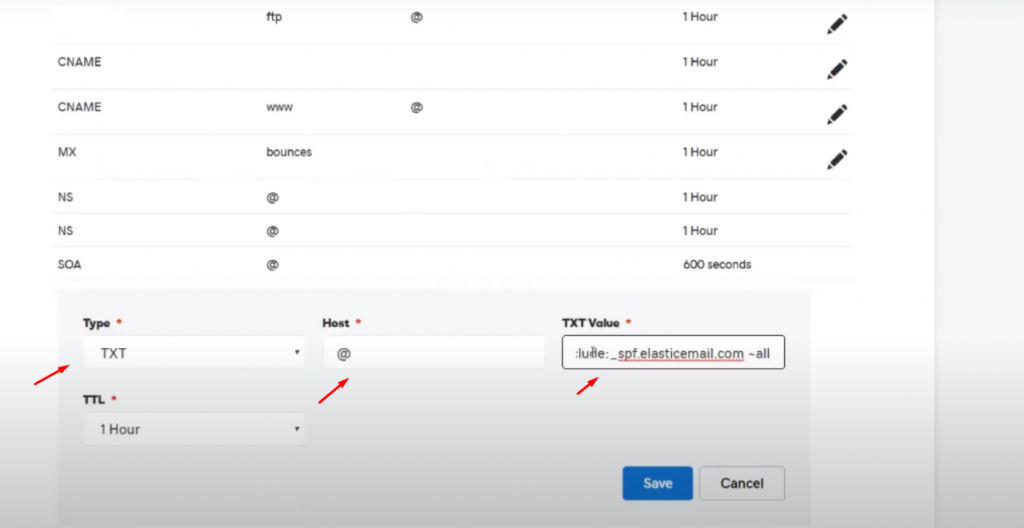
Then click on the SPF, and copy the Host Name: @ and Value:
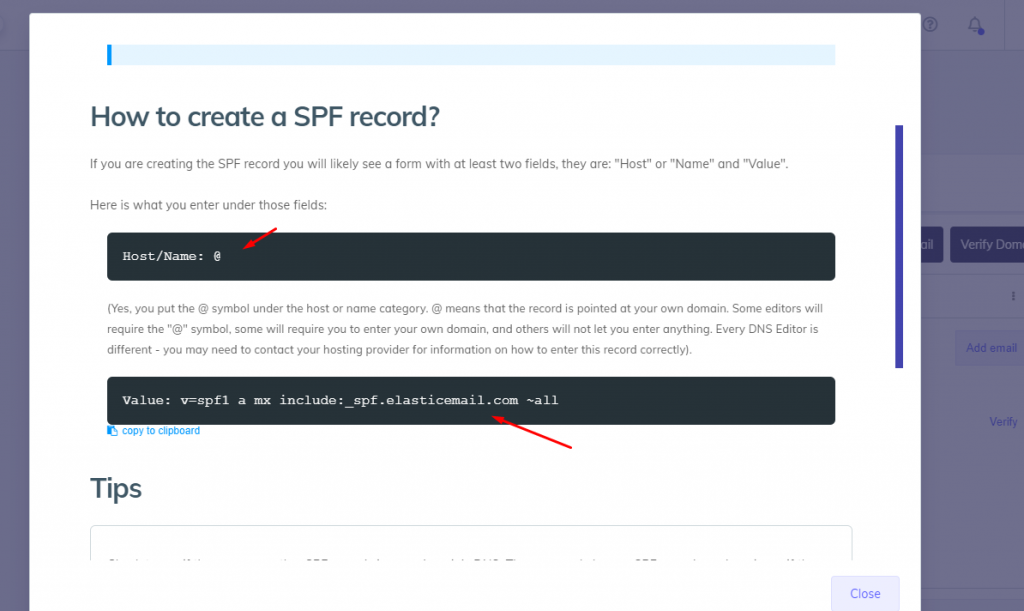
Now navigate to your website’s DNS and paste the Host name & value. That’s it!
So you’ve successfully verified your domain from Elastic Email.
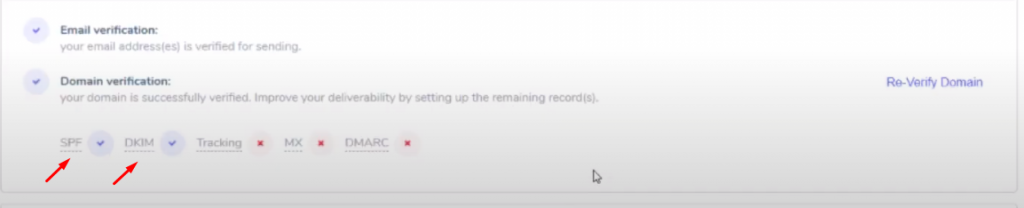
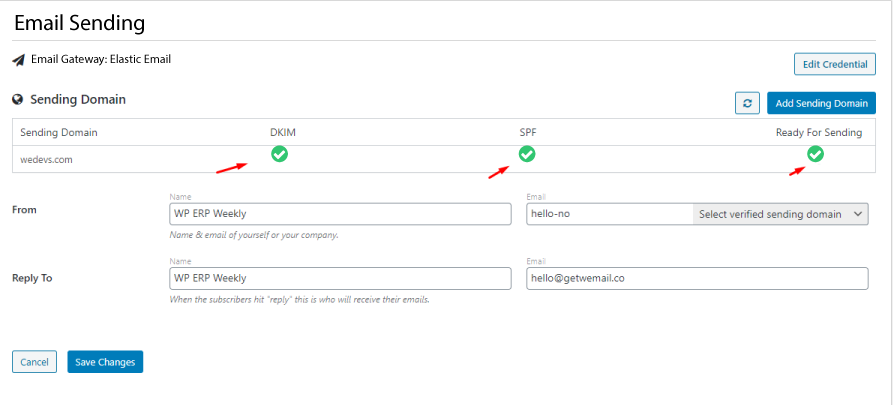
After you click on the re-verify button, you can see the green tick mark is appearing here. So you have successfully connected your email ending gateway with weMail.
Bonus: Revise Your Email List Building Strategies to Grow Subscribers Fast

Without having an email list, there is no meaning to use an email gateway. Let’s assume, you’re running behind to build a list or you have a tiny list. This is high time to put the limelight on your email building strategy. Because you need a really fast-growing email list to extend your business all around the globe.
However, to start the list generally, you need 3 essential attributes as follow:
- A website or blog
- An email marketing service
- High-converting opt-in forms
Email list building is one of the best strategies for growing a profitable business. Here’s you will get all the tips on how to build an engaging email list:
- Choose a great email marketing service
- Add your email list form on your website
- Give good reasons to sign up
- Leverage social media
- Get subscriber through content marketing
- Create an online community
- Offline List Building
Let’s learn more about it from the comprehensive guide of How to Build an Email List.
Handing Over to You

If you are serious at business, you must leverage the power of email marketing for your business. I bet you, you can hardly find any businesses from startup to giant company, who doesn’t use an email marketing solution for them.
So, choose the best one for your business that perfectly suits your requirements and at the same time meets your budget. Therefore, if you are a WordPress user looking for conducting your Email campaign in the easiest most affordable, and the quickest way nothing can beat the weMail.
More importantly, it has integrations with almost all the popular email gateways and more to come to send bulk emails and track it like a pro.
If you face any problem while using these email gateway integrations with weMail, don’t hesitate to let us know through the comment box below.


1Comments
Pingback: MailPoet vs MailChimp for Email Marketing in WordPress